Level Tree
Holds the information about the Goo Balls in the level, as well as things like where the pipe is, how many goos you need to collect and what music is played. See the bottom of the page for a full list.
It also has several attributes of it's own, listed below are those you may find quite useful... Full Details on all level attributes
ballsrequired
The number of Goo Balls required to finish the level. Required on levels with a levelexit, ignored on those without.
autobounds
If set to true this attribute limits the camera to "explored" areas only.
What consistutes an "explored area" is explained in more detail here - Explored Area
strandgeom
If set to true prevents the player from attaching Goo Balls through geometry objects. Useful for preventing building through walls or thin platforms. Can cause minor player "annoyance" when it prevents you for building near corners.
timebugprobability
The probability per move that a new time bug will appear. Values above about 0.5 will result in many timebugs, values around 0.1 will result in "a few", set 0 to disable timebugs completely.
visualdebug
If set to true displays an overlay showing geometry and other invisible objects. Static objects appear in yellow, Dynamic objects in Green, ForceFields in Blue. This can be very useful during the design phase, but should be set to false before you release the level.
The Level Tree contains....
Exits and Pipes


There are a number of ways you can complete a level in World of Goo, but by far the commonest is the pipe. see also Ending Levels without a pipe
However it's not the pipe that actually ends the level, it's a levelexit item, but you'll need both.
At it's simplest...
When the Editor creates a new level it includes a levelexit
Move this to where you want it and click the AutoPipe button on the toolbar, and you're almost done!
You just need to set how many balls are required to complete the level... see [ballsrequired]
If you want a little more than the "simplest"...
Pipes in detail
A pipe item is purely visual, it doesn't actually DO anything to the Goo Balls. A pipe just shows the player where they are aiming for, and becomes animated when the exit is open and Goo Balls are collected.
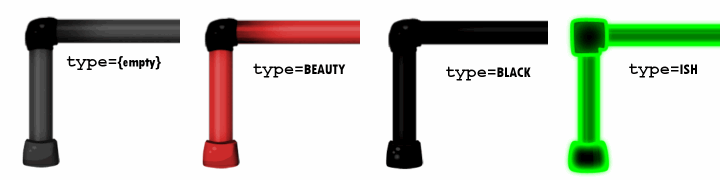
They have a type attibute which controls the colour of the pipe, but it does not affect what types of Goo Balls can or cannot be collected.
Pipes have child vertexes
The vertex items tell the game where to place the mouth of the pipe, where the bends are and where the pipe ends. You can have as many vertexes (bends) in the pipe as you like. However, pipes can only ever run horizontally or vertically and if there is a bend they MUST turn, if they go straight on (or turn back on themselves) the game crashes. The Editor will help you with this.
The first vertex listed is the mouth, it can be moved freely and should be positioned at (or close to) the centre of the levelexit. You should always position this first. Any other vertexes will "snap" into allowed positions as you drag. [Video that shows all of the above stuff about vertexes]
The levelexit
As mentioned above pipes are just visual items, it's levelexits that do all the real work. They control the opening / closing of the pipe, they suck Goo Balls towards their centre when the exit it open, and they allow balls into the pipe (or not). They also display the small puffs of air sucking towards the centre.
The radius attribute affects two functions of the pipe. It sets the detection distance for opening the pipe, if there is an attached Goo Ball within the radius, then the exit and pipe open. It also sets the suction range, (almost*) all Goo Balls within the radius are sucked towards the centre.
But not all Goo Balls will be collected.
Whether or not a Goo Ball is collected is controlled by two things. Some types of Goo Ball can never be collected (those tagged suckable=false; Pokey, Beauty, BlockHead etc). All other Goo Balls can be collected, and you can use the filter attribute to control which are "allowed" in this level.
If filter is empty or missing, then any "suckable" Goo Ball will be collected. Otherwise filter can be set to allow one (or more) specific types of Goo Ball into the exit. When more than one type of Goo Ball is allowed the types should be comma-seperated common,Ivy for example.
Notes
Pipes also have an id attribute which has no effect or function on the game.
Given this, both depth and id will be removed in future versions of the Editor.
Custom Pipes
In addition to the 4 "normal" pipes ('Grey','BLACK','BEAUTY' and 'ISH') it is possible to add your own custom pipes.
You could simply override the original graphics with your own, but this would also change the pipes throughout the original levels. So if you want to keep your special pipes "to yourself" and only use them in your levels... here's how.
Choose a name for your pipe
Something descriptive and "unique"... certainly nothing that has been used before. I used LEMON and since it is case-sensitive you are best sticking to UPPERCASE like the original types.
Create the new graphics
You will almost certainly need to create images for the open and closed mouth and the pipe itself, and it will be easiest if you keep the original naming convention for these images
| pipe_horiz_{PIPENAME} | pipeCap_closed_{PIPENAME} | pipeCap_{PIPENAME} | ||
 |  |  |
You could also create new images for the bends or corners, although for LEMON I just used the original black corner graphics that are used on the Grey,Black and Beauty pipes.
Add the Pipe Resources
If you plan to use this pipe in just 1 or 2 levels, you should add the resources to the level directly. Import the pipe images into your level then change the resource ids to match the list below. WooGLE will then automatically include the pipe resources and graphics in the goomod.
If you plan to make a level pack or chapter which uses the custom pipe many times, you should add the resources to the global properties/resources.xml.bin. However, you will need to add a merge file and all the necessary graphics to the goomod yourself.
| id | path | |
| IMAGE_GLOBAL_PIPE_{PIPENAME} | res/images/levelimages/pipe_horiz_{PIPENAME} | |
| IMAGE_GLOBAL_PIPE_BEND_TL_{PIPENAME} | res/images/levelimages/pipe_bend_tl_{PIPENAME} | |
| IMAGE_GLOBAL_PIPE_BEND_BR_{PIPENAME} | res/images/levelimages/pipe_bend_br_{PIPENAME} | |
| IMAGE_GLOBAL_PIPE_BEND_TR_{PIPENAME} | res/images/levelimages/pipe_bend_tr_{PIPENAME} | |
| IMAGE_GLOBAL_PIPE_BEND_BL_{PIPENAME} | res/images/levelimages/pipe_bend_bl_{PIPENAME} | |
| IMAGE_GLOBAL_PIPE_CAP_OPEN_{PIPENAME} | res/images/levelimages/pipeCap_{PIPENAME} | |
| IMAGE_GLOBAL_PIPE_CAP_CLOSED_{PIPENAME} | res/images/levelimages/pipeCap_closed_{PIPENAME} |
Notes about image files:
The paths shown above are for example only, you may use any valid image file for any of the pipe resources.
The image files do not have to be in res/images/levelimages, and if this pipe will only be used in one level it would be best if you put the images in the level folder.
You can use the original black bend images by simply omitting the _{PIPENAME} from the paths for the BEND resources.
Set the pipe type
Finally you need to set the pipe's type attribute.
This must exactly match the {PIPENAME} you used in the resource ids.
NB: You can only enter a "custom" name into type in WooGLE v0.74 and above. If you use a "custom" pipe then it will display as bright red in the level view.
If you want a closer look, or a reference for creating your own pipe, you can download my Lemon Pipe Demo below
| Attachment | Size |
|---|---|
| lemonpipe.goomod | 15.38 KB |
Ending Levels
There are a number of ways you can complete a level in World of Goo, by far the commonest is the pipe, but if you want something a little different there are several other options.
In the original game these other types of "exit" were used almost exclusively on the final level of a chapter. If you use any of these exits you should be aware that on "completion" the player will not be returned to the Chapter 1 Island screen, but to the main World screen. Also these other exits do not display the normal end-of-level sequence (Continue Handle -> Tank -> Level Stats), they jump immediately to any cutscene* then to the World screen.
targetheight
This type of exit was used in "Reguritation Pumping Station", it has a single attribute y which specifies a height.
The level will end if any attached Goo Ball is above this height.
NB: If an attached Goo Ball begins the level above this height, the level will end immediately.
endoncollision
This type of exit was used in "Product Launcher" and "Observatory Observation Station".
The level will end when two particular geometry objects collide (touch).
id1 and id2 are the ids of the geometry objects which must collide. There is one other attribute delay, this specifies the number of seconds after the objects collide, until the level actually ends. During this time the level remains completely playable.
endonnogeom *NEW*
This end condition was not used in any of the original levels, but is in the game code and does work.
Simply, the level ends when there are no dynamic geometry objects remaining.
Dynamic objects can be destroyed in 2 ways...
- Bombs and exploding Goos, if the geometry is tagged with break=
- By other geometry tagged as geomkiller
Multiple End Conditions
You may add more than one end condition to your level. In this case if any one of the possible conditions are achieved.. the level will end.
endonmessage
This end condition is used in "Deliverance" and "MOM", and ends the level after a particular message is displayed. If an UndeletePill hits a Ballbuster or a [Mostly]Deadly, it shows the popup, and ends the level if you have endonmessage set to END_DELIVERANCE. Otherwise, it will crash.
*Note: cutscenes are unavailable in the current version of GooTool.
Multiple Exits
It is possible to have multiple levelexit items in a level - but if you don't understand exactly how they work, the results will be confusing, both to you and to the player.
Multiple Pipes
Even if you add multiple pipes to your level, World of Goo will only display the first one you add. WOG Editor now only allows you to add 1 pipe item.
That's not to say you can't have more than one pipe appearing in your level. You can add as many pipe images as you like using SceneLayers, but only the pipe item will be a "real" pipe, and only the "real" pipe will change from closed to "open mouth" when the exit is triggered.
But Remember.. Pipes don't DO anything
Pipes do not SUCK, Pipes do not COLLECT Goo... even 'real' pipes. It's the levelexits that DO things... pipes just look pretty.
Multiple levelexits
In a normal level, with a single levelexit item, the levelexit performs 3 different actions:
- Trigger: Opens the exit and changes the pipe to the animated "open mouth"
- Sucker: Pulls goos (free or attached) towards its centre
- Collector: Accepts Goos and takes them out of the level (providing they match the filter property)
If you have two or more levelexit items in your level though, the first levelexit listed will only be the Sucker. It will not open the pipe when the Goo Balls get close, it will not collect any Goo Balls, and it will ONLY suck when the other exit tells it to. This exit is completely invisible.
The last levelexit listed will be the Trigger and the Collector. When the Goo Balls build close to this exit, it will open the pipe and collect balls. It will not Suck, but it will tell the first exit to suck. This exit will also show the little white "puffs" of air sucking into it.
Any additional levelexits do absolutely nothing.
So what use is an exit that doesn't suck? or one that ONLY sucks?
Well, both exits activate at the same time, when the Goos get to the last exit. This means that an action in one place (triggering the last exit) causes an effect somewhere else (Sucking at the first exit)
I used this effect to create a trap in Gotcha! but it could be used for other things, maybe even helping the Goo Balls somehow.
To be clear:
- Only ONE exit can ever open the pipe (The last levelexit item added)
- Only ONE exit can ever Suck (The first levelexit item added)
- Only ONE exit can ever collect any Goos (The last levelexit item added)
If you only have one levelexit, then first and last are the same, so it does everything. If you have two: know which is which, and what they do.
This video explains the behaviour in the case of multiple exits:
Explored Area
By default the camera is allowed to roam anywhere within the defined [Scenebounds], however if you set the autobounds attribute of the level to true, things get a little more complicated.
The game has the concept of an "explored area".
Put simply this area begins surrounding just the starting area and any initial Goo Ball structure and expands as you build to reveal more and more of the level.
Note: The explored area will not contract if the player dismantles their structure.
However there is a bit more to it than that...
The camera is allowed to move anywhere within the explored area and can show up to 800pixels either side horizontally and 600pixels above or below, although it will not go outside the defined scenebounds.
Note on Wide-Angle Cameras
If the initial zoom of the camera is "small" and the camera would show areas outside the explored area, the game automatically zooms in until only the explored area is visible. Each time the explored area expands the camera zooms out until it reaches its nominal zoom setting.
Fire

You can add particle effects that look like fire easily, see particles, but if you actually want to set Goo Balls on fire, you need a fire object.
Fire objects are circular so have a center and a radius. Any Goo Balls with a non-zero burntime attribute are flammable*, and will catch fire if they enter a fire object.
Note: Thrown balls do not catch fire, unless they bounce off something first.
You can control what the fire looks like using the particles attribute. You can select any local particle effect, although for playability you should choose
- an effect that looks like fire
- an effect that approximately matches the size of the fire object.
* Balls that are flammable
- Fuse
- Ivy
- Bit, Pixel, PixelProduct
- BombMini, BombShaft, BombSticky, ZBomb
- Drained, DrainedIsh
- BeautyProduct (but not BeautyProductEye, or UglyProduct)
Ivy balls are "flammable" in that the same "fire" property is used for "poisoned", just with different particle effects. Therefore it is inadvisable to use Ivy balls on levels containing real fire.
Goos and Strands


What is a Goo Ball?
The answer may seem obvious, but if you're new to editing World of Goo levels then there are some types of Goo Ball you probably won't be familiar with.
Things that you might not know are Goo Balls, but are.
- The Squares and Rectangles in "Graceful Failure"
- Timebugs
- Fixed Anchor Points
- The UndeletePill and the mass of Spam Envelopes in "Deliverance"
- The Applications and Games folders that create the window blocks in "MOM"
All these things are Goo Balls, along with the ones you'll know like "Ivy" and "Fuse". The different types of Goo Balls
Adding Goo Balls (aka BallInstance) to your level

The Goo-lbar allows you add any of the common types of Goo Ball from the original game. You can also add any other type of Goo Ball that came with the game, or a custom one you have made yourself, just add any Goo Ball from the toolbar, then change its type attribute to the type you want.
Goo Balls can be selected and moved with the mouse in the Level View. Square balls (Bone, BlockHead, RectHead etc) can also be rotated using the mouse.
You can Cut, Copy, Paste and Delete the selected Goo Ball using the toolbars, menus or the usual keyboard shortcut. Note: Pasted Goo Balls will appear exactly on top of the Copied one. So you should spread them out afterwards.
Connecting them together
Goo Balls can be connected together using Strands. The easiest way to do this is using the new "Strand Mode"
All you need to do is click on a Goo Ball and drag the rubberband line to another Goo Ball. If a Strand is too long, it be shown in red.
Some types of Goo Ball cannot have Strands (Beauty's, Blocks etc) the editor will prevent you from connecting these types of Goo Ball together.
Strands can be removed by simply selecting them and pressing {Delete} or from the Edit menu / toolbar
Note on deleting Goo Balls
If you delete a Goo Ball which is connected to another then the Strand will remain. Strands with only one (or no) Goo Balls attached will be highlighted in the Level Tree Tab.
discovered or sleeping
Goo Balls have a discovered attribute, this sets whether they begin the level awake or asleep. If this is left blank or set to true then the Goo Ball will begin the level awake. If discovered is set to false the Goo Ball will begin the level asleep.
Hint: By default Goo Balls are added awake. If you want a lot of sleeping Goo Balls, it is easier to add one, set it to be asleep, then Copy and Paste it as many times as you need.
Utility Balls
There is yet another type of Goo Ball; the Utility ball. These balls are used for many different things in the game, some you will have seen (the black support chain in Genetic Sorting Machine). Others you will not because they are invisible, and are used to do something "special" like playing a sound-effect or producing a cloud of other utility balls that each produce a particle effect. More information on Utility Balls
Music and Sound


There are two background sounds that can be played during your level: music and an additional loopsound. Both can be set from buttons on the WooGLE toolbar or from the Resources menu.
What music does should be obvious. loopsound provides additional background sound effects.. like wind, water or squeaky windmills.
You can select any ogg sound file to be either music or loopsound - see below for lists of those used in the original game. If you want to use your own music or sound effects you will need to convert them to Vorbis ogg format... [more information on sound files]
Music files
Sound files
Music by Level Name
| Level | Music File | Loop Sound |
|---|---|---|
| AB3 | Overture98Excerpt1 | loop_strongwind |
| BeautyAndTheTentacle | screamer | loop_rainLite |
| BeautySchool | temp_CarnivalLoop | |
| BlusteryDay | temp_jelly | loop_strongwind |
| BulletinBoardSystem | Overture98Excerpt1 | loop_squeaksInTheWind |
| BurningMan | stratloop | |
| Chain | temp_jelly | |
| Deliverance | temp_DWtD1 | |
| Drool | temp_CarnivalLoop | loop_waterPond |
| EconomicDivide | temp_DWtD2 | |
| FistyReachesOut | RainRainWindyWindy | |
| FlyAwayLittleOnes | RainRainWindyWindy | |
| FlyingMachine | temp_jelly | |
| GeneticSortingMachine | temp_DWtD1 threadcutter |
loop_squeaksInTheWind |
| GoingUp | temp_CarnivalLoop | |
| GracefulFailure | ReveilleDNT | |
| GrapeVineVirus | temp_DWtD2 | loop_bubbles |
| GraphicProcessingUnit | ReveilleDNT | |
| HangLow | RainRainWindyWindy | |
| HelloWorld | YearsOfWork | |
| HTInnovationCommittee | temp_islandam | loop_superbirds |
| ImmigrationNaturalizationUnit | temp_miniottbb | loop_shore |
| ImpaleSticky | temp_miniottbb | |
| IncinerationDestination | temp_DWtD1 | loop_fire |
| InfestyTheWorm | RainRainWindyWindy | loop_beforeItRains |
| island1 | temp_islandam | loop_firewater |
| island2 | threadcutter | loop_squeaksInTheWind |
| island3 | notld_anthem_excerpt1 | loop_strongwind |
| island4 | YearsOfWork | loop_strongwind |
| island5 | alwaysdestroythethingsilove(excerpt) | loop_strongwind |
| IvyTower | temp_DWtD2 | |
| LeapHole | temp_CarnivalLoop | |
| MapWorldView | temp_main | |
| MistysLongBonyRoad | RainRainWindyWindy | loop_strongwind |
| MOM | bigcomputer1 bigcomputer2 |
loop_superbirds |
| ObservatoryObservationStation | alwaysdestroythethingsilove(excerpt) | loop_eveningWater |
| OdeToBridgeBuilder | OdeToTheBridgeBuilder | |
| ProductLauncher | notld_anthem_excerpt1 | loop_celebrityCrowd |
| RedCarpet | n2 | loop_celebrityCrowd |
| RegurgitationPumpingStation | temp_DWtD1 | |
| RoadBlocks | screamer | loop_strongwind |
| SecondHandSmoke | temp_DWtD2 | |
| SuperFuseChallengeTime | kaptainpolka | |
| TheServer | temp_CarnivalLoop | loop_eveningWater |
| ThirdWheel | OdeToTheBridgeBuilder | loop_squeaksInTheWind |
| TowerOfGoo | kaptainpolka | |
| Tumbler | kaptainpolka | |
| UpperShaft | stratloop | loop_fire |
| VolcanicPercolatorDaySpa | temp_DWtD2 | loop_bubbles |
| WaterLock | temp_miniottbb | loop_waterPond |
| WeatherVane | threadcutter | loop_squeaksInTheWind |
| Whistler | temp_jelly | |
| wogc | RainRainWindyWindy | loop_squeaksInTheWind |
| wogc3d | DikkiPainguinLoop(rev-1) | loop_celebrityCrowd |
| wogcd | bigcomputer2 | loop_superbirds |
| YouHaveToExplodeTheHead | screamer | loop_fire |