Scene Tree
The scene tree holds information about how the level looks (graphics, particle effects etc), the geometry (solid things) and other physics-related items (like gravity and wind) that affect the Goo Balls.
The Scene Root item has a few properties of its own. Full Details Here
Scene Bound : minx,maxx,miny,maxy
These four values define the visual scene bounds - how far the level can be scrolled. No part of the level outside this area will ever be displayed on screen. Placing essential items (like the exit) outside these bounds could mean your level is unplayable. Placing balls outside this area is highly discouraged, since you won't be able to see them, or pick them up.
See also [Scene Bounds vs autobounds=true]
The Scene Tree contains....
Force Fields


There are 2 types of forcefield, linear and radial, these can provide effect like gravity, wind and water.
linearforcefields can simulate a number of very different effects depending on their settings.
Ambient Fields (Gravity)
If a linearforcefield has no size attribute (or it is left blank) then it is an ambient field, and it affects the entire level. Almost all of the original levels have an ambient field providing the gravity.
Local Fields (Wind)
linearforcefields can also be localized by giving them a size and a center. In this case only objects inside the field are affected by it. This is used most commonly to simulate wind or to support the Goo Balls when they are sitting on a cloud.
Water
When the water attribute is set to true, the game displays the water effect within the field in the given color. The top edge of the field is given surface ripples and makes little splashes when objects enter or leave at speed. However beyond these visual differences the field's physics operates in the same way as any other Local field.
radialforcefield
These fields are also used to provide a gravity effect, but on a larger scale. Used in Graphics Processing Unit and Main World View to give the orbiting effect. These fields cannot be ambient, so they must always have a center and a radius specified. The type,antigrav and dampeningfactor attributes work the same as linearforcefields see above
If forceatcenter and forceatedge values are different, then the force varies linearly between them.
Note on geomonly
This attribute can be applied to linear fields. When set to true the field only affects dynamic geometry objects and not Goo Balls. This can be useful in the construction of mechanisms - [link to...]
Note: geomonly tag was present on all radialforcefields in the original levels, but doesn't have any effect when set to true, so was removed from WooGLE in v0.74
Geometry


In the World of Goo, the geometry objects are what make things solid. Geometry is what the Goo Balls can sit on, walk on, attach to, bounce off etc.
There are several different kinds of geometry object you can include in your level, but no matter how complicated your level is, it's all built out of very simple shapes (rectangles and circles).
Geometry objects can be fixed in space (static) or moveable/moving (dynamic). They can be made of various materials, and can have a whole host of different effects on the balls and other things.
Geometry objects can also have images attached to them. This is unnecessary on static geometry - it is usually simpler to use a separate SceneLayer item for the image. But if you want the geometry to move, and you want the image to move with it, you must add the image to the geometry object.
Geometry IDs
Every geometry object has an id attribute. When you add a geometry object to your level, WoG Editor will automatically assign it a unique id of the form geometry{number}.
You can change these IDs to whatever you like, and the game is quite flexible in that regard. It will allow objects with duplicate IDs and blank IDs without complaint. However, this can cause you endless problems whilst you're editing the level.
WoG Editor will report any problems by refering to an object's ID. If you have many objects with the same (or blank) ID, you won't know which object actually has the problem.
Once you start designing larger levels, with dozens or hundreds of geometry objects, it can be useful to start giving them "meaningful" names: platform1, leftwall, killerwheel or whatever. As long as you keep these names unique, you will be fine.
Basic Shapes


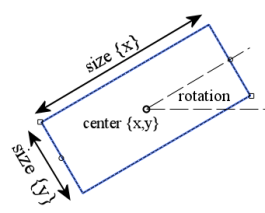
There are only two basic shapes that Geometry objects can be; rectangles and circles. Most of the solid objects in your levels will be built using just these items.
| Rectangles | Circles | |
|---|---|---|
 |
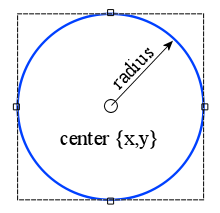 |
These shapes can be positioned, resized and rotated using the mouse in the Level View window, or you can enter values directly into the Properties Pane.
Options / Attributes
Static or Dynamic
tag attribute
[Material]
[Applying Images to Geometry]
[Making Geometry less Solid]
Composite


compositegeom objects are very similar to the Basic Shapes objects, with a couple of crucial differences and a few "quirks".
The basics of a compositegeom are most easily explained with a short video.
Whilst you can add as many children as you like to a compositegeom, and build a something fantastically complicated, it is still a single object, and it will move and act as such. Like other geometry objects it can have a material, tags and an image, and the compositegeom passes on these properties to all of its children.
So why is that useful?
The main uses of these objects are:
- Moving Objects which are 'complex' shapes
The Third Wheel in "Third Wheel" is a compositegeom object, as are the fingers in Genetic Sorting Machine. - Grouping a number of basic shapes together so that they share certain attributes.
Most of the platforms in "Alice and Bob" are parts of the same object, and all the walls and ledges in "Grape Vine Virus" are one big compositegeom.
Another crucial difference between compositegeom and other geometry objects is that compositegeom objects do not have a mass attribute. Their mass (and centre of gravity) are calculated from the masses and positions of all their child objects.
NB: This only matters when you are using [Dynamic objects].
Bugs
compositegeom objects also have a few "quirks" (steming from bugs in the game engine):
- Incorrect handling of deadly and mostlydeadly tags with "sticky" Goo Balls - see note in tag attribute
- Incorrect handling of nocontacts attribute with "sticky" Goo Balls - see note in [Making Geometry less Solid]
- Unexpected Displacement of Rotated, Dynamic compositegeom objects - [link TBA]
Dynamic


Dynamic Geometry is any geometry object that is set to static=false or {blank}. Dynamic objects can move or be moved, they will respond to forcefields (including gravity), they will react when Goo Balls or other geometry hits them. In short they behave as if they were real solid objects in your level.
Important Note: All Dynamic objects require a mass
If you set static=false you must enter a value for the mass of the object.
Despite what you might remember less than half the original World of Goo levels contained Dynamic Geometry.
If you're looking for information on how to create any of the following...
- spinning cogs
- wheels that will pop a Beauty Ball
- windmills that kills Goo Balls
- the wobbly head in "Chain"
- the lifting wheels from "Third Wheel"
then you should probably read this instead - Making things Spin!
There are a number of categories of Dynamic Geometry.
Free Standing
These are objects which are not fixed to anything, and are free to move or fall as the physics engine dictates.
Examples of Free Standing Objects
- The head block in "Burning Man"
- The Bomb Carriage in "Upper Shaft"
- All those explodable blocks in "Deliverance"
Free standing objects are the simplest to set up. Once you have set the object to static=false and given it mass.. you're done. Although you'll probably want to apply an image to it, so that the player can see it. see [Applying Images to Geometry]
Hinged
These objects can move, but they are constrained to rotating about a point, a hinge. The hinge can be a fixed point or can be attached to another dynamic object.
Examples of simple objects using fixed position hinges
- The platform in "Server Farm" - View Image
- The liftable bars/gates in "Flying Machine" - View Image
To create an object like this, set it to be static=false and give it a mass, then add a hinge object to the level. Move the hinge into the correct position and set its body1 attribute to the id of the geometry object.
[Full details on hinge and its attributes]
Examples of more complex hinged objects
- The Red Carpet Extend-o-matic machine in "Red Carpet" - View Image
- The machine/robot/thing at the bottom of "Deliverence" - View Image
Notes on Hinged objects
- When two dynamic objects are hinged together, they will not collide with each other.
However they will still collide with other geometry objects and Goo Balls.
And if A is hinged with B, and B is also hinged with C.. A and C can still collide. In the case of the Deliverance "robot".. the fingers could collide with the head, because they are not directly connected by a hinge. - Hinges cannot be attached to compositegeom child objects.
If you attempt to attach a hinge to a compositegeom child, the connection will be ignored, and the hinge will be in a fixed position. To hinge a compositegeom object you must attach the hinge to the parent object. - Hinges cannot be attached to Static Geometry
Again, if you try the connection will be ignored and the hinge will be a fixed position. This will not affect the dynamic object directly, since it was being hinged to a fixed body anyway. However, since the 2 objects are not connected by a hinge, they will collide as normal. - Bug in the game: Timebugs vs 2 body hinges
If you have a hinge which connects 2 dynamic bodies, then its position is not correctly reset when a timebug is popped, this can cause some very undesirable effects. Fixed position hinges are fine, but hinges that move get badly messed up.
Lines

Line objects are used to define the edges of the level, as far as the Goo Balls and dynamic geometry are concerned. Lines are the simplest type of geometry object, however if you don't understand how they work, they can cause you all sorts of problems.
Lines have a position (anchor) and a normal direction (normal). Together these tell the game where the line is and what its rotation is. The normal dictates which way the line points and defines the front and a back. It's the front and back which are important, because Goo Balls and dynamic geometry objects can only ever be in front of a line.

In fact, they must be in front of all the lines in a level. You must always have the normal's pointing inwards towards the middle of your level. If they face outwards then Goo Balls are not allowed to be in your level.
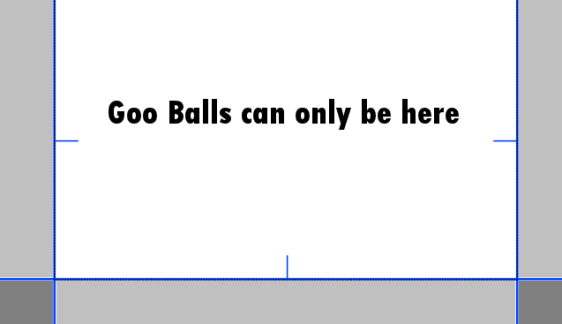
If a ball or dynamic geometry is placed the wrong side of a line, the physics simulation will go berserk due to the illegal placement.
Lines have a tag attribute and a material, so they can affect Goo Balls, Structures and Dynamic Geometry in many different ways.
Unlike circles and rectangles, lines can't be placed into a compositegeom - not that this would make sense anyway.
Sliders
[Under Construction]
Static


A Geometry object can be made fixed and unmovable by setting its static attribute to true.
Static objects are used for Walls, Cliffs, Platforms and the other things in your level that will never move. The vast majority of the geometry in your level will usually be static, so WoG Editor sets static=true on geometry objects when you add them.
The static attribute only affects the "fixed" nature of the Geometry object, it can still be assigned a [material] and tags.
You can also apply images to static geometry, however you are normally better using a separate image object. The only time that static geometry requires an image is when it can be destroyed - see [Making Geometry less Solid]
Note on Building Walls and Cliffs
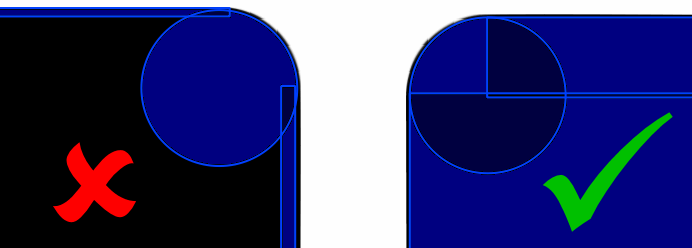
There is a bug (more a "weakness") in the World of Goo game engine which allows fast moving Goo Balls to pass through thin walls. This has been used to great advantage by many players in order to beat levels faster or better.
However it can also be annoying and problematic if a level is designed "poorly" and Goo Balls can accidentally pass through thin walls and become stuck or die. The best way to avoid this problem is to make your geometry as big and solid as possible, rather than building thin walls around the edges of the images. Overlapping regions are fine, in fact they are encouraged, since Goo Balls can get stuck in small gaps between geometry that almost touches.
Images

Image objects, known as SceneLayers in World of Goo and WoG Editor, are how you get graphics into your level. It is important to realise that images are not solid. Just because you add a picture of a cliff to your level, this doesn't mean the Goo Balls will sit on it. You need geometry objects to make things solid.
SceneLayers let you build up the visuals in a level, from the background image to what the walls and cliffs look like, and they let you add foreground objects, like bushes, which come between the player and the Goo Balls.
You cannot import image files directly onto a SceneLayer object, the image file must first be added to the resource list and given a unique id. You can then select this id from a list in the image attribute of the SceneLayer.
Once you have assigned an image the SceneLayer can be moved, rotated and resized using the mouse in the Level view, or by changing the center, rotation and scale attributes.
Images also have depth
This allows you to control which images appear in front or behind other images, the geometry and the Goo Balls. depth can be positive or negative (positive values are in front of the Goo Balls, negative values are behind), and can be a fractional number (1.234).
It also controls the "distance" to the image. Over a limited range (where depth is between -2 to +2) the only apparent effect is which things are in front and which are behind. On a larger scale a parallax scrolling effect can be seen. Objects with large negative depth (-1000 say) will appear to move more slowly around the screen as you scroll, simulating being further away. Objects with positive depth (+200) will be in the foreground, will move faster as you scroll and will appear between the player and the Goo Balls. [Embed Video]
Other useful SceneLayer attributes
alpha allows you to control the overall transparency of the image.

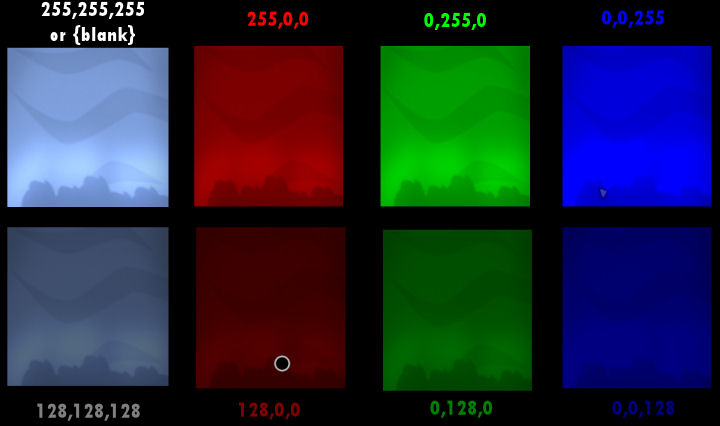
colorize allows you to change the color of an image.
The image will become tinted by the RGB color you enter [Technical Details Here]
A value of 255,255,255 will display the image unchanged, and 0,0,0 will display a completely black image.
tilex and tiley repeat the image across the whole level.
Used in the original World of Goo Corporation levels for the "infinite" sky and ground. Note:tilex and tiley should not be used with rotated images, see this example showing why not.
SceneLayers can also rotate/spin, see Making things spin, or can be animated. However, whilst this may make the images move, they will still not interact with the Goo Balls or Geometry objects. If you want to create a moving object which can affect things, see [Applying Images to Geometry]
Full details of all the SceneLayer attributes and their functions [Here]
Notes on depth
- Images representing walls, cliffs should be as close to depth=0 as possible.
This applies to all SceneLayers showing the image for any solid object created using geometry. If these images have a large positive or negative depth, then they will move relative to the geometry, and Goo Balls may appear to bounce off thin air, or fall through a cliff, rather than off the edge. This is because the balls and geometry themselves are at depth 0. - The absolute maximum foreground depth is +700
This is where the camera is. Beyond this, the game considers the image to be behind the camera, but will still attempt to display the image. This causes some rather odd and disorientating effects.
For foreground objects such as bushes, trees and rafters etc. depths in the range +100 - +300 are best.
Animations


SceneLayer objects can be animated by setting their anim attribute. There are many different animations available to choose from, however only a few of these will be of any real use in a level.
"Useful" Animations Library
Animation Speed animspeed
Most animations run quite quickly at their default speed (animspeed=1), so you will usually need to slow them down by setting the this to a number less than 1. You can use negative values to make the animation run in reverse.
In particular, rot_1rps is an animation with precisely 1 rotation per second. To make something rotate once every 10 seconds, set animspeed=0.1.
Animation "Delay" animdelay
This appears to be named incorrectly, as it actually appears to do animation advance. In the video below, the object with animdelay=0.1 is ahead of the object with animdelay=0.
You may also notice that animdelay=0 and animdelay=1 give identical results.. in fact animdelay={x} seems to be the same as animdelay={x+1} (presumably the animdelay is a specified as a fraction of the animation duration).
Note on Animations and Scale
SceneLayer items can have both a scaling factor and an animation set.
However the game seems only to support uniform (x=y) scaling in conjuction with animations, and if presented with non-uniform scaling, will use the larger scaling factor on both axes.
So scale=2,2 or 0.5,0.5 appear as expected, but scale=0.5,2 will appear in the game as if you entered scale=2,2
Importing

Before you can use an image in WoG Editor you must import it into the Resource List. To do this click the Import Images button and select the file (or files) you want to import in the standard file dialog.
Each file that you select will be given a unique id and added to the resources list, if it's not there already. The id will be automatically generated and will be something like IMAGE_{FOLDERNAME}_{FILENAME}
When you edit the image property of any object, a list of the ids of all the image resources will be displayed.
Image File Format
World of Goo uses png files for all its graphics. It will accept any "flavour" of png file (paletted, grey-scale or 16m colour) and supports both alpha-channel and single-colour transparency.
Importing "external" images
All the image files that World of Goo uses must be located within (or below) {Game_Folder}/res/ If you import files from anywhere within this folder then WoG Editor will just add the filename and id into the resource list.
However, you can import images from anywhere on your system.
If you import files from outside the res folder WoG Editor will take a copy of each file and place it in the [Level Folder], and add the copies into the resources list.
Note on Images for Mac
On Mac, World of Goo uses graphic files in a "non-standard" and substantially different format Details here. GooTool will convert standard png images to this format when it installs a level.
(TODO: State whether GooTool will also convert jpg renamed as png correctly on Mac)
Labels


labels can be used to add text to your level. In the original levels they were only used in Alice and Bob and MOM.
labels have a position atrribute called center, which is slightly misleading since it is not always the centre of the text. The final positioning of the text is also affected by the align attribute.

In the image the tip of the arrow is at the center coordinates.
labels have a rotation and a scale factor which can enlarge or reduce the text.
They also have a depth which operates in the normal way, but this can be overriden using the overlay attribute. If overlay is set to true, the text will be display on top of (in front of) everything else, regardless of the depth setting of the label, or the depths of the other elements in the scene.
text
The actual text for the label is held in a [Text Resource], so that it can be multi-lingual. The id of the text resource is selected using the text attribute of the label.
font
There are a number of fonts you can choose from, however not all the fonts can display the full character set.

Particles


particles items generally provide the background effects for a level like falling leaves, or snow or mist, but they are also used to provide effects such as fire, the signpost !'s and the musical notes created by the whistle.
There are 2 types of particle effect
- Ambient which cover the entire level
- Point-Source which eminate from a particular location
particles items have a position pos which only affects the Point-Source effects, and a depth attribute which allows you to control whether the effect appears in the foreground or the background.
The pretick attribute allows the particle effect to be virtually "run" for a time before the level begins. This time allows effects to "get going" or cover the level before it is displayed to the player. It was used very rarely in the original levels. The value is in milliseconds (1000 = 1second) and 1 second seems more than adequate for most cases.
Point-Source (non-ambient) Particles Library
Any of these effects could be used on a fire or signpost object, or as a particles item.
Ambient Particles Library
Any of these effects can be used on a particles item.
Guide: Spinning
There are several ways you can make something spin. The correct to do it depends on exactly what you want it to do.
If you just want a spinning background/foreground image
Use this method if you want a spinning image that looks pretty but doesn't affect the Goo Balls, like the small windmills in Blustery Day, or the black cogs in Upper Shaft.
Add a SceneLayer item, apply the image then set:
- anim = rot_1rps
- animspeed = 0.1 for example
In the above example, the image will rotate at 0.1 rotations per second, and thus complete its rotation once every ten seconds.
If you want a spinning cog or gear
If you want something to spin and also kill balls or pop a Beauty ball, like the main windmill in Blustery Day or the "buster" cogs, you are best doing it with two items:
- Add a SceneLayer exactly the same as the above. (this gives you the spinning image)
- Add a circle that's a similar size as the image and move it to the same place and set:
- static = true
- tag = {whatever} deadly or ballbuster - see tag attribute
If you want something that balls can grab hold of, or get hit by
Something that interacts with the balls and has physics effects, like the wobbly head in Chain or the wheels in Third Wheel, is achieved as follows:
- Add a Geometry object (Rectangle, Circle or Composite).
- Move it into place, set its image property and position the image.
- Set the object to be static=false and give it some mass - More information on Dynamic Geometry.
- Add a hinge and set body1={id of geometry object}.
- Move the hinge the centre of the object (or the point you want to it to spin around).
If you're happy with something that is moveable but doesn't rotate on its own, like the wobbly head in Chain, then you're done.
If you want it to spin on its own or lift balls, then on the geometry object set
rotspeed = 0.1.
Note about the mass of the object
In this last case, the mass you give to the object affects the power of the motor spinning it. If you set the hinge dead centre in the object it will spin fine regardless of its mass. But if you put the hinge off center, you will find that the motor may struggle to lift the object up one side, but it will drop down quickly on the other.
Also, if you have a "low" mass (like 10), as soon as a ball attaches, the motor will struggle to lift it. If you have a "high" mass (like 10,000), the wheel will grind on regardless and will lift many balls without slowing down at all.
If I can make it spin by just setting the rotspeed, what are motors for?
Well it's a good question. In fact there is only one proper motor object in the whole of the original game - on the robot's head in You Have to Explode The Head.
It seems that even 2D Boy found motors problematic / annoying / mostly pointless, and that using rotspeed and automatically setting the motor's power based on the mass of the object (discussed above) was far easier in most cases, than actually using a separate motor item.
The only time you really need a motor is if you want something that spins weakly but is also heavy, like the Robot's head.
You can't use rotspeed because that would automatically use a strong motor for a heavy object, so this is the only time you really need to use them.
Note: Since motors don't have a size or a position or anything else we could meaningfully draw, they don't show up in the Level View, so you must add and select them in the scene tab.