Reference Guide

Movie Overview
A movie consists of a list of actors, each of which has their own animation defined by a number of keyframes.
An actor can be either an image or a text string.
Each keyframe in an animation has a time (in seconds) and can specify the position, scale, rotation, alpha and colour of the actor at that time, although not all of those values need to be specified in each frame.
Movie Size and Length
Movies work in screen / pixel coordinates with ( 0,0 ) in the top left corner.
All the original movies were created to fill an area 1095 x 600...it's not clear why, because 1095 is not a "nice" ratio like 16:9.
Goovie treat this as the "visible area" and draws a dotted rectangle around it. However, players with 4:3 screens will not see the very left and right hand sides, so Goovie also draws dotted lines to the indicate area visible on 4:3 screens.
The length of a movie is simply determined by the last (highest time) keyframe of any actor.
Times and Frame Rates
Strictly movies don't have a frame rate, you can enter any time you like into any keyframe, and when a movie is played the game will just display as many frames as it can.
However, to make life easier when creating movies and adding keyframes using the GUI, Goovie uses a "frame rate" which sets the time divisions on the time slider, this defaults to 20fps (0.05 second increments) on new movies.
Movie.binltl files don't have a "Frame Rate" encoded into them anywhere, and 2DBoy created the original movies in a whole range of different rates (from 11fps up to about 33fps).. so when Goovie loads a movie, it attempts to "divine" the original frame rate based on the times in the keyframes... this doesn't always work, but usually gives a reasonable approximation.
Notes about XML and binltl formats
The game stores the movie information in an encoded (not encrypted) format in files called .movie.binltl. These files consist mostly of binary and numeric information and are very difficult for puny humans to understand / interpret directly.
So an XML format was created to represent the information in "human-readable" form. The original format, created by davidc, was designed to hold all the information contained within the binltl files produced by 2D Boy.
Goovie uses a modified version of this XML format which has been tailored for the purpose of creating and editting movies. The Goovie format contains a number of additional attributes which cannot be stored within a binltl file, but which simplify the editing process.
If you open an original movie, Goovie checks whether an XML version exists. If it does not, Goovie decodes the movie.binltl into its XML format.
Goovie also creates a MovieName.text.xml to hold the information for any text actors. Like WooGLE, this information is put into the Global text.xml when you save and play... If you run GooTool, it will overwrite the global file, remove the text entries and your movie may crash when you play the game "normally" (outside GooVie)
Distributing your Movie : This is currently under review / discussion
Until the situation is resolved, goomods containing movies might NOT be published
At present there is no "Make Goomod" option for movies, because it doesn't really fit, and releasing a goomod which just contains a movie is a bit pointless. Unless you're XDBoy and just want to show off!
So if you want to include a new movie in a goomod you will have to do it manually.
You will need to... Export the Movie to binltl
Then include in your goomod...
override/res/movies/moviename/moviename.movie.binltl (and .binltl64 for Linux compatibility)
compile/res/movies/moviename/moviename.resrc.xml (decrypted)
Any custom graphics or sounds in the override folder, and add any movie text into text.xml
Future versions may have a "Make goomod folder" button, which will export everything into a goomod subfolder of the movie, so that you can easily copy it all into another goomod.
Getting your movie to play
This should be very simple, however at the moment... not so much.
Normally movies are played at the end of a level using the cutscene attribute in the [ island.xml ]
The addin.xml for a goomod can contain a <cutscene> tag for each level, however this does not work in the current version of GooTool, so you need to do it "manually" with a merge on the island.xml
However, even this is not quite as easy as it should be.
The simple approach would be to create a merge XSL file that locates the required level tag in the island.xml and adds the cutscene attribute to it. However, the merge files from the goomod are processed BEFORE GooTool has added the level info into the island.xml, so the level tag cannot be found, and this type of merge has no effect.
The only way I have found to make it work...
Create a merge XSL which adds its own complete copy of the <level> tag to the island.xml, and also includes the required cutscene attribute. GooTool will also add its tag for this level, however since your merge one was added first the game uses that, and the one added by GooTool is ignored.
Actors

Each Actor in a movie is either an image or a piece of text, and has an associated animation made up of a series of keyframes.
Actors have a few attributes of their own.
labelMaxWidth and labelWrapWidth were never used in the original movies, and need investigation.
Making Actors do things
In order to appear, and "do things" actors require [keyframes]
Exporting Animations
You can export the list of keyframes for an actor as a stand-alone [Animation]
KeyFrames

Keyframes are what make up the animation for an actor.
Each keyframe has a time in seconds and can specify any or all of the following attributes.
position : x,y
scale : scalex,scaley
angle : rotation in degrees
alpha : Transparency 0-255
color : R,G,B colorize
Each actor only requires 1 keyframe, however these actors will be static. They will appear at the time of the keyframe and remain displayed until the end of the movie. This is useful for backgrounds.
For actors with more than 1 keyframe, each keyframe need only specify the values which should change from the previous frame. ie. If the actor is initially given a position and a scale, but in the next frame only to changes position, you do not need to specify the scale values again.
Stop Motion or Tweened
The default mode for animations is "Stop Motion". The actor will keep the values assigned in one keyframe, until the time of the next keyframe. When the next keyframe arrives the actor will "jump" to the values set by the new keyframe.
This was used to good effect in a number of the original movies, Chapter3Mid for example.
However it is also possible to have the actor change "smoothly" from the values given in one frame to the values in the next. Often called tweening, this can activated by setting the interpolation attribute to 'linear'.
Interpolation can be set (or not) for each keyframe in each actor.
Most of the values change intuitively; positions, scales, alpha etc... however angle has a couple of "quirks".
The game will attempt to take the "shortest" path between 2 angles...
So if you specify a starting angle of 0, and the next keyframe is set to 360, the actor will not rotate.
If you start at 0 and the next frame is 359 degrees, the actor will make a rotation of only 1 degree, rather than spinning all the way around.
To get a full rotation(or rotations)...
2D Boy used 3 keyframes with angles set to 0 , 180 , 360
But you can get the same effect by having 2 keyframes with angles set to 0 and 720
This may seem odd, but it appears the game subtracts 360 from the angle if it is greater than 180.
So by supplying larger angles (like 720) you can "trick" the game into performing a full rotation using only 2 frames.
Sounds
A keyframe, except the last one in an actor, can also play a sound.
However, if you set the sounds to play in the normal moving actors, you will find it can be hard to properly syncronise the sound with the action. This is often because the sound file has a small amount of silence at the beginning, so if you set the sound to play at exactly the same time as an action occurs, the sound appears to lag behind the action.
One easy way around this is to add all the sounds as extra keyframes in one of the static actors. That way you can tweak the keyframe times to get the sounds matching up, without affecting the animation of the actor which is apparently making the sound.
As well as typing values into the properties pane, you can add / edit the [keyframes in the GUI]
Movie View
You can also add and edit keyframes in the Movie View.
When you select an actor, and then use the slider to move through the movie, the actor will remain highlighted. If move the slider to a time where this actor has a keyframe, then the "Tool Handles" will appear and you can move, size and rotate the actor.
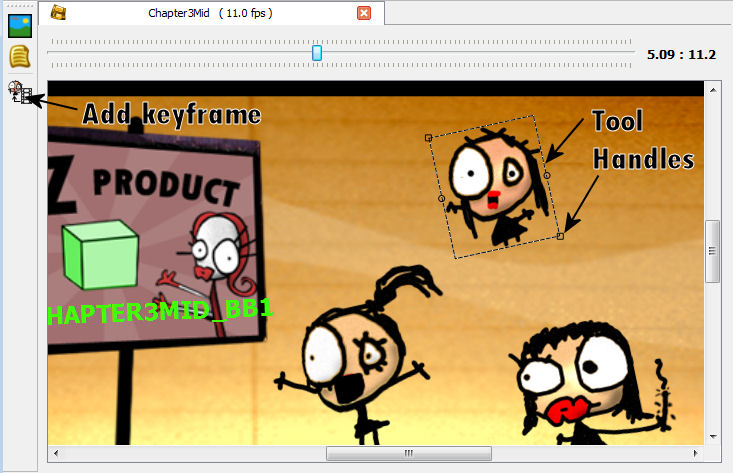
If the actor does not have a keyframe at this time, you can add one.
Click the "Add KeyFrame" toolbar button.
This will add a keyframe to this actor at the time shown on the slider.
If time is between two keyframes for this actor, those keyframes are set to interpolate=linear, then Goovie will calculate the position, scale, angle etc at this time, and automatically set those attributes on the new keyframe.
If you select a keyframe in the Tree View, the slider will automatically jump to the approriate time, and the keyframe for that actor will be selected, ready for visual editting.
You cannot set alpha, color or sound in the MovieView you must do this in the Properites Pane.
Animations


The keyframes you create for an actor can also be exported as a stand-alone animation file .anim.binltl
Simply select the actor whose animation you want to export and click the Export Animation button.
You can then apply these animations to SceneLayers in levels, in the same way you would apply any of the original animations (rot_1fps, blink etc)
If you give the actor a name then this will be used for the default filename name to export. {actorname}.anim.binltl
If you have not given the actor the default filename will be {moviename}.anim.binltl
Animation "quirks"
There are a few differences between how the game processes a movie animation and a stand-alone animation.
Alpha values only work in animations if color is also specifed and interpolation=linear
you can specify color="255,255,255" to avoid actually changing the color of the image
Animations with color values MUST also have alpha values.. or the game crashes.
Animations with no keyframe at time 0, can behave very strangely until the time of the first keyframe is reached.