Developers
World of Goo was written in a highly data-driven manner, consequently almost every aspect of the game is customisable through data files (generally XML). The pages in this book document the various file formats and show how to create custom addins.
The goomod file format was developed for authors to distribute their addins for easy installation by end-users. It is not supported by the game itself, but is used by GooTool to customise the game.
See also the addin development FAQ.
Addin File Format
These pages describes the addin file format for World of Goo, specification version 1.1, as implemented by GooTool.
Addins are extensions to World of Goo that add or modify functionality. There are two types of addin: mod and level. Mods can modify or replace any file. Levels can do the same but also get a button added to Chapter 1 allowing them to be played. Addins can depend on other addins. For example the level addin MyLevel could depend on the MyOrangeBall mod addin.
The binary format of an addin is just a Zip file with a .goomod extension and a special directory structure. The directory structure of the Zip file follows:
- /addin.xml - An XML manifest file describing this addin.
- /text.xml - An optional XML file containing text strings.
- /override/ - A directory containing new files, or replacements for 2dboy original files.
- /merge/ - A directory containing files to merge in with 2dboy-supplied XML.
- /compile/ - A directory containing files to compile (encrypt) into bin/binltl format.
Some knowledge of XML, XSLT and XPath may be helpful to create anything but the simplest addins. There are some examples in this documentation, and more in the addin development FAQ.
You can also look at existing addins in the download section, particularly the sample category which illustrates advanced addin techniques.
Changes
Specification version 1.0 was the first public goomod version and is supported by all versions of GooTool.
Specification version 1.1 is the updated version released in November 2009, and is supported in GooTool 1.0.1 upward. If your addin is a level addin, to upgrade to this version you will need to surround your <level> with a <levels> element.
Attempts to install a 1.1 goomod into an old version of GooTool will result in a message instructing the user to upgrade GooTool.
The following features were added in version 1.1:
- thumbnail was added to the manifest file, allowing a screenshot or other image to be embedded.
- A new file /text.xml is recognised, allowing quick addition of strings.
- cutscene and skipeolsequence can now be specified on a level.
- Addins can now provide more than one level. To support this, <level> is now a child of <levels>
Comments
Comments? Discuss in the forum.
Manifest File
The "addin.xml" file contains the definition of the addin and is read by GooTool. It contains descriptions of the addin for the user, and also technical data used by GooTool. It must be located in the root directory of the goomod file.
The root XML element is addin and this has one required property, spec-version. This describes the version of this specification that the addin follows. This document describes version 1.1. This is not related to your addin version at all.
Then follow a number of required and optional elements.
- id (required)
- The globally-unique identifier of this addin. This must not change between different versions of your addin. It is used for the internal filename of the addin, for other addins to define dependencies, and to ensure previous versions of your addin are removed on upgrade.. It is never displayed to the user.
The format of the field is alphanumeric identifiers separated by periods. The field begins with your reversed domain name. This is your namespace and it is up to you to partition it as you wish. This is followed by any details needed to identify this particular addin. For example: com.mycompany.mods.mymod.
If you do not have a domain name, but you do have an account on goofans.com, you can use our domain and your username as your namespace: com.goofans.<yourname>. For example if your username is robert and you've made a level "Going Down", you might name the addin com.goofans.robert.levels.goingdown.
- name (required)
- The name of this addin, as shown to the user. It is used in various lists and displays and should be short, but should also be descriptive as to what your addin is or does. For example Going Down.
- type (required)
- This is either mod or level. Both kinds may merge and override files, but only level addins have a <level> entry in their manifest. Thus only level addins can have levels displayed in Chapter 1.
- version (required)
- The version of your addin. This is used for dependency and upgrade calculations so you should increment it on each new release.
The format is a sequence of between 1 and 4 version number components separated by periods. Each component consists of decimal digits, and within each component the version should be numerically comparable. For example, version 1.11 must be a newer version than 1.2. It is perfectly permissible to have only 1 component to the version number, in which case no periods are needed.
Examples of valid version numbers:
1
0.1
1.0.2
1.5.0.1
Note that any unused components are treated as zeros. So version "1" is equivalent to "1.0.0.0" in terms of comparison.
- thumbnail (optional)
- goomod 1.1+ only. An optional element specifying the screenshot displayed to the user in GooTool. The text content is the filename in the goomod file, and the element has the required attributes type, width and height giving the MIME-type, width and height of the thumbnail respectively. The only permitted MIME-types are image/jpeg and image/png. The recommended thumbnail size is 200x150 as larger images may be resized by GooTool giving poor quality results.
- description (required)
- The description of your addin as displayed when the user requests the properties dialog for your addin. You have two choices for the format.
The first choice is plain text, in which case any newlines in the description are preserved. CDATA is optional here.
The second choice is HTML, for which CDATA wrapping is required. HTML is identified by a description that begins with <html> and ends with </html>. You can use any basic HTML formatting allowed by Java within this description.
- author (required)
- Your name or handle. Should be fairly short.
- dependencies (optional)
- An optional element which may be omitted if your addin doesn't require any others to be installed first. GooTool inspects this when enabling your addin, to ensure that other addins you need have already been enabled. This also allows for a more modular approach to addin development. It is intended that eventually GooTool will be able to automatically download your dependencies from goofans.com
The format is a set of <depends> elements. Each of these elements has a required attribute ref, which is ths id of the addin you require. You can also specify optional min-version and max-version attributes, in which case your addin will not be enabled unless the other addin matches the versions you specify.
- levels (required)
- An element that is required for level addins, and prohibited for mod addins. It gives information about your level which will be added automatically to Chapter 1.
You should use this element rather than merge with chapter 1 yourself for several reasons. First, it allows GooTool to put your texts in text.xml automatically. Second, allowing GooTool to do it will ensure that multiple custom levels do not overlap each other on the display. And third, when World of Goo has better modding support, GooTool will add your mod to a custom chapter instead. If there are compelling reasons to still do overrides yourself, please contact the author so better support can be built into GooTool or this spec.
In goomod version 1.0, level was a direct child of addin. Goomod version 1.1 supports multiple levels, so level is now a child of levels, and there can be more than one of them present.
The level element has three required and three optional child elements.
- dir (required)
- Specifies the directory of your level under the levels directory.
- name (required)
- Specifies the name of your level in its text attribute. This is used on the chapter screen and as the title of your loading screen.
- subtitle (required)
- Specifies the subtitle displayed on the loading screen in its text attribute.
- ocd (optional)
- specifies the OCD requirements, e.g. balls,16. This element is optional; if omitted, the player will see "This one is mine -the Sign Painter".
- skipeolsequence (optional)
- goomod 1.1+ only. If this empty element is present, the end of level sequence (showing the scores and the draining balls) is skipped.
- cutscene (optional)
- goomod 1.1+ only. The cutscene to play when the level ends (if skipeolsequence is set) or when the score screen "continue" handle is clicked (if skipeolsequence is not set). Contains three strings separated by commas. First is the lead-in transition, second is the movie to play, third is the lead-out transition. Either transition may be "x" to cut directly. Example: gooTransition_in,wogcunlock,gooTransition_out or x,wogcunlock,gooTransition_out.
The name and subtitle elements may also be internationalized in the same way that existing goo levels are using two-letter language attributes.
Example Mod
Here is the manifest file for an example mod. This one is taken from the Merger test mod in GooTool's test suite:
<addin spec-version="1.1">
  <!-- The unique ID of this addin. Read the spec for uniqueness and format requirements. -->
  <id>net.davidc.test.merger</id>

  <!-- Short display name shown to user. -->
  <name>Merger Test</name>

  <!-- either "mod" or "level". For user display, and to determine whether to create a chapter 1 entry -->
  <type>mod</type>

  <!-- An optional thumbnail image of the mod (goomod 1.1+ only) -->
  <thumbnail type="image/jpeg" width="200" height="150">thumbnail.jpg</thumbnail>

  <!-- Version. Must be numerically comparable in each "."-delimited component. You could also do it without periods at all, e.g. 11281.-->
  <version>1.0</version>

  <!-- Description shown to user when mod is selected. Basic HTML is allowed if you put it in a CDATA and surround it with <html></html>. -->
  <description><![CDATA[
    <html>
    <p>This addin is a test of the merger. It has the following functions:</p>

    <ul>
      <li><b>GoingUp</b> - Changes unattached balls to UglyProduct, and turns on visual debug.</li>
      <li><b>SmallDivide</b> - Removes all black balls and adds a new structure of drip balls.</li>
    </ul>

    <p>N.B. This test addin modifies existing game levels. It is intended for test purposes only, so don't make
    any changes that could allow leaderboard fudging (e.g. changing to ivy balls would allow them to save more
    balls).</p>
    </html>
  ]]></description>

  <!-- Author shown to user. -->
  <author>davidc</author>

  <!-- No dependencies. -->
</addin>
Example Level
<addin spec-version="1.1">
  <id>net.davidc.gravitas</id>
  <name>Gravitas</name>
  <type>level</type>
  <thumbnail type="image/png" width="200" height="150">thumbnail.jpg</thumbnail>
  <version>0.5</version>
  <description>This is a lovely level you can play. It has awesome gravity!</description>
  <author>davidc</author>

  <!-- Other addins this one depends on. -->
  <dependencies>
    <depends ref="net.davidc.test.mynewball" min-version="1.0"/>
  </dependencies>

  <!-- Details about this level -->
  <levels>
    <level>
      <dir>Gravitas</dir>
      <name text="Gravitas" de="Schwerkraftas"/>
      <subtitle text="weighty matters" de="gewichtige Angelegenheiten"/>
      <ocd>balls,16</ocd>
    </level>
  </levels>
</addin>
Future
A future version of this spec may introduce a chapter addin type, if World of Goo ever supports this.
Compile Directory
Like the override and merge directories, files inside the compile directory are relative to the World of Goo installation directory.
The compile directory directory contains XML files which are compiled (encrypted) into bin format. This allows GooTool to compile the file for you, so you don't have to distribute different versions of your addin for Mac and PC.
Files ending in .xml are automatically compiled to the same filename but with a .bin extension instead. For example, your addin file /compile/res/levels/MyLevel/MyLevel.level.xml is compiled to <WorldOfGoo dir>/res/levels/MyLevel/MyLevel.level.bin.
Future
Once the .binltl format is figured out (if that turns out to be useful - it's only used for animations which seem to be programmatically triggered), another file extension will identify files to be compiled to .binltl format.
Merge Directory
Like the override directory, files inside the merge directory are relative to the World of Goo installation directory. However that's where the similarity ends. Files in the merge directory are not replaced, they are merged with the 2dboy originals (and possibly also merged with the results of lower-priority mods). Consequently the merge directory only operates on XML files.
The format of files in this directory are XSLT stylesheets, enabling full control of the produced XML. For each file that you want to merge, GooTool decrypts the 2dboy original, merges in your changes, and encrypts it back. (It also makes a backup of the original; it always merges from the 2dboy original and doesn't do incremental merging as that would have unexpected results when enabling and disabling addins).
The filenames end with the .xsl extension instead of .bin. An example of a full filename relative to your goomod root would be merge/res/levels/GoingUp/GoingUp.level.xsl. Note that the .bin suffix is replaced with .xsl.
Some knowledge of XSLT and XPath will help create complex merging rules, but the rest of this page contains some examples. You may also find davidc's XML Diff tool helpful - you give it the original XML file and your modified XML file, and it gives you back an XSL file that will make the changes.
Default rule
You need a default rule to copy across anything not matched by any other rules. Here it is:
  <!-- Copy everything not matched by another rule -->
  <xsl:template match="* | comment()">
    <xsl:copy>
      <xsl:copy-of select="@*"/>
      <xsl:apply-templates/>
    </xsl:copy>
  </xsl:template>
Modify existing elements
You can modify existing elements by selecting them with your XPath. Remember to copy @* to preserve the other attributes, and to apply-templates to copy their child elements. The follow example selects all BallInstance elements, copies their attributes, and then overrides their type attribute:
  <!-- Change existing balls to UglyProduct -->
  <xsl:template match="/level/BallInstance">
    <xsl:copy>
      <xsl:copy-of select="@*"/>
      <xsl:attribute name="type">UglyProduct</xsl:attribute>
      <xsl:apply-templates/>
    </xsl:copy>
  </xsl:template>
Remember that the most specific rule matches, so here we select the balls where their id attribute is less than 4, and copy them unchanged. In this example, we're changing to UglyProduct balls, which don't have strands defined, so we don't want to touch the first 4 balls which are already connected.
  <!-- But we must leave the first 4 balls alone, since -->
  <!-- Ugly balls don't have strand definitions -->
  <xsl:template match="/level/BallInstance[@id < 4]">
    <xsl:copy>
      <xsl:copy-of select="@*"/>
      <xsl:apply-templates/>
    </xsl:copy>
  </xsl:template>
In this example we modify the visualdebug attribute of the level element to enable graphical display of the level scene structure.
  <xsl:template match="/level">
    <xsl:copy>
      <xsl:copy-of select="@*"/>
      <!-- set visual debug. set attributes after copying them, so we can overwrite -->
      <xsl:attribute name="visualdebug">true</xsl:attribute>
      <xsl:apply-templates/>
    </xsl:copy>
  </xsl:template>
Deleting and inserting elements
Here we match all strand elements and delete them simply by not copying them at all.
  <!-- Delete existing strand instances -->
  <xsl:template match="/level/Strand"/>
If we wanted to add more Strands back in, we could select the "Arms" comment and add them there:
  <xsl:template match="/level/comment()[contains(., 'Arms')]">
    <xsl:copy/>
    <Strand .... insert our strands here >
  </xsl:template>
Or, because WoG doesn't validate against a DTD, we could just add them to the end of the level element. This is probably preferable in case comments are removed or changed by another addin or by 2dboy in a future release.
Note that the new stuff is inside the <xsl:copy> - if outside it would append after the level is already closed!
  <xsl:template match="/level">
    <xsl:copy>
      <xsl:copy-of select="@*"/>
      <xsl:apply-templates/>

      <Strand .... insert our strands here >

    </xsl:copy>
  </xsl:template>
Full example
This example modifies the EconomicDivide (displayed name: Small Divide) level using the above examples. The first template copies everything that isn't matched by another template untouched. The second template removes all balls. The third inserts balls where the old balls were (after the Balls comment). The fourth deletes all strands. The fifth modifies the level element by enabling visualdebug, and adds new Strands to the end of the file (demonstrating the second method of adding elements).
<?xml version="1.0" encoding="ISO-8859-1"?>
<xsl:transform version="1.0" xmlns:xsl="http://www.w3.org/1999/XSL/Transform">

  <!-- Copy everything not matched by another rule -->
  <xsl:template match="* | comment()">
    <xsl:copy>
      <xsl:copy-of select="@*"/>
      <xsl:apply-templates/>
    </xsl:copy>
  </xsl:template>

  <!-- Delete existing ball instances -->
  <xsl:template match="/level/BallInstance"/>

  <!-- insert drip balls into the place where the previous balls were -->
  <xsl:template match="/level/comment()[contains(., 'Balls')]">
    <xsl:copy/>
    <BallInstance type="water" x="-459.69" y="262.68" id="0" angle="0" />
    <BallInstance type="water" x="-341.64" y="279.34" id="1" angle="0" />
    <BallInstance type="water" x="-232.63" y="284.03" id="2" angle="0" />
    <BallInstance type="water" x="-122.63" y="284.03" id="3" angle="0" />
    <BallInstance type="water" x="-122.63" y="184.03" id="4" angle="0" />

    <BallInstance type="water" x="-329.74" y="411.84" id="5" angle="0" />
    <BallInstance type="water" x="-329.74" y="411.84" id="6" angle="0" />
    <BallInstance type="water" x="-329.74" y="411.84" id="7" angle="0" />
    <BallInstance type="water" x="-329.74" y="411.84" id="8" angle="0" />
    <BallInstance type="water" x="-329.74" y="411.84" id="9" angle="0" />
    <BallInstance type="water" x="-329.74" y="411.84" id="10" angle="0" />
  </xsl:template>

  <!-- Delete existing strand instances -->
  <xsl:template match="/level/Strand"/>

  <!-- Set visual debug and insert new Strands -->
  <xsl:template match="/level">
    <xsl:copy>
      <xsl:copy-of select="@*"/>
      <!-- set visual debug. set attributes after copying them, so we can overwrite -->
      <xsl:attribute name="visualdebug">true</xsl:attribute>
      <xsl:apply-templates/>

      <!-- Here is where we can insert nodes at the end of the file -->
      <!-- As a demo, just insert the new strands at the end -->

      <Strand gb1="0" gb2="1" />
      <Strand gb1="1" gb2="2" />
      <Strand gb1="2" gb2="3" />
      <Strand gb1="3" gb2="4" />

    </xsl:copy>
  </xsl:template>
</xsl:transform>
Result
How the goo am I going to reach the exit now?
You can see a similar example in action in the merger-test addin.
Override Directory
The override directory inside the goomod file contains files that the addin provides or replaces. These can either override default files, or be entirely new files. Within this directory are files to override relative to the World of Goo installation directory.
For example to override the main body image of the Drained ball, the path relative to your addin zip file would be /override/res/balls/Drained/body.png
It is illegal to override a file in the World of Goo directory itself, and GooTool will not load the addin if it has files directly inside override.
Note that if you replace the same file that another addin does, the file will end up being overridden by the addin that has priority (as selected by the user by dragging the addins around).
The override directory is NOT the place to put XML (compiled or otherwise). Use the merge directory for this.
For Mac compatibility, ".png" files in the override directory are treated specially. They are automatically compiled into the Mac version's ".png.binltl" format, thus producing the same effect as on the PC version.
Strings File
An addin may supply strings to be added to the game's text.xml file. These strings are stored in a file called text.xml in the addin's root directory. This facility is only available in goomod format 1.1 onwards.
This allow addins to easily add or replace text in the game's text.xml file without having to write a merge XSLT. For example, you can quickly add signpost text.
The addin's text.xml file may contain both new strings (specific to that addin) and existing strings (which override entries already in the game's text.xml file).
Format
The format of this file is the same as World of Goo's existing text.xml. The root element is strings which contains a number of string children.
Each string has two mandatory attributes: id and text (the English/default text). Optionally it can have additional attributes, where the attribute name is the 2-letter language code supported by World of Goo.
Encoding
It may be important to watch the encoding of your file if you are using international character sets. Particularly, make sure you are using a UTF-8 aware editor, and specify the encoding in the <xml> directive.
Example
The following example is taken from Jingle Balls version 1.3:
<?xml version="1.0" encoding="UTF-8"?> <strings> <string id="SIGNPOST_JINGLEBALLS_1" text="'Twas the night before Christmas, when all through the house|Not a creature was stirring, not even a mouse.|The Goo Balls were nestled all snug by the fire.|In hope of avoiding the Sign Painter's ire.|Fat chance. Let's open the present early.|-Ebenezer Sign Painter" es="Era la noche antes de Navidad, y en toda la casa|ni una criatura se movía, ni tan sólo un ratón.|Las Bolas de Goo se acurrucaban junto al fuego|deseando escapar de la ira del escritor de carteles.|Gran oportunidad; pongámoslas a trabajar.|-el escritor de carteles de las Navidades pasadas." ru="В рождественскую ночь, когда все дома у меня|И даже мышь не шевельнется в норке.|Все шарики устроились уютно у огня.|В надежде избежать Авторской порки.|Но нет им шанса отдохнуть. Придется отправляться снова в путь.|-трудолюбивый Автор" de="In der Nacht vor dem Christfest, da regte im Haus|sich niemand und nichts, nicht mal eine Maus.|Die Goo-Bälle machten es sich vor dem Feuer bequem.|In der Hoffnung der Wut des Schildermalers zu entgehen.|Gute Chancen. Lasst uns das Geschenk früh öffnen.|-Ebenezer Schildmaler" nl="'t Was de nacht voor Kerstmis, en in heel het huis,|Was geen teken van leven, zelfs niet van een muis.|De Goo-ballen lagen bij het vuur te dromen,|In de hoop aan de bordjesschilder te ontkomen.|Mooi niet! Laten we het cadeau alvast openmaken.|-Ebenezer Bordjesschilder" fr="C'était la veille de Noël, lorsque dans toute la maison|Personne, pas même une souris, ne laissait entendre un son.|Les Boules de Goo étaient nichées bien au chaud près de l'âtre.|Dans l'espoir d'éviter la colère du peintre des pancartes.|Pas de chance. Ouvrons les cadeaux en avance.|-le peintre des pancartes Ebenezer" /> <string id="SIGNPOST_JINGLEBALLS_2" text="A bundle of toys lying here 'neath the tree?|Could Chapter Six be there just waiting for me?|Bah, only more Goo Balls in festive attire.|But yummy, let's roast them all over the fire." es="¿Hay acaso regalos esperando bajo el árbol?|¿Estará allí el Capítulo 6 esperándome?|Bah, sólo más navideñas Bolas de Goo.|Ñam ñam, vamos a asar las castañas." ru="Гора игрушек, возлегающих под елкой?|Или шестая часть игры там ждет меня?|Эх нет, и только шарики Гуу одеты как с иголки.|И значит нужно их поджарить, сидя у огня." de="Ein großer Geschenkeberg liegt neben dem Baum so fein?|Könnte es das wartende, sechste Kapitel sein?|Bah, nur noch mehr Goo-Bälle im festlichen Gewand.|Lasst uns sie über dem Feuer rösten mit knusprigem Rand." nl="Zie ik speelgoed liggen onder de boom?|Hoofdstuk Zes misschien, waar ik al tijden van droom?|Bah, meer Goo ballen met muts en baard.|Maar wel lekker, geroosterd boven de haard." fr="Qu'est-ce derrière l'arbre, un tas de jouets?|Est-ce le chapitre six que depuis longtemps j'attendais?|Oh, ce ne sont que des Boules de Goo dans un déguisement joyeux.|Miam, faisons-les rôtir au-dessus du feu." /> <string id="SIGNPOST_JINGLEBALLS_3" text="As I drew in my head, and was turning around|Up the chimney escaped the Goo Balls with a bound.|But I heard them exclaim, 'ere they climbed out of sight,|"Happy Christmas to all, and to all a good-night!"" es="Tal y como había imaginado, y así sucedía|por la chimenea escapaban las Bolas de Goo.|Pero las oí gritar, al escapar de mi vista,|"¡Feliz Navidad a todos y Próspero Año Nuevo!" " ru="Я обернулся так, что растянул всю шею, что за наказанье|И дымоход скрывает шариков бегущих, что есть мочи.|Но прежде чем убраться с глаз долой, услышал я их восклицанье,|"Счастливого Рождества, и всем спокойной ночи!"" de="Dann wollt' ich die Fensterläden zuzieh'n|und sah den Haufen durch den Kamin entfliehen.|Doch ich hört' sie noch rufen, von fern klang es sacht:,|"Frohe Weihnachten allen, - und allen gut' Nacht!"" nl="Toen ik even niet oplette, namen ze de benen,|En zijn de Goo-ballen door de schoorsteen verdwenen!|Maar ik hoorde ze roepen, door de schacht,|"Vrolijk kerstfeest allemaal, en een goede nacht!"" fr="Alors que je levais la tête, en regardant partout|Par la cheminée s'échappaient les boules de Goo.|Alors qu'elles disparaissaient, leurs paroles j'entendis,|"Joyeux Noël à tous, et à tous une bonne nuit!"" /> </strings>
ANT build file
This ANT build file is used by davidc to build distributions of multiple addins. It's not required for general addin development but is provided here for anyone who may wish to use ANT.
You will need ant-contrib for the <foreach> task. Addins should be in individual subdirectories. It will automatically read the addin.xml file to pick up the IDs and version numbers.
<?xml version="1.0"?>
<!--$Id: build.xml 263 2009-04-22 23:53:12Z david $-->
<project name="addins" default="build" basedir=".">

  <property name="addins.src" value="src"/>
  <property name="addins.dest" value="dist"/>

  <taskdef resource="net/sf/antcontrib/antlib.xml" classpath="../lib/build/ant-contrib-1.0b3.jar"/>


  <target name="build" description="Builds all addins in the src directory">
    <mkdir dir="${addins.dest}"/>

    <foreach target="-foreach-addin" param="src.dir">
      <path>
        <dirset dir="${addins.src}" includes="/*/">
        </dirset>
      </path>
    </foreach>
  </target>

  <target name="-foreach-addin">
    <!-- Read the XML file to get the addin name and version -->
    <xmlproperty file="${src.dir}/addin.xml"/>

    <fail unless="addin.id" message="No Addin ID set in ${src.dir}"/>
    <fail unless="addin.version" message="No Addin version set in ${src.dir}"/>

    <property name="out.file" value="${addins.dest}/${addin.id}_${addin.version}.goomod"/>

    <zip file="${out.file}">
      <fileset dir="${src.dir}">
        <exclude name="**/.svn"/>
        <exclude name="**/Thumbs.db"/>
      </fileset>
    </zip>
  </target>

  <target name="clean" description="Removes everything that was built">
    <delete dir="${addins.dest}"/>
  </target>

</project>
Game File Formats
Here are descriptions of the various file formats used by the game.
Encryption formats
- Windows/Linux - .bin AES format
- Mac - .bin XOR format
- iOS - Not encrypted
Profile
Graphic formats
- Windows/Linux - Standard PNG
- Mac - .png.binltl format
- Language specific - .en.png
- font .txt format (popcap)
Sound Files
- Default - Standard OGG format
- Language specific - .en.ogg
Animation file formats
- .anim.binltl - in-level object keyframe animation
- .movie.binltl - cut-scene animations
XML file formats
Levels
- .level.bin - Level gameplay file format
- .scene.bin - Level physics and design file format
- .resrc.bin - Resource file format
Balls
- balls.xml.bin - Ball definition file
- resources.xml.bin - Resource file format
Game-wide properties
- config.txt - User game configuration
- fx.xml.bin - Particle emitter definitions
- materials.xml.bin - Material definitions
- resources.xml.bin - Game-wide resources
- text.xml.bin - Internationalised text
Islands
- island.xml file format
AES Encryption format
On Windows and Linux platforms, the encryption method is AES. This applies to the profile and to all files ending in ".bin".
The files are encrypted using AES in CBC mode with the 192-bit key 0D0607070C01080506090904060D030F03060E010E02070B
It is important to note that the AES algorithm requires data in 16-byte blocks. Since the game does not store the actual length in the file, you must instead look for 0xFD in the last block to indicate the end-of-file. When encrypting, if you wish to follow how the game encrypts, you should pad with up to 4 0xFD bytes, and the rest with 0x00 bytes.
PHP code
If you have the mcrypt extension for PHP installed, the code is trivial:
$key = "\x0D\x06\x07\x07\x0C\x01\x08\x05\x06\x09\x09\x04\x06\x0D\x03\x0F\x03\x06\x0E\x01\x0E\x02\x07\x0B";

$encrypted = file_get_contents("pers2.dat");
$decrypted = mcrypt_decrypt(MCRYPT_RIJNDAEL_128, $key, $encrypted, MCRYPT_MODE_CBC, str_repeat("\x00", 16));
echo $decrypted;
Python code
Likewise, Python with the Python Cryptography Toolkit is equally simple:
def decode_pc(data):
    if len(data)%16 !=0: return ""
    # AES encryption key used (192 bits)
    key = "\x0D\x06\x07\x07\x0C\x01\x08\x05\x06\x09\x09\x04\x06\x0D\x03\x0F\x03\x06\x0E\x01\x0E\x02\x07\x0B"
    return AES.new(key, AES.MODE_CBC).decrypt(data)
Complete Python encryption/decryption routines in Python are on the 2D Boy forum.
Java code
GooTool's Java class for decryption/encryption follows. Note that Java ships by default to all users with a restricted-export encryption strength. Although the limit is easily lifted with a new file in the user's lib directory, this is not a very user-friendly requirement, so GooTool instead uses the BouncyCastle lightweight API.
package com.goofans.gootool.io;

import com.goofans.gootool.util.Utilities;
import org.bouncycastle.crypto.BlockCipher;
import org.bouncycastle.crypto.BufferedBlockCipher;
import org.bouncycastle.crypto.InvalidCipherTextException;
import org.bouncycastle.crypto.engines.AESEngine;
import org.bouncycastle.crypto.modes.CBCBlockCipher;
import org.bouncycastle.crypto.params.KeyParameter;

import java.io.File;
import java.io.IOException;

/**
 * Encrypt/decrypt .bin files in AES format (Windows/Linux).
 *
 * @author David Croft
 * @version $Revision: 186$
 */
public class AESBinFormat
{
  private static final byte[] KEY = {0x0D, 0x06, 0x07, 0x07, 0x0C, 0x01, 0x08, 0x05,
          0x06, 0x09, 0x09, 0x04, 0x06, 0x0D, 0x03, 0x0F,
          0x03, 0x06, 0x0E, 0x01, 0x0E, 0x02, 0x07, 0x0B};

  private static final byte EOF_MARKER = (byte) 0xFD;

  private AESBinFormat()
  {
  }

  public static byte[] decodeFile(File file) throws IOException
  {
    byte[] inputBytes = Utilities.readFile(file);
    return decode(inputBytes);
  }

  // Java Crypto API - can't use because user will have to install 192-bit policy file.
//    SecretKey key = new SecretKeySpec(KEY, "AES");
//    Cipher cipher = Cipher.getInstance("AES/CBC/PKCS5Padding");//CBC
//    cipher.init(Cipher.DECRYPT_MODE, key);
//    byte[] decrypted = cipher.doFinal(bytes);

  private static byte[] decode(byte[] inputBytes) throws IOException
  {
    BufferedBlockCipher cipher = getCipher(false);

    byte[] outputBytes = new byte[cipher.getOutputSize(inputBytes.length)];

    int outputLen = cipher.processBytes(inputBytes, 0, inputBytes.length, outputBytes, 0);

    try {
      outputLen += cipher.doFinal(outputBytes, outputLen);
    }
    catch (InvalidCipherTextException e) {
      throw new IOException("Can't decrypt file: " + e.getLocalizedMessage());
    }

    for (int i = outputLen - 16; i < outputLen; ++i) {
      byte b = outputBytes[i];
      if (b == EOF_MARKER) {
        outputLen = i;
        break;
      }
    }

    byte[] finalBytes = new byte[outputLen];
    System.arraycopy(outputBytes, 0, finalBytes, 0, outputLen);
    return finalBytes;
  }

  public static void encodeFile(File file, byte[] input) throws IOException
  {
    byte[] bytes = encode(input);
    Utilities.writeFile(file, bytes);
  }

  private static byte[] encode(byte[] inputBytes) throws IOException
  {
    /* If input was multiple of 16, NO padding. Example: res\levels\BulletinBoardSystem\BulletinBoardSystem.level.bin */
    /* Otherwise pad to next 16 byte boundary */

    int origSize = inputBytes.length;
    if (origSize % 16 != 0) {
      int padding = 16 - origSize % 16;

      int newSize = origSize + padding;

      byte[] newInputBytes = new byte[newSize];
      System.arraycopy(inputBytes, 0, newInputBytes, 0, origSize);
      inputBytes = newInputBytes;

      /* Write up to 4 0xFD bytes immediately after the original file. The remainder can stay as the 0x00 provided by Arrays.copyOf. */
      for (int i = origSize; i < origSize + 4 && i < newSize; ++i) {
        inputBytes[i] = EOF_MARKER;
      }
    }

    BufferedBlockCipher cipher = getCipher(true);

    byte[] outputBytes = new byte[cipher.getOutputSize(inputBytes.length)];

    int outputLen = cipher.processBytes(inputBytes, 0, inputBytes.length, outputBytes, 0);

    try {
      outputLen += cipher.doFinal(outputBytes, outputLen);
    }
    catch (InvalidCipherTextException e) {
      throw new IOException("Can't encrypt file: " + e.getLocalizedMessage());
    }

    byte[] finalBytes = new byte[outputLen];
    System.arraycopy(outputBytes, 0, finalBytes, 0, outputLen);
    return finalBytes;
  }

  private static BufferedBlockCipher getCipher(boolean forEncryption)
  {
    BlockCipher engine = new AESEngine();
    BufferedBlockCipher cipher = new BufferedBlockCipher(new CBCBlockCipher(engine));

    cipher.init(forEncryption, new KeyParameter(KEY));
    return cipher;
  }
}
XOR Encryption format
On the Mac platform, the "encryption" method is a simple rotating XOR . This applies to the profile and to all files ending in ".bin".
Unlike the AES format, there is no requirement for 16-byte alignment of the file. Thus the input length equals the output length for both encryption and decryption.
The initial "salt" for the XOR is binary 00X00Y0Z XOR 0xAB, where X, Y and Z are bits from the file length. X is the first bit, Y is the second bit and Z is the third bit.
For each byte in the file you XOR it with the current salt to decrypt. The salt is then updated by rotating it one bit higher and XORing it with the (encrypted) byte that was just read.
This is explained better in the very simple code below:
package com.goofans.gootool.io;

import com.goofans.gootool.util.Utilities;

import java.io.File;
import java.io.IOException;

/**
 * Encrypt/decrypt .bin files in XOR format (Mac).
 *
 * @author David Croft
 * @version $Revision: 227$
 */
public class MacBinFormat
{
  public static byte[] decodeFile(File file) throws IOException
  {
    byte[] inputBytes = Utilities.readFile(file);
    return decode(inputBytes);
  }

  private static byte[] decode(byte[] inputBytes) throws IOException
  {
    int length = inputBytes.length;
    byte[] outputBytes = new byte[length];

    int salt = (((length & 1) << 6) | ((length & 2) << 3) | (length & 4)) ^ 0xab;

    for (int i = 0; i < length; ++i) {
      byte inByte = inputBytes[i];
      outputBytes[i] = (byte) (salt ^ inByte);

      salt = ((salt & 0x7f) << 1 | (salt & 0x80) >> 7) ^ inByte;
    }

    return outputBytes;
  }

  public static void encodeFile(File file, byte[] inputBytes) throws IOException
  {
    byte[] bytes = encode(inputBytes);
    Utilities.writeFile(file, bytes);
  }

  private static byte[] encode(byte[] inputBytes) throws IOException
  {
    int length = inputBytes.length;
    byte[] outputBytes = new byte[length];

    int salt = (((length & 1) << 6) | ((length & 2) << 3) | (length & 4)) ^ 0xab;

    for (int i = 0; i < length; ++i) {
      byte inByte = inputBytes[i];
      byte newByte = (byte) (salt ^ inByte);
      outputBytes[i] = newByte;

      salt = ((salt & 0x7f) << 1 | (salt & 0x80) >> 7) ^ newByte;
    }

    return outputBytes;
  }
}
Sample encryption/decryption routines in Python are on the 2dboy forum.
Balls XML
General Overview
Every Gooball starts with the ball tag with a series of attributes (name, shape, mass...)
Inside the ball tag may live the following tags:
part : defines the balls appearence (usually the first part is the body image, followed by eyes and other features).
marker : definition of the cursor when pointing at a ball, or detaching it
shadow : a shadow image/overlay that only shows above geometry.
particles : defined for various states such as sleeping or falling, it adds a particle effect above or beneath the ball
strand : the parts other balls walk on, mainly the definition of the structures physics this ball will form
detachstrand : image and length of detaching visualisation.
splat : drops of this goo, shown when the player clicks on or releases this ball and when it dies.
sound : the soundeffects for various events (attach, throw, death...)
sinvariance : animations of the bodyparts in different states (walking, falling, sleeping...)
All these tags are (strictly) optional and which are present depends on the ball's type.
A ball with no part tags will be invisible, a ball with no sound tags will be silent... etc.
For descriptions of these tags, and more detailed explainations on their attributes... follow the links.
Balls also have a state which indicates what the ball is currently doing, and events which are things that can happen to a ball.
Contents
- Core Attributes
- Behaviour Attributes
- Movement Attributes
- Player Interaction
- Level Interaction
- Other Ball Interaction
- Cosmetic Attributes
- Burn Attributes
- Popping / MOM Attributes
- Dispenser Attributes
Core Attributes
These attributes are always (or usually) required for any normal functioning ball.
If 0 is set (or is omitted) all balls will be exactly the size specified, If 1 is specified the balls will range randomly from (almost) 0 -> 2 x size The "original" balls used numbers in the range 0.1 -> 0.3
The variation can be included on both circle and rectangle balls.
Behaviour Attributes
These attributes govern the actions of the Goos when they are "left alone"
Movement Attributes
These attributes govern the Goo Balls motion
Player Interaction
These attributes control how the Goos respond to the Player.
Level Interaction
These attributes control how the Goos interact with various elements of the level.. pipes, spikes etc.
Other Ball Interaction
These attributes govern how the Goos behave when they encounter other Goos.
Cosmetic Attributes
These attributes control the Goos look, but do not significantly affect game play.
Burn Attributes
These attributes control whether the Goos are flammable, and how the behave when lit.
Popping / MOM Attributes
These attributes control whether the Goos are "pop-able", and what they contain
Dispenser Attributes
FallingAttachment
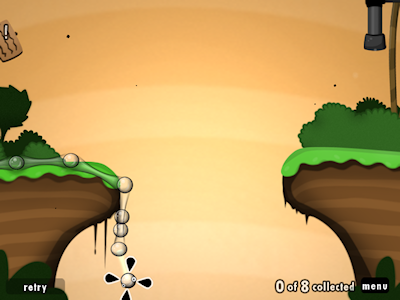
If you got here, that means you played my level: Stranded.
If not, you might want to play it before you read this, it has
SPOILERS!!!
The falling attachment attribute, when set to true on a gooball, allows strands to attach to it when it is falling/thrown. This means you can start a level with no existing strands within the scene limits! This can be quite interesting...
The first thing I want to show you is a single stand ball with the fallingattachment attribute set to true. One gooball can be attached to the other when it is falling, like so:

However! The ball that was attached to remains in a detached state even though it has a strand! Here is what I mean:

This means that particular gooball can be sucked by the pipe, this can give some quite amusing results:

This is why:

The unattached with strand gooball is eligible to enter the pipe, so it does, and drags the attached gooball with it! This can cause crashes (though not necessarily).
Now, let's check out the gooball I used in the level, the DynamAttach. This is how the attachment works:

However, if one of the two on the structure gets sucked by the pipe, the game WILL crash!

This is why I set this gooball to not be suckable.
The fact this gooball can both have a strand AND be in a unattached state, means the structure can roll around, which is quite funny! Also, if you click then release the gooball on this mobile structure, it will switch to an attached state. You will have noticed both of these while playing the level.
I hope you enjoyed my little explanation on this attribute! I'm looking forward to see such gooballs from you!
Parts
<part>
These tags define the visible elements of the balls. A ball can contain any number of part tags.
Balls with no parts area invisible.
It is used as a reference for the sinanim tags.
eg Beauty's lips and Ivy's leaves.
Strands
<strand>
This tag is optional in a ball.
However without it the ball cannot create strands with other balls, even if the ball's strands attribute is set.
<detachstrand>
This tag specifies attributes about detaching and flinging. It is required for balls to be detachable.
* How the springconst attributes actually work
These attributes allow balls to have a range of different spring constants, however whilst the variation is predictable to the designer, it can appear almost random to the player and makes building structures rather frustrating.
When a strand is created, the spring constant is set based on the initial / "natural" length of the strand.
If the initial length is LESS than the minlen attribute - The spring constant is set to springconstmax
If the initial length is GREATER than the maxlen2 attribute - The spring
constant is set to springconstmin
Between minlen and maxlen2 the spring constant varies linearly from springconstmax to springconstmin
This produces some odd, perhaps "interesting", behaviour if max and min are set to substantially different values, however it makes the result on any strand very hard for the player to predict, and thus makes building "difficult"
As mentioned above, 2DBoy set max and min to the same value, which makes the spring constant "constant", whatever length the strand is.
Other effects
<marker>
Defines the graphics use for the mouse cursor when selecting and dragging Goo Balls.
<particles>
Adds a particle effect to the ball in the give state.
In the original balls these tags are used mostly for sleeping ZZzz effects and "onfire" burning.
<shadow>
Image displayed around / behind the ball when it is on (or near) geometry objects.
Only the parts of the image actually over the geometry are displayed.
<sound>
Sounds that are played when something happens to the ball.
<splat>
States and Events
States
These are named "states" in which the balls can exist. They describe what the ball is currently doing.
| attached | Attached to a structure |
| climbing | Moving along a strand |
| detaching | Being detached, but has not been actually removed from the structure |
| dragging | Being held by the player |
| falling | Falling or Flying.. not held by player, not sitting on geometry. |
| pipe | Moving along inside the pipe |
| sleeping | Asleep |
| standing | On geometry, but not walking. |
| stuck | Is a "sticky" ball and is stuck to geometry |
| stuck_attached | Stuck to geometry and attached to a structure |
| stuck_detaching | Stuck to geometry and being detached from a structure |
| tank | In the tank (Final Stats screen) |
| walking | On geometry and walking along. |
There is one additional state onfire which can only be used in a particles tag.
Events
These are named events which can happen to the balls. They describe what happened to it.
| attach | Attaches to a structure |
| attachcloser | Attaches to a structure and is closer to the pipe |
| bounce | Bounces when hitting geometry |
| collidediff | Collides with a different type of ball |
| collidegeom | Collides with a geometry object |
| collidesame | collides with the same type of ball |
| death | dies |
| deathfall | Unknown |
| detached | Is detached from a structure |
| detaching | Is clicked ready for detaching |
| detonate | Explodes after being on fire |
| drop | Is dropped (at low speed) by the player.. not thrown |
| exit | Enters the pipe |
| extinguish | Unknown may be unused |
| ignite | Catches fire |
| land | Lands on geometry, but does not bounce. |
| marker | the player moves the mouse over this ball (Hover) |
| pickup | The player clicks the ball to grab it. |
| snap | a strand snaps, also used for Pilot and Bit "launch" ** |
| suction | in range of the pipe |
| throw | Released travelling at speed |
**Note
Balls with "fling" capability use the snap event to specify the sound when the ball is launched.
The sounds played as the arrow changes size are hardcoded to SOUND_GLOBAL_FLING0 -> 9
It is "unclear" what specifies the sound to play when a Pilot strand snaps.
Animations
Advanced - Not for the faint hearted
Bringing balls to life!
Without animations balls seem rather lifeless and flat. They do not wobble or stretch or do anything that makes them appear to be made of Goo.
Obviously it is sometimes desirable to have them appear "lifeless", Bones, Bombs, Blocks etc...
But for balls made of Goo the animations are really the thing that brings them to life!
<sinvariance>
The tags hold information about the variation of the aniamtions (from ball to ball) and contain sinanim tags which actually describe the animations.
When each ball is created, the game selects a random value for each of the variance attributes [0 -> variance]
This is then applied to all the corresponding attributes in each of sinamin tags the sinvariance contains.
Setting all the variance attributes to 0, will make every ball animate in exactly the same way, at exactly the same time. This looks a bit odd.
You should take care that the variance values are less than the values set in the sinanim tags.
If the variance is equal (or greater than) the sinamin value this can result is very strange effects, such as negative scaling.. where the ball shrinks to a point, then expands again as its mirror image, then shrinks to a point and expands back to its normal appearance.
<sinanim>
These tags define elements of the balls animation. Each element is a simple sinusoidal oscillation, but when several are combined (correctly) the resultinf animation can be quite complex.
Experimention is the key to understanding
These are not easy concepts to understand, and its difficult to explain how these animations will work and the effects they will produce when combined.
Your best bet is...
Take an original ball... simplify it, so it has only a single sinvariance and sinanim.
Set the sinvariance values to 0, and have try out some values in the sinanim.
Once you think you've "got" that, add some variance, or a second sinanim tag... and play with that...
Eventually you'll "get it", and be able to produce all sorts of weird and wonderful things.
Alternatively.. just clone an existing ball, and keep whatever 2DBoy had set! 
Font
The game fonts are bitmap files stored in res/fonts, along with a .txt file describing the font contents. These were generated using FontBuilder.exe from the PopCap framework. The format of these files is described below:
If you open up one of the text files generated by Fontilizer, you will see a whole bunch of numbers and stuff. In most cases you can leave these as they are. However, if you feel the need to edit them, here's a brief description of what some of them do.
- Define CharList
- This simply lists all the characters in the font.
- Define WidthList
- This defines the width, in pixels, of each character in the font. There may be cases where you would want to edit this... if, for instance, one letter had a really odd flourish that you didn't want taken into account for spacing, or if you wanted the characters to overlap in some strange manner.
- Define RectList
- This defines the size and position of each character in the image. Don't think you'd wanna mess with this.
- Define OffsetList
- This defines a set of integer pairs specifying how many pixels in X,Y you want to offset each character. This can be used to move individual characters around without modifying the image.
- Define KerningPairs
- This defines the different pairs of characters that have special kerning numbers set for them.
- Define KerningValues
- This defines how special sets of characters are kerned when they turn up. This is imported directly from the Truetype font and in most cases should be left alone.
- LayerSetCharWidths Main (' ') (X)
- This value in the spew of data below is used to set the width of a space character. If you feel the font needs bigger or smaller spaces, edit this.
- LayerSetImage Main 'X'
- The X here is the file name used for the font. You may need to edit this manually if you are creating a special font.
The remaining items are either the values selected in the GUI when the font was originally generated, or references to other objects in the file to link them together.
Island.xml
Stored in the res/islands/ folder, these files describe the setup of a chapter specifies which levels it contains. It also has additional infomation about each level which is not contained in the level files, such as OCD, movies to play, which level must be complete before this level can be played... etc.
<island>
<level>
The <island> tag contains a level tag for each level in the chapter.
Note on playable levels.
Levels with no "depends" are always playable, however the chapter they are in may not be open.
Chapters are "open" if the first level specified in the island.xml is available.
Language Specific Audio Files
This page is currently under construction and the information here may not be complete and/or accurate.
All audio files in World Of Goo are stored as standard OGG files. However, although it is not used in the original game, it is possible to have different audio files play depending on the language World Of Goo is being played in. Presumably this could be used to translate dialogue into different languages.
When loading an OGG file, World Of Goo also looks for a language-specific alternative. This alternative has the exact same file name as the original OGG file, only with a slightly different extension. The extension consists of the two-letter country code of the language World Of Goo is being played in, followed by a period, followed by the standard "ogg". The file must also be in the same folder as the original OGG file.
So, for example, a file named temp_main.en.ogg in the same directory as temp_main.ogg would play at the main menu when World Of Goo is being played in English. Similarly, renaming the file to temp_main.de.ogg would cause this to play when playing in German.
There are a few rules to keep in mind when using this feature:
- The file must simply be an OGG file with a modified extension.
- The file must have a name identical to the OGG file it overrides (excluding the extension).
- The file must be in the same folder as the OGG file is overrides.
This feature does not only apply for OGG files used in the original game; any OGG file loaded by World Of Goo will be overridden if a language-specific alternative exists. That is, whenever the game loads an OGG file through the a level's .resrc.bin file, a ball's resources.xml.bin file, Therefore, this will work in the same way for custom OGG files and custom levels/Goo Balls that load them. This, as mentioned earlier, can be used to, for instance, translate dialogue in a level or total conversion.
See Also:
Level level.xml
<level>
Attributes
- allowskip (boolean) (optional, default: true)
- Whether the user may skip this level.
- autobounds (boolean) (optional, default: false)
- If true, the camera bounds are limited to the Explored Area. If false, the <scene> bounds are fixed.
- ballsrequired (integer) (optional, default: 1)
- Number of balls required in the pipe to exit the level. Not used for levels where there is no levelexit
- cursor1color (also 2, 3, 4) (RGB) (optional, default null)
- 1 for the default cursor colour. 2, 3, 4 are used in manymouse mode in Linux & Wii versions. Used by the levels in Chapter 4 where they are set to 0,255,0; 0,255,255; 0,0,255; 255,0,0.
- letterboxed (boolean) (optional, default: false)
- Whether to letterbox the display (16:9). false on levels, true on islands.
- retrytime (float) (optional, default: 0 )
- Retry button will be lit after there are fewer available balls (i.e. suckable, in the pipe/@filter list, not attached or detachable) than ballsrequired or the given time span (i.e. retrytime seconds) has elapsed if retrytime isn't set to zero.
- strandgeom (boolean) (optional, default: false)
- Whether ball strands interact with geometry. If true, prevents building strands through geometry.
- textcolor (RGB) (optional, default: 255,255,255)
- Colour of various text effects.
- "metres to go", "Made It!", ball count shown at the pipe, !'s from signposts and waking Goo Balls
- texteffects (boolean) (optional, default: true)
- If set to false, prevents the display of the "metres to go" and "Made it!" text effects.
- timebugprobability (float) (optional, default: ~0.5)
- The probability per move that a new time bug will appear. It seems that moving the same balls repeatedly will not trigger a new time bug; there must be some clever logic to prevent people stocking up on time bugs..
- visualdebug (boolean) (optional, default: false)
- When enabled, shows a translucent overlay detailing geometry, balls (including their alignment), and the level exit.
- zoomoutlimit (float) (optional, default 0 )
- Minimum zoom in this level. Any camera zoom smaller than this will be set to this value.
Child Elements
2 camera
0-1 music
0-1 loopsound
0-n signpost
0-1 pipe
0-n BallInstance
0-n Strand
0-2 levelexit
0-n endoncollision
0-n endonmessage
0-1 endonnogeom
0-n fire
0-1 targetheight
Specify a camera for the given aspect ratio. The game normally uses zoom levels of 1.0 or 0.889 depending on the type of level.
Attributes
- aspect (string) (required)
- The aspect ratio under which this camera will be used. Valid values: normal or widescreen.
- endpos (2D) (optional, default null)
- The camera position upon level completion, while the score shows.
- endzoom (float) (optional, default null)
- The camera zoom level upon level completion, while the score shows.
Child Elements
1-n poi
POIs specify how the camera moves when the level loads. The last POI dictates the position and zoom of the camera during play. When retrying the level, the game skips directly to the last POI.
Attributes
- pause (float) (required)
- How long to display this POI before travelling to the next (or, for the final POI, before allowing play).
- pos (2D) (required)
- The camera centre position (in world coordinates) for this POI.
- traveltime (float) (required)
- How long the camera takes to move to the next POI. Irrelevant for the final POI.
- zoom (float) (required)
- The camera zoom level for this POI.
Defines the background music for this level.
Attributes
- id (resource) (required)
- The resource ID of the music to play in the background.
An additional background soundtrack for the level, played on top of the music. Typically used to provide atmospheric effects such as fire.
Attributes
- id (resource) (required)
- The resource ID of the sound to play in the background.
A signpost defines a clickable image. Note that the signpost image only includes the actual board. You'll want to add a corresponding signpost pole in a <SceneLayer> on the <scene> as well.
Attributes
- alpha (float) (required)
- The opacity of the signpost image, where 1 is completely opaque. Note that all game files currently use a value of 1.
- colorize (RGB) (required)
- Specifies the colour factor of each RGB component. Most levels use 255,255,255 to use the full colour. "Darker" levels like UpperShaft use 128,128,128 to remove some of the vibrant colour. "Silhouette" levels like ObservatoryObservationStation use 0,0,0 to remove all colour and display only in greyscale.
- depth (float) (required)
- The visual depth of the signpost image. Affects layering and perspective.
- image (resource) (required)
- The resource ID of the signpost image.
- name (string) (required)
- An ID for the signpost that may be referenced elsewhere.
- particles (string) (optional, default null)
- A particle effect to apply at the signpost's coordinates/depth. Must be a valid particle generator. The game uses this exclusively to apply the effect signpostAlertMom (little black rising bubbles) to MOM's signposts.
- scalex (float) (required)
- X-scaling of the signpost image.
- scaley (float) (required)
- Y-scaling of the signpost image.
- text (string) (required)
- The contents of the signpost to display - a valid string from text.xml.
- x (float) (required)
- X-position (in world coordinates) of the signpost image.
- y (float) (required)
- Y-position (in world coordinates) of the signpost image.
Defines the visual exit pipe. Note that this is purely cosmetic; a <levelexit> must exist to cause suction and allow balls to exit. Once sucked, the balls go along the defined pipe.
Attributes
- depth (float) (required)
- The visual depth of the pipe.
- id (string? integer?) (required)
- An unique ID for this pipe in the level. Always 0 in game files.
- type (string) (optional, default )
- The type of balls this pipe will suck. Note that this is only decorative; it affects the visuals of the pipe. The filter on the levelexit affects the actual sucking. Known values (caps): ISH (only Bit and Pilot balls), BEAUTY (red pipe, only BeautyProduct and BeautyProductEye balls), and BLACK (only common_black balls, used by WeatherVane). These values appear to correspond directly to the IMAGE_GLOBAL_PIPE_xx_yy resources in the global resources.xml
Child Elements
2-n Vertex
A vertex in the exit pipe. The game will draw the pipe between these vertices. There must be at least two.
The vertices should form horizontal or vertical lines, not diagonal.
It isn't allowed to enlongate a line with a third vertex on the same axis. (e.g. 0,0 ; 100,0 ; 200,0)
Attributes
- x (float) (required)
- X-position (in world coordinates) of this vertex.
- y (float) (required)
- Y-position (in world coordinates) of this vertex.
An instance of a ball that is present at level start.
Attributes
- angle (float) (required)
- Angle of the ball, North=0 (degrees).
- discovered (boolean) (optional, default true)
- Whether the ball is discovered (false=sleeping ball).
- id (string) (required)
- Unique ID for the ball in this level, to be referenced by the <Strand>. The game uses integers beginning from 0, but any string is fine as long as it's unique.
- type (string) (required)
- The ball type ID of this ball instance (same as the directory name under res/balls/).
- x (float) (required)
- X-position (in world coordinates) of this ball.
- y (float) (required)
- Y-position (in world coordinates) of this ball.
A strand between two balls that is already connected at level start.
Attributes
- gb1 (string) (required)
- ID of the first ball.
- gb2 (string) (required)
- ID of the second ball.
The actual point at which a pipe sucks. The <pipe> element only defines the visual appearance of the exit.
Attributes
- filter (string) (required)
- A comma-separated list of the balls that will be accepted into this pipe. Empty string to allow all balls. Note that balls that have suckable="false" are automatically excluded.
- id (string) (required)
- ID of the exit. Generally "theExit".
- pos (2D) (required)
- X,Y coordinates (in world coordinates) of the exit.
- radius (float? integer?) (required)
- The suck radius (coordinates unknown - 75 seems unreasonable?) within which balls will be accepted. Always 75 in game levels.
If the level has no pipe, level completion can be triggered by collision of two geometry objects. This is used in the game levels ProductLauncher and ObservatoryObservationStation, both of which end when two geometries touch.
Attributes
- delay (float) (required)
- Number of seconds to delay after the collision before the level ends.
- id1 (string) (required)
- ID of the first geometry object.
- id2 (string) (required)
- ID of the second geometry object.
If the level has no pipe, the level can end when a specific text message is displayed. This is used by MOM to end when MOM_DESTROY_11 ("I love you, MOM. Goodbye.") is chosen, and in Deliverance on END_DELIVERANCE string is triggered. Since in both cases the strings are programmatically triggered, this seems to be a hack to allow level end on hard-coded triggers.
- id (string) (required)
- Text string ID or programmatic trigger to end the level on.
This element appears in the game code, but is not used by any current levels, so its functionality, attributes and status is unknown.
A circular fire trigger that can ignite certain balls (whose burntime is set). Note that Ivy balls can "burn" too - they simply display a different particle effect which looks like poison instead.
- depth (float) (required)
- Visual depth of the particle generator.
- particles (float) (required)
- ID of the particle generator. Must be a valid particle generator in fx.xml.
- radius (float) (required)
- Radius (in world coordinates) within which balls will ignite. Does not affect the particle generator/visuals in any way, so it's possible to have a fire whose ignite radius doesn't correspond to its particle generator at all.
- x (float) (required)
- X-position (in world coordinates) of both the particle generator, and the ignite radius.
- y (float) (required)
- X-position (in world coordinates) of both the particle generator, and the ignite radius.
Triggers level end when the given height is used. Used by the game level RegurgitationPumpingStation to end the level when the structure flies to a certain height.
- y (float) (required)
- Y-height (in game coordinates) that a live ball must reach to trigger the end of the level.
The game appears to have a concept of "live" balls. This excludes balls that are sleeping, that are being thrown, or that are falling. Only live balls can trigger expansion of the view area with autobounds, or level exit on targetheight.
One could conjecture that it only includes balls that are in a structure, but that is not true for example in World of Goo Corporation, where a ball walking to one side will trigger bounds expansion.
Level scene.xml
RGB = r,g,b integers (0-255 each).
2D = x,y floats
resource = string, an ID present in this level's resources file
<scene>
The min/max x/y attributes are only optional on wogc* levels. The bounds can be overridden if autobounds is set on the level.
Attributes
- backgroundcolor (RGB) (required)
- Background colour of the level that shows through when nothing is in front of it. Always black in shipped levels.
- minx (float) (optional)
- Lower bound for the X-coordinate (in world coordinates) of the camera.
- miny (float) (optional)
- Lower bound for the Y-coordinate (in world coordinates) of the camera.
- maxx (float) (optional)
- Upper bound for the X-coordinate (in world coordinates) of the camera.
- maxy (float) (optional)
- Upper bound for the Y-coordinate (in world coordinates) of the camera.
Child Elements
0-n SceneLayer
0-n button
0-n buttongroup
0-n circle
0-n compositegeom
0-n hinge
0-n label
0-n line
0-n linearforcefield
0-n motor
0-n particles
0-n radialforcefield
0-n rectangle
tag attribute
A tag can be applied to any geometry object (line, rectangle, circle and compositegeom*), and specifies additional properties of the object.
The tags you can apply are fixed, but you can have more than one by using a comma separator, for example walkable,detaching.
What do the different tags do?
- ballbuster
- Pops any container ball and releases its children. Container balls are those that have a contains attribute. The existing ones in the game are: Beauty, Ugly, ZBombMom and Bit ("contains" a Pilot).
- break=1
- Can be destroyed by bombs, Bits & PixelProducts & ZBombs, a subtype of break=X.
- break=2
- Can be destroyed by bombs, Bits & PixelProducts but not ZBombs, a subtype of break=X.
- break=X
- Specifies the "damage" needed to break this object. If a Goo Ball explodes, it deals "damage" to all geometry within the explosion radius, linearly scaled from the explosion force at the center to 0 at the edge. If the center of a breakable geometry object takes enough damage in one hit, it breaks. NOTE: This experimentation was done after the latest version of WooGLE was released, you you need to modify it by hand.
- deadly
- Kills all balls on contact (* see note on compositegeom below)
- mostlydeadly
- Kills all balls except those with the attribute invulnerable=true (Bone, Bombs, and Anchors)
(* see note on compositegeom below) - detaching
- Detaches any ball from a structure, even the un-detachable.
- geomkiller
- Destroys non-static geometry objects on contact. Note: If 2 geomkiller objects come into contact with each other, only one will explode - which one seems consistent but "unpredictable"
- kindasticky
- Removed in v0.70 (**see below)
- stopsign
- Balls that make contact with this will reverse direction, so it's effectively a "stop sign" indicating that they should not walk off a cliff etc. This has no effect on thrown, flying, jumping, falling or climbing balls. Note: If a ball falls into a stopsign area, and lands on a walkable surface it will be thrown (violently) to the nearest edge of the stopsign shape, even if that's straight down into (inside) the floor.
- unwalkable
- Balls will not walk or roll on this surface, they will just sit still.
- walkable
- Balls will walk or roll on this surface (default if tag field is left blank)
- nodrag
- Balls cannot be dragged within this volume. Automatically becomes non-solid. Discovered by MyGod long after Daft as Brush left, so it needs to be added in by hand in WooGLE.
* Notes about compositegeom objects and tags
- Only the tag applied to the compgeom itself has any effect. Tags applied to child items are ignored.
- The game doesn't process the deadly tag 100% correctly on compositegeom objects. This gets a bit complicated...
When a compgeom is tagged as deadly it does not kill "sticky" things.
StickyBombs & AnchorStickys never die. Pokeys will die if they just fall into it, but survive if they are trying to attach.Tagging as mostlydeadly instead will always kill Pokeys and most other balls, but won't kill Boney, Bombs and Anchors.
Tagging it as both, deadly,mostlydeadly, makes it kill everything except StickyAnchors and StickyBombs.
The Solution! In addition to the deadly or mostlydeadly tags, also add detaching. This makes a compositegeom act exactly the same as any other geometry.. deadly kills everything!
** Note on kindasticky
This value attribute is present in one of the original game levels, but it looks to be there by mistake. In Second Hand Smoke the main platform is tagged kindasticky,walkable, however the kindasticky has absolutely no effect.
There is, however, a material called kindasticky, which is never used in any of the original levels. Most likely, 2D Boy meant to set the material of the platform to kindasticky, but accidentally put it in the tag field instead.
Mac .png.binltl File Format
On the Mac, raster files are stored in a different file format, suffixed .png.binltl. These files are neither PNG format nor are they encrypted.
The format of the file is as follows. Note that all data types are little-endian.
| Offset | Datatype | Description |
|---|---|---|
| 0x00 | unsigned 16-bit int | width of the final image |
| 0x02 | unsigned 16-bit int | height of the final image |
| 0x04 | unsigned 32-bit int | size of compressed data |
| 0x08 | unsigned 32-bit int | size of uncompressed data |
| 0x12 | ... | compressed image data |
The image data is compressed using zlib deflate. When uncompressed it is a stream of RGBA bytes in that order, so four bytes per pixel.
The actual dimensions of the uncompressed image are always square, with each side being a power of two. The dimensions are the smallest power-of-two square that completely encloses the actual source image (whose size appears in the header).
Thus, a 18x12 image would be stored in a 32x32 square, but a 512x512 image would be in a 512x512 square.
The square should be cropped to the image size specified in the header. Pixels outside these bounds have undefined values.
Particles - fx.xml.bin
The fx.xml.bin file stores the data of all particle effects in World of Goo.
They are used to create fire, smoke, rain, leaves falling in the wind, goo drops and trails, and a lot of other visual goo-dness.
There are 2 types of effect...
Point Source: Particles appear from a single point. eg. Fire, Trails, Explosions etc. Details here
Ambient: Particles appear at random positions and cover the whole screen. eg. Rain, Leaves, Snow Details here
The Level Editor Reference Guide has videos showing the different effects of each type.
<effects>
root of fx.xml
children: All the available <ambientparticleeffect> and <particleeffect>
<ambientparticleeffect>
Ambient effects can only be used in levels in a <particles> item.
children: 1 or more <particle>
<particleeffect>
Point Source particle effects can be used in levels (in particles, fire and signpost items) and they can also be used in Goo Balls.
children: 1 or more <particle>
<particle>
A single particle effect may contain a number of different elements which act in different ways. Smoke and Fire for example.
This tag sets the values for one particular type of particle in the effect.
children: [0-n] Any number (or none) <axialsinoffset>
<axialsinoffset>
Axial Sin Offset adds extra components to the motion of the particle on either the x or y axis. The original particle effects use at most 1 axialsinoffset on each axis, however you can have more than one on any axis if you wish.
Ambient Effects
Here is a list of all the Ambient Particle effects in the original World of Goo.
And below the "code" from the original fx.xml for each.
bigleaves1, smallleaves1, rainingleaves, rainingleavesRight, leavesRight,
snowSparse, snowDense, snowStorm, snowStormC3,
blackBallsRising, blackBallsRight, blackLeaves, blackLeavesHeavy,
rainStreaksHeavy, rainStreaksHeavyDistant, rainStreaksDown,
mistRight, breezeRight, breezeUpSlow, breezeDownSlow, breezeUp, mistUpSepia,
ish_BigLeaves, ish_SmallLeaves, ish_RainLeavesLeft, ish_RainLeavesUp, ish_RainLeavesUpRed,
ish_BreezeRight, ish_HeavyBreezeLeft, ish_HeavyBreezeUp, OOS_breezeRight
Up to Particle List bigleaves1:
<ambientparticleeffect name="bigleaves1" maxparticles="2">
  <particle image="IMAGE_FX_LEAF1,IMAGE_FX_LEAF2,IMAGE_FX_LEAF3,IMAGE_FX_LEAF4,IMAGE_FX_LEAF5"
            rotspeed="-6,-1"
            rotation="-6,-1"
            scale="0.4,0.5"
            directed="false"
            additive="false"
            speed="1.0,4.0"
            movedir="-80"
            movedirvar="10"
            acceleration="0,0">
    <axialsinoffset amp="5,25" freq="0.5,4" phaseshift="0.2,0.4" axis="x"/>
  </particle>
</ambientparticleeffect>
Up to Particle List smallleaves1:
<ambientparticleeffect name="smallleaves1" maxparticles="2">
  <particle image="IMAGE_FX_LEAF1,IMAGE_FX_LEAF2,IMAGE_FX_LEAF3,IMAGE_FX_LEAF4,IMAGE_FX_LEAF5"
            rotspeed="-6,-1"
            rotation="-6,-1"
            scale="0.3,0.4"
            directed="false"
            additive="false"
            speed="1.0,4.0"
            movedir="-80"
            movedirvar="10"
            acceleration="0,0">
    <axialsinoffset amp="5,25" freq="0.5,4" phaseshift="0.2,0.4" axis="x"/>
  </particle>
</ambientparticleeffect>
Up to Particle List rainingleaves:
<ambientparticleeffect name="rainingleaves" maxparticles="60">
  <particle image="IMAGE_FX_LEAF1,IMAGE_FX_LEAF2,IMAGE_FX_LEAF3,IMAGE_FX_LEAF4,IMAGE_FX_LEAF5"
            rotspeed="-6,-1"
            rotation="-6,-1"
            scale="0.2,0.5"
            directed="false"
            additive="false"
            speed="1.0,4.0"
            movedir="-80"
            movedirvar="10"
            acceleration="0,0">
    <axialsinoffset amp="5,25" freq="0.5,4" phaseshift="0.2,0.4" axis="x"/>
  </particle>
</ambientparticleeffect>
Up to Particle List rainingleavesRight:
  <ambientparticleeffect name="rainingleavesRight" maxparticles="60">
    <particle image="IMAGE_FX_LEAF1,IMAGE_FX_LEAF2,IMAGE_FX_LEAF3,IMAGE_FX_LEAF4,IMAGE_FX_LEAF5"
              rotspeed="-6,-1"
              rotation="-6,-1"
              scale="0.2,0.5"
              directed="false"
              additive="false"
              speed="1.0,4.0"
              movedir="-30"
              movedirvar="10"
              acceleration="0,0">
      <axialsinoffset amp="5,25" freq="0.5,4" phaseshift="0.2,0.4" axis="x"/>
    </particle>
  </ambientparticleeffect>
Up to Particle List leavesRight:
<ambientparticleeffect name="leavesRight" maxparticles="20">
    <particle image="IMAGE_FX_LEAF1,IMAGE_FX_LEAF2,IMAGE_FX_LEAF3,IMAGE_FX_LEAF4,IMAGE_FX_LEAF5"
              rotspeed="-6,-1"
              rotation="-6,-1"
              scale="0.2,0.5"
              directed="false"
              additive="false"
              speed="1.0,4.0"
              movedir="-30"
              movedirvar="10"
              acceleration="0,0">
      <axialsinoffset amp="5,25" freq="0.5,4" phaseshift="0.2,0.4" axis="x"/>
    </particle>
</ambientparticleeffect>
Up to Particle List snowSparse:
<ambientparticleeffect name="snowSparse" maxparticles="5">
  <particle image="IMAGE_FX_SNOWFLAKE1,IMAGE_FX_SNOWFLAKE2"
            rotspeed="-2,2"
            rotation="-180,180"
            scale=".75,1.25"
            directed="false"
            additive="false"
            speed="1.0,4.0"
            movedir="-90"
            movedirvar="10"
            acceleration="0,0">
    <axialsinoffset amp="5,25" freq="0.5,4" phaseshift="0.2,0.4" axis="x"/>
  </particle>
</ambientparticleeffect>
Up to Particle List snowDense:
<ambientparticleeffect name="snowDense" maxparticles="16">
  <particle image="IMAGE_FX_SNOWFLAKE1,IMAGE_FX_SNOWFLAKE2"
            rotspeed="-2,2"
            rotation="-180,180"
            scale=".75,1.25"
            directed="false"
            additive="false"
            speed="1.0,4.0"
            movedir="-90"
            movedirvar="10"
            acceleration="0,0">
    <axialsinoffset amp="5,25" freq="0.5,4" phaseshift="0.2,0.4" axis="x"/>
  </particle>
</ambientparticleeffect>
Up to Particle List snowStorm:
<ambientparticleeffect name="snowStorm" maxparticles="26">
  <particle image="IMAGE_FX_SNOWFLAKE1,IMAGE_FX_SNOWFLAKE2"
            rotspeed="-2,2"
            rotation="-180,180"
            scale="1,2"
            directed="false"
            additive="false"
            speed="4.0,8.0"
            movedir="-10"
            movedirvar="10"
            acceleration="0,0">
    <axialsinoffset amp="5,25" freq="0.5,4" phaseshift="0.2,0.4" axis="x"/>
  </particle>
</ambientparticleeffect>
Up to Particle List snowStormC3:
<ambientparticleeffect name="snowStormC3" maxparticles="64">
  <particle image="IMAGE_FX_SNOWFLAKE1,IMAGE_FX_SNOWFLAKE2"
            rotspeed="-2,2"
            rotation="-180,180"
            scale="1,2"
            directed="false"
            additive="false"
            speed="3.0,6.0"
            movedir="-80"
            movedirvar="10"
            acceleration="0,0">
    <axialsinoffset amp="5,25" freq="0.5,4" phaseshift="0.2,0.4" axis="x"/>
  </particle>
</ambientparticleeffect>
Up to Particle List blackBallsRising:
<ambientparticleeffect name="blackBallsRising" maxparticles="6">
  <particle image="IMAGE_FX_SNOWFLAKE_BLACK"
            rotspeed="-1,1"
            rotation="-180,180"
            scale="0.25,1"
            directed="false"
            additive="false"
            speed="1.0,3.0"
            movedir="90"
            movedirvar="10"
            acceleration="0,0">
    <axialsinoffset amp="5,25" freq="0.5,4" phaseshift="0.2,0.4" axis="x"/>
  </particle>
</ambientparticleeffect>
Up to Particle List blackBallsRight:
<ambientparticleeffect name="blackBallsRight" maxparticles="10">
  <particle image="IMAGE_FX_SNOWFLAKE_BLACK"
            rotspeed="-1,1"
            rotation="-180,180"
            scale="0.25,1"
            directed="false"
            additive="false"
            speed="3.0,5.0"
            movedir="0"
            movedirvar="10"
            acceleration="0,0">
    <axialsinoffset amp="5,25" freq="0.5,4" phaseshift="0.2,0.4" axis="x"/>
  </particle>
</ambientparticleeffect>
Up to Particle List blackLeaves:
<ambientparticleeffect name="blackLeaves" maxparticles="5">
  <particle image="IMAGE_FX_SNOWFLAKE_BLACK"
            rotspeed="-2,2"
            rotation="-180,180"
            scale="0.25,1.0"
            directed="false"
            additive="false"
            speed="3.0,5.0"
            movedir="-20"
            movedirvar="10"
            acceleration="0,-0.03">
    <axialsinoffset amp="5,15" freq="0.5,3" phaseshift="0.2,0.4" axis="x"/>
    <axialsinoffset amp="30,60" freq="0.5,3" phaseshift="0.2,0.4" axis="y"/>
  </particle>
</ambientparticleeffect>
Up to Particle List blackLeavesHeavy:
<ambientparticleeffect name="blackLeavesHeavy" maxparticles="45">
  <particle image="IMAGE_FX_SNOWFLAKE_BLACK"
            rotspeed="-2,2"
            rotation="-180,180"
            scale="0.25,1.0"
            directed="false"
            additive="false"
            speed="3.0,5.0"
            movedir="-20"
            movedirvar="10"
            acceleration="0,-0.03">
    <axialsinoffset amp="5,15" freq="0.5,3" phaseshift="0.2,0.4" axis="x"/>
    <axialsinoffset amp="30,60" freq="0.5,3" phaseshift="0.2,0.4" axis="y"/>
  </particle>
</ambientparticleeffect>
Up to Particle List rainStreaksHeavy:
<ambientparticleeffect name="rainStreaksHeavy" maxparticles="20" margin="384">
  <particle image="IMAGE_FX_RAINSTREAK"
            rotation="0,0"
            scale="0.5,3"
            directed="true"
            additive="false"
            speed="40.0,80.0"
            movedir="-5"
            movedirvar="5"
            acceleration="0,-0.1">
  </particle>
</ambientparticleeffect>
Up to Particle List rainStreaksHeavyDistant:
<ambientparticleeffect name="rainStreaksHeavyDistant" maxparticles="20">
  <particle image="IMAGE_FX_RAINSTREAK"
            rotation="0,0"
            scale="0.05,1"
            directed="true"
            additive="false"
            speed="10.0,20.0"
            movedir="-5"
            movedirvar="5"
            acceleration="0,0">
  </particle>
</ambientparticleeffect>
Up to Particle List rainStreaksDown:
  <ambientparticleeffect name="rainStreaksDown" maxparticles="50" margin="384">
    <particle image="IMAGE_FX_RAINSTREAK"
              rotation="0,0"
              scale="1,2.5"
              directed="true"
              additive="false"
              speed="20.0,40.0"
              movedir="-70"
              movedirvar="5"
              acceleration="0,-0.3">
    </particle>
  </ambientparticleeffect>
Up to Particle List mistRight:
<ambientparticleeffect name="mistRight" maxparticles="6" margin="500">
  <particle image="IMAGE_FX_WINDWHITE"
            rotation="-180,180"
            scale="4,6"
            directed="true"
            additive="true"
            speed="30,50"
            movedir="0"
            movedirvar="5"
            acceleration="0,0">
  </particle>
</ambientparticleeffect>
Up to Particle List breezeRight:
<ambientparticleeffect name="breezeRight" maxparticles="6" margin="500">
  <particle image="IMAGE_FX_WINDWHITE"
            scale="4,6"
            directed="true"
            additive="true"
            speed="8,12"
            movedir="0"
            movedirvar="5"
            acceleration="0,0">
  </particle>
</ambientparticleeffect>
Up to Particle List breezeUpSlow:
<ambientparticleeffect name="breezeUpSlow" maxparticles="6" margin="500">
  <particle image="IMAGE_FX_WINDWHITE"
            scale="4,6"
            directed="false"
            additive="true"
            speed="4,5"
            movedir="90"
            movedirvar="5"
            acceleration="0,0">
  </particle>
</ambientparticleeffect>
Up to Particle List breezeDownSlow:
<ambientparticleeffect name="breezeDownSlow" maxparticles="6" margin="500">
  <particle image="IMAGE_FX_WINDWHITE"
            scale="4,6"
            directed="false"
            additive="true"
            speed="4,5"
            movedir="270"
            movedirvar="5"
            acceleration="0,0">
  </particle>
</ambientparticleeffect>
Up to Particle List breezeUp:
<ambientparticleeffect name="breezeUp" maxparticles="6" margin="500">
  <particle image="IMAGE_FX_WINDWHITE"
            scale="4,6"
            directed="false"
            additive="true"
            speed="12,16"
            movedir="90"
            movedirvar="5"
            acceleration="0,0">
  </particle>
</ambientparticleeffect>
Up to Particle List mistUpSepia:
<ambientparticleeffect name="mistUpSepia" maxparticles="10" margin="500">
  <particle image="IMAGE_FX_WINDSEPIA"
            rotation="0,0"
            scale="4,6"
            directed="false"
            additive="true"
            speed="1.0,4.0"
            movedir="90"
            movedirvar="10"
            acceleration="0,0">
    <axialsinoffset amp="5,25" freq="0.5,4" phaseshift="0.2,0.4" axis="x"/>
  </particle>
</ambientparticleeffect>
Up to Particle List ish_BigLeaves:
<ambientparticleeffect name="ish_BigLeaves" maxparticles="8">
  <particle image="IMAGE_FX_ISH_CHAR_0,IMAGE_FX_ISH_CHAR_1"
            rotspeed="-6,-1"
            rotation="-6,-1"
            scale="1.0,1.5"
            directed="false"
            additive="true"
            speed="1.0,4.0"
            movedir="-30"
            movedirvar="10"
            acceleration="0,0">
    <axialsinoffset amp="5,25" freq="0.5,4" phaseshift="0.2,0.4" axis="x"/>
  </particle>
</ambientparticleeffect>
Up to Particle List ish_SmallLeaves:
<ambientparticleeffect name="ish_SmallLeaves" maxparticles="8">
  <particle image="IMAGE_FX_ISH_CHAR_0,IMAGE_FX_ISH_CHAR_1"
            rotspeed="-6,-1"
            rotation="-6,-1"
            scale="0.75,1.0"
            directed="false"
            additive="true"
            speed="1.0,4.0"
            movedir="-30"
            movedirvar="10"
            acceleration="0,0">
    <axialsinoffset amp="5,25" freq="0.5,4" phaseshift="0.2,0.4" axis="x"/>
  </particle>
</ambientparticleeffect>
Up to Particle List ish_RainLeavesLeft:
<ambientparticleeffect name="ish_RainLeavesLeft" maxparticles="10">
  <particle image="IMAGE_FX_ISH_CHAR_0,IMAGE_FX_ISH_CHAR_1"
            rotspeed="-6,-1"
            rotation="-6,-1"
            scale="1.0,2.5"
            directed="false"
            additive="false"
            speed="10.0,30.0"
            movedir="180"
            movedirvar="10"
            acceleration="0,0">
    <axialsinoffset amp="5,25" freq="0.5,4" phaseshift="0.2,0.4" axis="x"/>
  </particle>
</ambientparticleeffect>
Up to Particle List ish_RainLeavesUp:
<ambientparticleeffect name="ish_RainLeavesUp" maxparticles="10">
  <particle image="IMAGE_FX_ISH_CHAR_0,IMAGE_FX_ISH_CHAR_1"
            rotspeed="-6,-1"
            rotation="-6,-1"
            scale="1.0,2.5"
            directed="false"
            additive="false"
            speed="3.0,8.0"
            movedir="90"
            movedirvar="10"
            acceleration="0,0">
    <axialsinoffset amp="5,25" freq="0.5,4" phaseshift="0.2,0.4" axis="x"/>
  </particle>
</ambientparticleeffect>
Up to Particle List ish_RainLeavesUpRed:
<ambientparticleeffect name="ish_RainLeavesUpRed" maxparticles="40">
  <particle image="IMAGE_FX_ISHR_CHAR_0,IMAGE_FX_ISHR_CHAR_1"
            rotspeed="-6,-1"
            rotation="-6,-1"
            scale="1.0,2.5"
            directed="false"
            additive="false"
            speed="3.0,8.0"
            movedir="90"
            movedirvar="10"
            acceleration="0,0">
    <axialsinoffset amp="5,25" freq="0.5,4" phaseshift="0.2,0.4" axis="x"/>
  </particle>
</ambientparticleeffect>
Up to Particle List ish_BreezeRight:
<ambientparticleeffect name="ish_BreezeRight" maxparticles="6" margin="400">
  <particle image="IMAGE_FX_WINDISH"
            scale="4,6"
            directed="true"
            additive="true"
            speed="8,12"
            movedir="0"
            movedirvar="5"
            acceleration="0,0">
  </particle>
</ambientparticleeffect>
Up to Particle List ish_HeavyBreezeLeft:
<ambientparticleeffect name="ish_HeavyBreezeLeft" maxparticles="12" margin="400">
  <particle image="IMAGE_FX_WINDISH"
            scale="4,6"
            directed="true"
            additive="true"
            speed="8,12"
            movedir="180"
            movedirvar="5"
            acceleration="0,0">
  </particle>
</ambientparticleeffect>
Up to Particle List ish_HeavyBreezeUp:
<ambientparticleeffect name="ish_HeavyBreezeUp" maxparticles="12" margin="400">
  <particle image="IMAGE_FX_WINDISH"
            scale="4,6"
            directed="true"
            additive="true"
            speed="8,12"
            movedir="90"
            movedirvar="5"
            acceleration="0,0">
  </particle>
</ambientparticleeffect>
Up to Particle List OOS_breezeRight:
<ambientparticleeffect name="OOS_breezeRight" maxparticles="6" margin="1000">
  <particle image="IMAGE_FX_WINDSEPIA"
            scale="8,10"
            directed="true"
            additive="true"
            speed="8,12"
            movedir="0"
            movedirvar="5"
            acceleration="0,0">
  </particle>
</ambientparticleeffect>
Point Source Effects
Here is a list of all the Point Source Particle effects in the original World of Goo.
And below the "code" from the original fx.xml for each.
unlockfuse, unlockburst, snowStormFromPoint, splash, gooFallWide2, gooSplatter,
gooSplatterSubtle, mistUp, fireStack1, fireStackSmaller1, fireStackSmaller2,
fireRobotHead, fireStackSquat, fireStackLanternBw, fireBallBurn, thruster,
fireArmBurn, poisonBallBurn, poisonArmBurn, blackSmokeRising, bubblesRisingFromPoint,
bubblesRisingFromPointSlow, wogcSmoke, wogcSmokeIsh, whiteSmokeRising, sleepyZzz,
ish_sleepyZzz, ishr_sleepyZzz, signpostAlert, signpostAlertMom, whistle,
worldMap_FactorySmoke, BurningManSmoke, RobotHeadSmoke, distantSmokestack,
worldMap_FactorySmokeWhite, cigSmoke, gentleFactorySmoke, puffyFactorySmoke,
gentleFactorySmokeSepia, matchSmoke, gooTankStream, gooDrips, polFountain1, polFountain2,
gooMist, timebugFizz, flashes, tubeAirFlowUp, tubeAirFlowLeft, geomExplosionDust,
ish_smallfire, ish_FlingTrail, ishr_FlingTrail, ish_gpu_bitspew, ish_bitPop, beautypop,
flowerDust, OOS_gooDrips, OOS_gooGlobs, BallExplode_Fuse, BallExplode_Bomb, BallExplode_ISH,
ISH_undeleteFizz, ish_bubbles
Up to Particle List unlockfuse:
<particleeffect name="unlockfuse" maxparticles="30" rate="0.5">
  <particle image="IMAGE_FX_GOOGLOB"
            rotspeed="0.2"
            directed="false"
            scale="0.5,1.0"
            finalscale="0"
            fade="false"
            additive="false"
            lifespan="3,4"
            speed="0.2,0.4"
            movedir="0"
            movedirvar="180"
            acceleration="0,0"/>
</particleeffect>
Up to Particle List unlockburst:
<particleeffect name="unlockburst" maxparticles="40">
  <particle image="IMAGE_FX_GOODRIP1"
            directed="true"
            scale="0.35,0.75"
            finalscale="0"
            fade="false"
            additive="false"
            lifespan="1.4,2"
            dampening="0.98"
            speed="3,12"
            movedir="90"
            movedirvar="20"
            acceleration="0,0" />
  <particle image="IMAGE_FX_GOOGLOB"
          directed="true"
          scale="0.25,0.8"
          finalscale="0"
          fade="false"
          additive="false"
          lifespan="1.4,2"
          dampening="0.98"
          speed="2,7"
          movedir="90"
          movedirvar="30"
          acceleration="0,-0.1" />
</particleeffect>
Up to Particle List snowStormFromPoint:
  <particleeffect name="snowStormFromPoint" maxparticles="60" rate="0.22">
    <particle image="IMAGE_FX_SNOWFLAKE1,IMAGE_FX_SNOWFLAKE2"
            rotspeed="-2,2"
            rotation="-180,180"
            scale="1,1.5"
			lifespan="6"
            directed="false"
            additive="false"
            speed="9.0,12.0"
            movedir="-10"
            movedirvar="20"
            acceleration="0,0"
			fade="true">
		<axialsinoffset amp="5,25" freq="0.5,4" phaseshift="0.2,0.4" axis="x"/>
    </particle>
  </particleeffect>
Up to Particle List splash:
<particleeffect name="splash" maxparticles="20">
  <particle image="IMAGE_FX_WATERDROP1"
            directed="true"
            scale="0.25,1"
            finalscale="0"
            fade="true"
            lifespan="1,1.6"
            dampening="0.98"
            speed="6,16"
            movedir="90"
            movedirvar="60"
            acceleration="0,-0.2" />
</particleeffect>
Up to Particle List gooFallWide2:
<particleeffect name="gooFallWide2" maxparticles="24" rate="0.025">
  <particle image="IMAGE_FX_GOOFALLWIDE2"
            directed="false"
            scale="4.0,4.0"
			finalscale="3.0"
            fade="false"
            additive="false"
            lifespan="11"
            speed="0.3,0.5"
            movedir="90"
            movedirvar="0"
            acceleration="0,0.02"/>
</particleeffect>
Up to Particle List gooSplatter:
<particleeffect name="gooSplatter" maxparticles="10" rate="0.15">
  <particle image="IMAGE_FX_GOODRIP1"
            directed="true"
            scale="0.6"
            finalscale="0.0"
            fade="true"
            additive="false"
            lifespan="1.2"
            speed="3.0,6.0"
            movedir="270"
            movedirvar="180"
            acceleration="0,-0.6"/>
</particleeffect>
Up to Particle List gooSplatterSubtle:
<particleeffect name="gooSplatterSubtle" maxparticles="10" rate="0.15">
    <particle image="IMAGE_FX_GOODRIP1"
              directed="true"
              scale="0.0"
              finalscale="0.6"
              fade="true"
              additive="false"
              lifespan="1.2"
              speed="3.0,6.0"
              movedir="270"
              movedirvar="180"
              acceleration="0,-0.6"/>
  </particleeffect>
Up to Particle List mistUp:
<particleeffect name="mistUp" maxparticles="10" rate="0.08" margin="400">
  <particle image="IMAGE_FX_MIST1"
            rotspeed="-4,4"
            rotation="-180,180"
            scale="0.5,1"
            finalscale="14"
            fade="true"
            lifespan="0.8,1.5"
            directed="false"
            additive="false"
            speed="0.5,3.0"
            movedir="90"
            movedirvar="60"
            acceleration="0,0.1">
  </particle>
</particleeffect>
Up to Particle List fireStack1:
<particleeffect name="fireStack1" maxparticles="30" rate="0.3">
  <particle image="IMAGE_FX_FIREMAIN1"
            directed="false"
            rotspeed="-4,-2"
            rotation="-180,180"
            scale="2.05,3.05"
            finalscale="0.35"
            fade="true"
            additive="true"
            lifespan="1.7,1.7"
            speed="9.5"
            movedir="90"
            movedirvar="12"
            acceleration="0,0.12"/>
  <particle image="IMAGE_FX_FIREMAIN2"
            directed="false"
            rotspeed="-4,-2"
            rotation="-180,180"
            scale="3.05,4.05"
            finalscale="0.1"
            fade="true"
            additive="true"
            lifespan="1.7,1.7"
            speed="9.5"
            movedir="90"
            movedirvar="5"
            acceleration="0,0.12"/>
</particleeffect>
Up to Particle List fireStackSmaller1:
 <particleeffect name="fireStackSmaller1" maxparticles="20" rate="0.3">
    <particle image="IMAGE_FX_FIREMAIN1"
              directed="false"
              rotspeed="-4,-2"
              rotation="-180,180"
              scale="1.35,1.95"
              finalscale="0.35"
              fade="true"
              additive="true"
              lifespan="1,1"
              speed="7.5"
              movedir="90"
              movedirvar="12"
              acceleration="0,0.12"/>
    <particle image="IMAGE_FX_FIREMAIN2"
              directed="false"
              rotspeed="-4,-2"
              rotation="-180,180"
              scale="2.05,2.85"
              finalscale="0.1"
              fade="true"
              additive="true"
              lifespan="1,1"
              speed="7.5"
              movedir="90"
              movedirvar="5"
              acceleration="0,0.12"/>
  </particleeffect>
Up to Particle List fireStackSmaller2:
  <particleeffect name="fireStackSmaller2" maxparticles="20" rate="0.3">
    <particle image="IMAGE_FX_FIREMAIN1"
              directed="false"
              rotspeed="-4,-2"
              rotation="-180,180"
              scale="0.4,0.9"
              finalscale="0.1"
              fade="true"
              additive="true"
              lifespan="0.6,0.8"
              speed="3.5"
              movedir="90"
              movedirvar="12"
              acceleration="0,0.12"/>
    <particle image="IMAGE_FX_FIREMAIN2"
              directed="false"
              rotspeed="-4,-2"
              rotation="-180,180"
              scale="0.4,0.9"
              finalscale="0.02"
              fade="true"
              additive="true"
              lifespan="0.6,0.8"
              speed="3.5"
              movedir="90"
              movedirvar="5"
              acceleration="0,0.12"/>
  </particleeffect>
Up to Particle List fireRobotHead:
   <particleeffect name="fireRobotHead" maxparticles="20" rate="0.3">
    <particle image="IMAGE_FX_FIREMAIN1"
              directed="false"
              rotspeed="-4,-2"
              rotation="-180,180"
              scale="0.9,1.25"
              finalscale="0.35"
              fade="true"
              additive="true"
              lifespan="1,1"
              speed="6.5"
              movedir="90"
              movedirvar="12"
              acceleration="0,0.12"/>
    <particle image="IMAGE_FX_FIREMAIN2"
              directed="false"
              rotspeed="-4,-2"
              rotation="-180,180"
              scale="1.5,2.0"
              finalscale="0.1"
              fade="true"
              additive="true"
              lifespan="1,1"
              speed="6.5"
              movedir="90"
              movedirvar="5"
              acceleration="0,0.12"/>
  </particleeffect>
Up to Particle List fireStackSquat:
   <particleeffect name="fireStackSquat" maxparticles="20" rate="0.3">
    <particle image="IMAGE_FX_FIREMAIN1"
              directed="false"
              rotspeed="-4,-2"
              rotation="-180,180"
              scale="1.35,1.95"
              finalscale="0.35"
              fade="true"
              additive="true"
              lifespan="1,1"
              speed="4"
              movedir="90"
              movedirvar="12"
              acceleration="0,0.12"/>
    <particle image="IMAGE_FX_FIREMAIN2"
              directed="false"
              rotspeed="-4,-2"
              rotation="-180,180"
              scale="2.05,2.85"
              finalscale="0.1"
              fade="true"
              additive="true"
              lifespan="1,1"
              speed="4"
              movedir="90"
              movedirvar="5"
              acceleration="0,0.12"/>
  </particleeffect>
Up to Particle List fireStackLanternBw:
   <particleeffect name="fireStackLanternBw" maxparticles="16" rate="0.3">
    <particle image="IMAGE_FX_FIREMAIN1BW"
              directed="false"
              rotspeed="-4,-2"
              rotation="-180,180"
              scale="0.2,0.3"
              finalscale="0.1"
              fade="true"
              additive="true"
              lifespan="1,1"
              speed="1"
              movedir="90"
              movedirvar="12"
              acceleration="0,0.01"/>
    <particle image="IMAGE_FX_FIREMAIN2BW"
              directed="false"
              rotspeed="-4,-2"
              rotation="-180,180"
              scale="0.2,0.4"
              finalscale="0.05"
              fade="true"
              additive="true"
              lifespan="1,1"
              speed="1"
              movedir="90"
              movedirvar="5"
              acceleration="0,0.01"/>
  </particleeffect>
Up to Particle List fireBallBurn:
  <particleeffect name="fireBallBurn" maxparticles="12" rate="0.2">
    <particle image="IMAGE_FX_FIREMAIN1"
              directed="false"
              rotspeed="-4,-2"
              rotation="-180,180"
              scale="0.3,0.6"
              finalscale="0.1"
              fade="true"
              additive="true"
              lifespan="0.5,0.8"
              speed="1.5"
              movedir="90"
              movedirvar="12"
              acceleration="0,0.12"/>
    <particle image="IMAGE_FX_FIREMAIN2"
              directed="false"
              rotspeed="-4,-2"
              rotation="-180,180"
              scale="0.3,0.6"
              finalscale="0.02"
              fade="true"
              additive="true"
              lifespan="0.5,0.8"
              speed="1.5"
              movedir="90"
              movedirvar="5"
              acceleration="0,0.12"/>
  </particleeffect>
Up to Particle List thruster:
  <particleeffect name="thruster" maxparticles="30" rate="1.5" >
    <particle image="IMAGE_FX_FIREMAIN1"
              directed="false"
              rotspeed="-4,-2"
              rotation="-180,180"
              scale="0.08,0.14"
              finalscale="0.3"
              fade="true"
              additive="true"
              lifespan="0.25,0.45"
              speed="10"
              movedir="90"
              movedirvar="4"
              acceleration="0,0"/>
    <particle image="IMAGE_FX_FIREMAIN2"
              directed="false"
              rotspeed="-4,-2"
              rotation="-180,180"
              scale="0.1,0.1"
              finalscale="0.4"
              fade="true"
              additive="true"
              lifespan="0.38,0.40"
              speed="10"
              movedir="90"
              movedirvar="2"
              acceleration="0,0"/>
  </particleeffect>
Up to Particle List fireArmBurn:
  <particleeffect name="fireArmBurn" maxparticles="16" rate="0.3">
    <particle image="IMAGE_FX_FIREMAIN1"
              directed="false"
              rotspeed="-4,-2"
              rotation="-180,180"
              scale="0.1,0.2"
              finalscale="0.5"
              fade="true"
              additive="true"
              lifespan="0.2,0.3"
              speed="0.5"
              movedir="0"
              movedirvar="180"
              acceleration="0,0"/>
    <particle image="IMAGE_FX_FIREMAIN2"
              directed="false"
              rotspeed="-4,-2"
              rotation="-180,180"
              scale="0.1,0.2"
              finalscale="0.6"
              fade="true"
              additive="true"
              lifespan="0.2,0.3"
              speed="0.5"
              movedir="0"
              movedirvar="180"
              acceleration="0,0"/>
  </particleeffect>
Up to Particle List poisonBallBurn:
  <particleeffect name="poisonBallBurn" maxparticles="12" rate="0.2">
    <particle image="IMAGE_FX_GOOGLOB"
              directed="false"
              rotspeed="-4,-2"
              rotation="-180,180"
              scale="0.3,0.6"
              finalscale="0.0"
              fade="true"
              additive="false"
              lifespan="0.25,0.8"
              speed="0.1,6.5"
              movedir="0"
              movedirvar="180"
              acceleration="0,0.12"/>
  </particleeffect>
Up to Particle List poisonArmBurn:
  <particleeffect name="poisonArmBurn" maxparticles="30" rate="0.5">
  <particle image="IMAGE_FX_GOOGLOB"
            rotspeed="0.2"
            directed="false"
            scale="0.5,1.0"
            finalscale="0"
            fade="false"
            additive="false"
            lifespan="3,4"
            speed="0.2,0.4"
            movedir="0"
            movedirvar="180"
            acceleration="0,0"/>
</particleeffect>
Up to Particle List blackSmokeRising:
<particleeffect name="blackSmokeRising" maxparticles="40" rate="0.3">
  <particle image="IMAGE_FX_SMOKEBLACK"
            rotspeed="-4,4"
            rotation="-180,180"
            scale="0"
            finalscale="6"
            directed="false"
            additive="false"
            speed="6,9"
            fade="true"
            lifespan="1.6,2"
            movedir="90"
            movedirvar="15"
            acceleration="0,0.1">
  </particle>
</particleeffect>
Up to Particle List bubblesRisingFromPoint:
  <particleeffect name="bubblesRisingFromPoint" maxparticles="20" rate="0.1">
    <particle image="IMAGE_FX_BUBBLE1"
              rotspeed="-4,4"
              rotation="-180,180"
              scale="0"
              finalscale="1.1"
              directed="false"
              additive="false"
              speed="1,8"
              fade="true"
              lifespan="1.8,2.0"
              movedir="90"
              movedirvar="30"
              acceleration="0,0.1">
      <axialsinoffset amp="5,25" freq="0.5,4" phaseshift="0.2,0.4" axis="x"/>
    </particle>
  </particleeffect>
Up to Particle List bubblesRisingFromPointSlow:
    <particleeffect name="bubblesRisingFromPointSlow" maxparticles="20" rate="0.1">
    <particle image="IMAGE_FX_BUBBLE1"
              rotspeed="-4,4"
              rotation="-180,180"
              scale="0"
              finalscale="1.5"
              directed="false"
              additive="false"
              speed="0.1,1.25"
              fade="true"
              lifespan="1.8,2.0"
              movedir="90"
              movedirvar="60"
              acceleration="0,0.1">
      <axialsinoffset amp="5,25" freq="0.5,4" phaseshift="0.2,0.4" axis="x"/>
    </particle>
  </particleeffect>
Up to Particle List wogcSmoke:
  <particleeffect name="wogcSmoke" maxparticles="30" rate="0.1">
  <particle image="IMAGE_FX_SMOKEBLACK"
            rotspeed="-1,1"
            rotation="-180,180"
            scale="4"
            finalscale="6"
            directed="false"
            additive="false"
            speed="2,4"
            fade="true"
            lifespan="4,5"
            movedir="90"
            movedirvar="15"
            acceleration="0,0.01">
  </particle>
</particleeffect>
Up to Particle List wogcSmokeIsh:
  <particleeffect name="wogcSmokeIsh" maxparticles="30" rate="0.1">
  <particle image="IMAGE_FX_SMOKEGREEN"
            rotspeed="-1,1"
            rotation="-180,180"
            scale="4"
            finalscale="6"
            directed="false"
            additive="false"
            speed="2,4"
            fade="true"
            lifespan="4,5"
            movedir="90"
            movedirvar="15"
            acceleration="0,0.01">
  </particle>
</particleeffect>
Up to Particle List whiteSmokeRising:
<particleeffect name="whiteSmokeRising" maxparticles="30" rate="0.3">
  <particle image="IMAGE_FX_SMOKEWHITE"
            rotspeed="-4,4"
            rotation="-180,180"
            scale="4,5"
            finalscale="6"
            directed="false"
            additive="false"
            speed="6,9"
            fade="true"
            lifespan="1.6,2"
            movedir="90"
            movedirvar="15"
            acceleration="0,0.1">
  </particle>
</particleeffect>
Up to Particle List sleepyZzz:
<particleeffect name="sleepyZzz" maxparticles="7" rate="0.06">
  <particle image="IMAGE_FX_SLEEPYZZZ"
            rotspeed="0"
            directed="false"
            scale="0.2"
            finalscale="0.8"
            fade="true"
            additive="false"
            lifespan="0.8"
            speed="0.5,0.9"
            movedir="90"
            movedirvar="90"
            acceleration="0,0.01">
    <axialsinoffset amp="5,10" freq="2,3" phaseshift="0.2,0.4" axis="x"/>
  </particle>
</particleeffect>
Up to Particle List ish_sleepyZzz:
<particleeffect name="ish_sleepyZzz" maxparticles="7" rate="0.06">
  <particle image="IMAGE_FX_ISH_SLEEPYZZZ"
            rotspeed="0"
            directed="false"
            scale="0.2"
            finalscale="0.8"
            fade="true"
            additive="false"
            lifespan="0.8"
            speed="0.5,0.9"
            movedir="90"
            movedirvar="90"
            acceleration="0,0.01">
    <axialsinoffset amp="5,10" freq="2,3" phaseshift="0.2,0.4" axis="x"/>
  </particle>
</particleeffect>
Up to Particle List ishr_sleepyZzz:
<particleeffect name="ishr_sleepyZzz" maxparticles="7" rate="0.06">
  <particle image="IMAGE_FX_ISHR_SLEEPYZZZ"
            rotspeed="0"
            directed="false"
            scale="0.2"
            finalscale="0.8"
            fade="true"
            additive="false"
            lifespan="0.8"
            speed="0.5,0.9"
            movedir="90"
            movedirvar="90"
            acceleration="0,0.01">
    <axialsinoffset amp="5,10" freq="2,3" phaseshift="0.2,0.4" axis="x"/>
  </particle>
</particleeffect>
Up to Particle List signpostAlert:
  <particleeffect name="signpostAlert" maxparticles="4" rate="0.05">
    <particle image="IMAGE_FX_SIGNPOSTEXCLAIMATION"
              rotspeed="0"
              rotation="-20,20"
              directed="false"
              scale="0.5, 0.8"
              finalscale="1.0"
              fade="true"
              additive="false"
              lifespan="0.6"
              speed="1,3"
              movedir="90"
              movedirvar="45"
              acceleration="0,0.01">
      <axialsinoffset amp="5,10" freq="5,8" phaseshift="0.2,0.4" axis="x"/>
    </particle>
  </particleeffect>
Up to Particle List signpostAlertMom:
  <particleeffect name="signpostAlertMom" maxparticles="4" rate="0.05">
    <particle image="IMAGE_FX_SNOWFLAKE_BLACK"
              rotspeed="0"
              rotation="-20,20"
              directed="false"
              scale="0.5, 0.8"
              finalscale="1.0"
              fade="true"
              additive="false"
              lifespan="0.6"
              speed="1,3"
              movedir="90"
              movedirvar="45"
              acceleration="0,0.01">
      <axialsinoffset amp="5,10" freq="5,8" phaseshift="0.2,0.4" axis="x"/>
    </particle>
  </particleeffect>
Up to Particle List whistle:
  <particleeffect name="whistle" maxparticles="10" rate="0.2">
    <particle image="IMAGE_FX_NOTE1,IMAGE_FX_NOTE2,IMAGE_FX_NOTE3"
              rotspeed="0"
              rotation="-20,20"
              directed="false"
              scale="0.5, 0.8"
              finalscale="1.0"
              fade="true"
              additive="false"
              lifespan="0.6"
              speed="1,3"
              movedir="90"
              movedirvar="45"
              acceleration="0,0.01">
      <axialsinoffset amp="5,10" freq="5,8" phaseshift="0.2,0.4" axis="x"/>
    </particle>
  </particleeffect>
Up to Particle List worldMap_FactorySmoke:
  <particleeffect name="worldMap_FactorySmoke" maxparticles="38" rate="0.6">
  <particle image="IMAGE_FX_SMOKEBLACK"
            rotspeed="-4,4"
            rotation="-180,180"
            scale="0.5,1.2"
            finalscale="3"
            directed="false"
            additive="false"
            speed="1,3"
            fade="true"
            lifespan="1.6,2"
            movedir="120"
            movedirvar="15"
            acceleration="0.2,0.0">
  </particle>
</particleeffect>
Up to Particle List BurningManSmoke:
<particleeffect name="BurningManSmoke" maxparticles="36" rate="0.4">
  <particle image="IMAGE_FX_SMOKEBLACK"
            rotspeed="-4,4"
            rotation="-180,180"
            scale="0.5,1.2"
            finalscale="6"
            directed="false"
            additive="false"
            speed="1,3"
            fade="true"
            lifespan="1.2,2.0"
            movedir="120"
            movedirvar="15"
            acceleration="0.15,0.05">
  </particle>
</particleeffect>
Up to Particle List RobotHeadSmoke:
<particleeffect name="RobotHeadSmoke" maxparticles="48" rate="0.15">
  <particle image="IMAGE_FX_SMOKEBLACK"
            rotspeed="0,1"
            rotation="-180,180"
            scale="0.5,1.2"
            finalscale="6"
            directed="false"
            additive="false"
            speed="0.1,1"
            fade="true"
            lifespan="2.0,2.2"
            movedir="90"
            movedirvar="15"
            acceleration="0.0,0.05">
  </particle>
</particleeffect>
Up to Particle List distantSmokestack:
  <particleeffect name="distantSmokestack" maxparticles="18" rate="0.2">
    <particle image="IMAGE_FX_SMOKEBLACK"
              rotspeed="-4,4"
              rotation="-180,180"
              scale="0.25,0.5"
              finalscale="3"
              directed="false"
              additive="false"
              speed="0.2,2"
              fade="true"
              lifespan="1,1.4"
              movedir="90"
              movedirvar="5"
              acceleration="0.0,0.1">
    </particle>
    <particle image="IMAGE_FX_SMOKEBLACK"
              rotspeed="-4,4"
              rotation="-180,180"
              scale="0.25,0.6"
              finalscale="3"
              directed="false"
              additive="false"
              speed="0.1,2"
              fade="true"
              lifespan="0.6,1.0"
              movedir="90"
              movedirvar="15"
              acceleration="0.0,0.1">
    </particle>
  </particleeffect>
Up to Particle List worldMap_FactorySmokeWhite:
  <particleeffect name="worldMap_FactorySmokeWhite" maxparticles="38" rate="0.6">
    <particle image="IMAGE_FX_SMOKEWHITE"
              rotspeed="-4,4"
              rotation="-180,180"
              scale="0.5,1.2"
              finalscale="3"
              directed="false"
              additive="false"
              speed="1,3"
              fade="true"
              lifespan="1.6,2"
              movedir="120"
              movedirvar="15"
              acceleration="0.2,0.0">
    </particle>
  </particleeffect>
Up to Particle List cigSmoke:
<particleeffect name="cigSmoke" maxparticles="30" rate="0.3">
  <particle image="IMAGE_FX_WINDWHITE"
            scale="0.05,0.1"
            finalscale="0.8"
            directed="true"
            additive="false"
            speed="2,4"
            fade="true"
            lifespan="1.6,2"
            movedir="90"
            movedirvar="3"
            acceleration="0.01,0.0">
  </particle>
</particleeffect>
Up to Particle List gentleFactorySmoke:
<particleeffect name="gentleFactorySmoke" maxparticles="45" rate="0.125">
  <particle image="IMAGE_FX_WINDBLACK"
            scale="0.1,0.2"
            finalscale="2.1"
            directed="true"
            additive="false"
            speed="3,4"
            fade="true"
            lifespan="6.8,6.8"
            movedir="90"
            movedirvar="0.08"
            acceleration="0.01,0.0">
  </particle>
</particleeffect>
Up to Particle List puffyFactorySmoke:
<particleeffect name="puffyFactorySmoke" maxparticles="32" rate="0.2">
  <particle image="IMAGE_FX_SMOKEBLACK"
            rotspeed="-4,4"
            rotation="-180,180"
            scale="0.5,0.7"
            finalscale="3"
            directed="false"
            additive="false"
            speed="0.5,1"
            fade="true"
            lifespan="2,2.2"
            movedir="0"
            movedirvar="180"
            acceleration="0.0,0.0">
  </particle>
</particleeffect>
Up to Particle List gentleFactorySmokeSepia:
<particleeffect name="gentleFactorySmokeSepia" maxparticles="45" rate="0.125">
  <particle image="IMAGE_FX_WINDSEPIA"
            scale="0.1,0.2"
            finalscale="2.1"
            directed="true"
            additive="false"
            speed="3,4"
            fade="true"
            lifespan="6.8,6.8"
            movedir="90"
            movedirvar="0.08"
            acceleration="0.01,0.0">
  </particle>
</particleeffect>
Up to Particle List matchSmoke:
  <particleeffect name="matchSmoke" maxparticles="10" rate="0.08">
    <particle image="IMAGE_FX_SMOKEBLACK"
              scale="0.1,0.25"
              finalscale="4"
              directed="false"
              rotspeed="-4,4"
              additive="false"
              speed="1,3"
              fade="true"
              lifespan="1.6,2"
              movedir="90"
              movedirvar="3"
              acceleration="0.01,0.0">
    </particle>
  </particleeffect>
Up to Particle List gooTankStream:
  <particleeffect name="gooTankStream" maxparticles="40" rate="0.4">
    <particle image="IMAGE_FX_GOODRIP1"
              directed="true"
              scale="1,1"
              fade="false"
              additive="false"
              lifespan="0.6,0.6"
              speed="20,30"
              movedir="270"
              movedirvar="1"
              acceleration="0,0"/>
  </particleeffect>
Up to Particle List gooDrips:
  <particleeffect name="gooDrips" maxparticles="8" rate="0.06">
    <particle image="IMAGE_FX_GOODRIP1"
              directed="true"
              scale="0.2,0.5"
              fade="false"
              additive="false"
              lifespan="1.9,1.9"
              speed="4,6"
              movedir="270"
              movedirvar="0"
              acceleration="0,-0.01"/>
  </particleeffect>
Up to Particle List polFountain1:
  <particleeffect name="polFountain1" maxparticles="20" rate="0.25">
    <particle image="IMAGE_FX_GOODRIP1"
              directed="true"
              scale="0.0,0.0"
              finalscale="1.2"
              fade="true"
              additive="false"
              lifespan="0.8,0.8"
              speed="17,18"
              movedir="115"
              movedirvar="0.1"
              acceleration="0,-0.5"/>
  </particleeffect>
Up to Particle List polFountain2:
  <particleeffect name="polFountain2" maxparticles="30" rate="0.25">
    <particle image="IMAGE_FX_GOODRIP1"
              directed="true"
              scale="0.0,0.0"
              finalscale="1.6"
              fade="true"
              additive="false"
              lifespan="0.8,0.8"
              speed="12,13"
              movedir="150"
              movedirvar="0.1"
              acceleration="0,-0.65"/>
  </particleeffect>
Up to Particle List gooMist:
  <particleeffect name="gooMist" maxparticles="10" rate="0.6">
    <particle image="IMAGE_FX_SMOKEBLACK"
              scale="0.1,0.25"
              finalscale="2.4"
              directed="false"
              rotspeed="-4,4"
              additive="false"
              speed="0,1"
              fade="true"
              lifespan="0.3,0.6"
              movedir="0"
              movedirvar="180"
              acceleration="0.0,0.0">
    </particle>
  </particleeffect>
Up to Particle List timebugFizz:
  <particleeffect name="timebugFizz" maxparticles="8" rate="0.1">
    <particle image="IMAGE_FX_SMOKEWHITE"
              rotspeed="2,4"
              directed="false"
              scale="0.4"
              finalscale="0.7"
              fade="true"
              additive="false"
              lifespan="0.8"
              speed="0.1,0.2"
              movedir="0"
              movedirvar="180"
              acceleration="0,-0.01">
    </particle>
  </particleeffect>
Up to Particle List flashes:
  <particleeffect name="flashes" maxparticles="3" rate="0.1">
    <particle image="IMAGE_FX_FLASH"
              rotspeed="0"
              rotation="-180,180"
              directed="false"
              scale="4.0, 8.0"
              finalscale="0.0"
              fade="true"
              additive="true"
              lifespan="0.06"
              speed="25,400"
              movedir="0"
              movedirvar="180"
              acceleration="0,0">
    </particle>
  </particleeffect>
Up to Particle List tubeAirFlowUp:
  <particleeffect name="tubeAirFlowUp" maxparticles="8" rate="0.1">
    <particle image="IMAGE_FX_WINDWHITE"
              scale="0.5,0.75"
              finalscale="5"
              directed="true"
              additive="true"
              speed="15,20"
              fade="true"
              lifespan="1.2,1.4"
              movedir="90"
              movedirvar="3"
              acceleration="0.0,0.0">
    </particle>
  </particleeffect>
Up to Particle List tubeAirFlowLeft:
  <particleeffect name="tubeAirFlowLeft" maxparticles="8" rate="0.1">
    <particle image="IMAGE_FX_WINDWHITE"
              scale="0.5,0.75"
              finalscale="5"
              directed="true"
              additive="true"
              speed="15,20"
              fade="true"
              lifespan="1.2,1.4"
              movedir="180"
              movedirvar="3"
              acceleration="0.0,0.0">
    </particle>
  </particleeffect>
Up to Particle List geomExplosionDust:
    <particleeffect name="geomExplosionDust" maxparticles="100">
    <particle image="IMAGE_FX_SMOKEBLACK"
				scale="1.0,3.0"
	            directed="false"
	            additive="false"
	            dampening="0.95"
	            speed="3,4"
	            fade="true"
	            lifespan="1,3"
	            movedir="90"
	            movedirvar="90"
	            acceleration="0,0">
    </particle>
  </particleeffect>
Up to Particle List ish_smallfire:
   <particleeffect name="ish_smallfire" maxparticles="16" rate="0.3">
    <particle image="IMAGE_FX_FIREMAIN1ISH"
              directed="false"
              rotspeed="-4,-2"
              rotation="-180,180"
              scale="2,2.5"
              finalscale="0.3"
              fade="true"
              additive="true"
              lifespan="1,1"
              speed="1"
              movedir="90"
              movedirvar="12"
              acceleration="0,0.09"/>
    <particle image="IMAGE_FX_FIREMAIN1ISH"
              directed="false"
              rotspeed="-4,-2"
              rotation="-180,180"
              scale="2,2.5"
              finalscale="0.05"
              fade="true"
              additive="true"
              lifespan="1,1"
              speed="1"
              movedir="90"
              movedirvar="5"
              acceleration="0,0.09"/>
  </particleeffect>
Up to Particle List ish_FlingTrail:
  <particleeffect name="ish_FlingTrail" maxparticles="60" rate="0.5">
  <particle image="IMAGE_FX_ISH_CHAR_0,IMAGE_FX_ISH_CHAR_1"
            rotspeed="-2,-0.2"
            directed="false"
            scale="1.0,1.5"
            finalscale="0"
            fade="false"
            additive="true"
            lifespan="3,4"
            speed="0.2,0.4"
            movedir="0"
            movedirvar="180"
            acceleration="0,0"/>
</particleeffect>
Up to Particle List ishr_FlingTrail:
  <particleeffect name="ishr_FlingTrail" maxparticles="60" rate="0.5">
  <particle image="IMAGE_FX_ISHR_CHAR_0,IMAGE_FX_ISHR_CHAR_1"
            rotspeed="-2,-0.2"
            directed="false"
            scale="1.0,1.5"
            finalscale="0"
            fade="false"
            additive="true"
            lifespan="3,4"
            speed="0.2,0.4"
            movedir="0"
            movedirvar="180"
            acceleration="0,0"/>
</particleeffect>
Up to Particle List ish_gpu_bitspew:
  <particleeffect name="ish_gpu_bitspew" maxparticles="30" rate="0.07">
  <particle image="IMAGE_FX_ISH_CHAR_0"
            rotspeed="-9,-3"
            directed="false"
            scale="1.0,1.5"
            finalscale="4"
            fade="true"
            additive="true"
            lifespan="2,4"
            speed="1,3"
            movedir="0"
            movedirvar="180"
            acceleration="0,0"/>
</particleeffect>
Up to Particle List ish_bitPop:
<particleeffect name="ish_bitPop" maxparticles="80">
    <particle image="IMAGE_FX_FIREMAIN1ISH"
              directed="false"
              rotspeed="-4,-2"
              rotation="-180,180"
              scale="2,2.5"
              finalscale="0.3"
              fade="true"
              additive="true"
              lifespan="1,1"
              speed="1"
              movedir="90"
              movedirvar="12"
              acceleration="0,0.09"/>
    <particle image="IMAGE_FX_FIREMAIN1ISH"
              directed="false"
              rotspeed="-4,-2"
              rotation="-180,180"
              scale="2,2.5"
              finalscale="0.05"
              fade="true"
              additive="true"
              lifespan="1,1"
              speed="1"
              movedir="90"
              movedirvar="5"
              acceleration="0,0.09"/>
  </particleeffect>
Up to Particle List beautypop:
  <particleeffect name="beautypop" maxparticles="80">
    <particle image="IMAGE_FX_GOODRIP1"
              directed="true"
              scale="0.35,0.75"
              finalscale="0"
              fade="false"
              additive="false"
              lifespan="1.4,2"
              dampening="0.98"
              speed="3,12"
              movedir="90"
              movedirvar="180"
              acceleration="0,0" />
    <particle image="IMAGE_FX_GOOGLOB"
            directed="true"
            scale="1.25,1.8"
            finalscale="0"
            fade="false"
            additive="false"
            lifespan="1.4,2"
            dampening="0.98"
            speed="2,7"
            movedir="90"
            movedirvar="180"
            acceleration="0,-0.1" />
  </particleeffect>
Up to Particle List flowerDust:
  <particleeffect name="flowerDust" maxparticles="30" rate="0.25">
	<particle image="IMAGE_FX_GOOGLOB"
            rotspeed="0.2"
            directed="false"
            scale="0.5,1.0"
            finalscale="0"
            fade="false"
            additive="false"
            lifespan="2,3"
            speed="0.2,0.4"
            movedir="0"
            movedirvar="180"
            acceleration="0,0"/>
 </particleeffect>
Up to Particle List OOS_gooDrips:
 <particleeffect name="OOS_gooDrips" maxparticles="16" rate="0.035">
  <particle image="IMAGE_FX_GOODRIP1"
            directed="true"
            scale="0.2,0.7"
            finalscale="0.0"
            fade="true"
            additive="false"
			lifespan="4, 8"
            speed="0.2,1.2"
            movedir="270"
            movedirvar="30"
            acceleration="0,-0.02"/>
</particleeffect>
Up to Particle List OOS_gooGlobs:
  <particleeffect name="OOS_gooGlobs" maxparticles="30" rate="0.25">
	<particle image="IMAGE_FX_GOOGLOB"
            rotspeed="0.2"
            directed="false"
            scale="0.5,1.0"
            finalscale="0"
            fade="false"
            additive="false"
            lifespan="2,3"
            speed="0.6,0.8"
            movedir="0"
            movedirvar="180"
            acceleration="0,0.01"/>
 </particleeffect>
Up to Particle List BallExplode_Fuse:
<particleeffect name="BallExplode_Fuse" maxparticles="80">
    <particle image="IMAGE_FX_EXPLODESTREAK1"
              directed="true"
              scale="0.01,0.1"
              finalscale="3"
              fade="true"
              additive="true"
              lifespan="0.15,0.55"
              speed="3,12"
              movedir="0"
              movedirvar="180"
              acceleration="0,0"
			  dampening="0.1" />
	<particle image="IMAGE_FX_RAINSTREAK"
              directed="true"
              scale="0.01,0.1"
              finalscale="4"
              fade="true"
              additive="false"
              lifespan="0.25,0.75"
              speed="3,12"
              movedir="0"
              movedirvar="180"
              acceleration="0,0"
			  dampening="0.1" />
	<particle image="IMAGE_FX_FIREMAIN1,IMAGE_FX_FIREMAIN2"
			  rotspeed="-1,-0.1"
              rotation="-180,180"
	          directed="false"
	          scale="0.25,0.8"
	          finalscale="0"
	          fade="true"
	          additive="true"
	          lifespan="1.4,2"
	          dampening="0.98"
	          speed="2,7"
	          movedir="90"
	          movedirvar="30"
	          acceleration="0,-0.1" />
</particleeffect>
Up to Particle List BallExplode_Bomb:
<particleeffect name="BallExplode_Bomb" maxparticles="80">
    <particle image="IMAGE_FX_EXPLODESTREAK1"
              directed="true"
              scale="0.01,0.1"
              finalscale="4"
              fade="true"
              additive="true"
              lifespan="0.5,1.0"
              speed="10,30"
              movedir="0"
              movedirvar="180"
              acceleration="0,0"
			  dampening="0.1" />
	<particle image="IMAGE_FX_RAINSTREAK"
              directed="true"
              scale="0.01,0.1"
              finalscale="5"
              fade="true"
              additive="false"
              lifespan="0.5,1.0"
              speed="10,30"
              movedir="0"
              movedirvar="180"
              acceleration="0,0"
			  dampening="0.1" />
	<particle image="IMAGE_FX_FIREMAIN1,IMAGE_FX_FIREMAIN2"
			  rotspeed="-1,-0.1"
              rotation="-180,180"
	          directed="false"
	          scale="1.0,2.0"
	          finalscale="0"
	          fade="false"
	          additive="true"
	          lifespan="1.4,2"
	          dampening="0.98"
	          speed="2,7"
	          movedir="90"
	          movedirvar="30"
	          acceleration="0,-0.05" />
</particleeffect>
Up to Particle List BallExplode_ISH:
<particleeffect name="BallExplode_ISH" maxparticles="80">
    <particle image="IMAGE_FX_EXPLODESTREAK1ISH"
              directed="true"
              scale="0.01,0.1"
              finalscale="3"
              fade="true"
              additive="true"
              lifespan="0.15,0.75"
              speed="10,32"
              movedir="0"
              movedirvar="180"
              acceleration="0,0"
			  dampening="0.05" />
	<particle image="IMAGE_FX_EXPLODESTREAK1ISH"
              directed="true"
              scale="0.01,0.1"
              finalscale="4"
              fade="true"
              additive="false"
              lifespan="0.15,0.55"
              speed="10,22"
              movedir="0"
              movedirvar="180"
              acceleration="0,0" />
	<particle image="IMAGE_FX_FIREMAIN1ISH"
			  rotspeed="-1,-0.1"
              rotation="-180,180"
	          directed="false"
	          scale="0.25,0.8"
	          finalscale="0"
	          fade="false"
	          additive="true"
	          lifespan="1.4,2"
	          dampening="0.98"
	          speed="2,7"
	          movedir="90"
	          movedirvar="30"
	          acceleration="0,-0.1" />
</particleeffect>
Up to Particle List ISH_undeleteFizz:
<particleeffect name="ISH_undeleteFizz" maxparticles="6" rate="0.04">
	<particle image="IMAGE_FX_FIREMAIN1ISH,IMAGE_FX_FIREMAIN2"
            rotspeed="1,2"
            directed="false"
            scale="1.0,2.0"
            finalscale="0"
            fade="true"
            additive="true"
            lifespan="1,1.5"
            speed="0.6,1.3"
            movedir="0"
            movedirvar="180"
            acceleration="0,0.05"/>
 </particleeffect>
Up to Particle List ish_bubbles:
   <particleeffect name="ish_bubbles" maxparticles="30" rate="0.25">
	<particle image="IMAGE_FX_FIREMAIN1ISH"
            rotspeed="0.2"
            directed="false"
            scale="0.5,1.0"
            finalscale="0"
            fade="false"
            additive="false"
            lifespan="2,3"
            speed="0.6,0.8"
            movedir="0"
            movedirvar="180"
            acceleration="0,0.01"/>
 </particleeffect>
Profile file format
Profile location
The user's profile file is named "pers2.dat" and the location depends on the platform and version of World of Goo.
Windows Vista and Windows 7
Prior to version 1.10 it was stored in %ProgramData%, e.g. C:\ProgramData\2DBoy\WorldOfGoo
From version 1.10 it is stored in the user's profile under %LOCALAPPDATA%, e.g. C:\Users\david\AppData\Local\2DBoy\WorldOfGoo
Windows XP
Prior to version 1.10 it was stored in the All Users profile under %ALLUSERSPROFILE%, e.g. C:\Documents and Settings\All Users\Application Data\2DBoy\WorldOfGoo
From version 1.10 it is stored in the user's profile under %LOCALAPPDATA%, e.g. C:\Documents and Settings\david\Local Settings\Application Data\2DBoy\WorldOfGoo
Mac OS X
The profile is stored in the user's home directory under Library/Application Support/WorldOfGoo/
Linux
In the Linux native port, the profile is stored at ${HOME}/.WorldOfGoo/pers2.dat
Users playing under PlayOnLinux or wine may have their profile located in one of the following locations depending on version:
- ${HOME}/.PlayOnLinux/wineprefix/WorldOfGoo/drive_c/windows/profiles/${USERNAME}/Application Data/2DBoy/WorldOfGoo
- ${HOME}/.PlayOnLinux/wineprefix/WorldOfGoo/drive_c/windows/profiles/All Users/Application Data/2DBoy/WorldOfGoo
- ${HOME}/.wine/drive_c/windows/profiles/${USERNAME}/Application Data/2DBoy/WorldOfGoo
- ${HOME}/.wine/drive_c/windows/profiles/All Users/Application Data/2DBoy/WorldOfGoo
iPad
On the iPad, the profile is serialised into a string which is stored in a single preferences entry.
With wog.app installed in /Applications/, the property list file is found at /var/mobile/Library/Preferences/com.2dboy.worldofgoo.plist.
With wog.app installed normally through the App Store, it will presumably be located in the application's sandbox in /var/mobile/Applications/GUID/Library
The actual plist contains a single entry, "pers2.dat", with binary data.
davids-iPhone-2:/var/mobile/Library/Preferences root# plutil  com.2dboy.worldofgoo.plist
{
    "pers2.dat" = <342c6d72 7070312c 30392c70 726f6669 6c655f30 31323338 [...many bytes snipped...] 5f2c5f2c 302e>;
}
As with other iPad files, the pers2.dat contents are unencrypted.
Profile Encryption
The profile is encrypted using the platform's standard .bin file encryption, i.e. AES for Windows and Linux, and XOR for Mac OS X, except the plaintext is padded with zero bytes. The character encoding used is unknown; most likely it is the native character set of the operating system.
Profile Format
At the highest level, it contains a sequence of strings, terminated by the sequence ",0." (without quotes). Each string is encoded with a decimal integer signifying its length, followed by a comma, followed by the string contents.
For example, "foo" would be encoded as "3,foo" (quotes for clarity only).
Note that the number specifies the number of BYTES that follow, not characters, so be careful not to use Unicode functions at this stage. This will particularly show up in version 1.40+ where the Unicode representation of non-ASCII characters in profile names has been fixed. See also the notes at the bottom of this page regarding encoding.
The strings in the data file describe a dictionary, with alternating keys and values. Keys in use are:
- countrycode: values are two-letter ISO 3166-1 country codes, or EU for the European Union, or XX for unknown.
- fullscreen: indicates whether the game runs in full-screen or in windowed mode; value is either "true" or "false"
- mrpp: most recent player profile; value is a decimal integer between 1 and 3.
- profile_0/profile_1/profile_2: the three player profile slots.
countrycode and fullscreen are not present in the iPad version.
Obviously, the player profile strings are the most interesting. These strings consist of a number of fields, seperated by commas. The first four fields are:
- player name
- player flags (see below)
- total play time (in seconds)
- number of levels played/completed
The player flags field is an integer that combines several bits:
| Flag | Meaning |
|---|---|
| 1 | online play is enabled |
| 2 | World of Goo Corporation has been unlocked |
| 4 | World of Goo Corporation has been destroyed |
| 8 | the whistle has been found |
| 16 | the Terms & Conditions have been accepted (this unlocks Deliverance) |
So a player that has finished the first two chapters, for example, would have flags set to 2|8 = 10 or 1|2|8 = 11 (here '|' indicates bitwise-or).
Then follows, for each level:
- level id (same as the directory name in res/levels/)
- greatest number of balls collected
- least number of moves used
- least time taken (in seconds)
Note that these three stats are "best ever" and are independent for each stat. i.e. they were NOT necessarily achieved during the same level attempt.
The number of levels in this list is not necessarily equal to the fourth field in the header (levels played).
A level id with an integer value indicates the end of level data. This is usually 0, meaning no fields follow. However if it is a positive integer, it is the number of levels that the user has skipped, and will be followed by a list of the level IDs.
Then, the World of Goo Corporation tower data follows, which is a string prefixed by an underscore character (_) which is how it can be distinguished from more level data.
It may be empty if WoGC has not been unlocked yet. Otherwise, it contains first the location of balls, and then the configuration of strands (connections between balls). All data is seperated by colon characters (:).
Each ball description consists of six fields; for example:
b:Drained:-61.88:211.98:-0.96:1.75. The fields are:
- "b" indicating ball (fixed)
- "Drained" indicating ball type (fixed)
- x-coordinate as a decimal number
- y-coordinate as a decimal number
- x-velocity as a decimal number
- y-velocity as a decimal number
Each strand description consists of seven fields; for example: s:Drained:288,20,9.000,140.0,0. The fields are:
- "s" indicating strand (fixed)
- "Drained" indicating ball type (fixed)
- first endpoint (zero-based index of a ball in the list above)
- second endpoint (same as above)
- spring constant: read from the ball.xml and always "9.0"
- "natural" length: length of strand when it was created
- "0" or "1": indicates whether or not a ball was absorbed to create this strand, which is released if the strand is destroyed.
Next, the online player key follows, which is prefixed by an underscore; the player key is 32 characters long and consists of lower-case hexadecimal digits. If the player has never connected to the internet, the key is empty.
Since this key is used to authenticate players online, it should be kept private. For other purposes e.g. Soultaker's site, he proposes to take an MD5 hash code of the string and use that instead, so players can be identified without compromising their scoreboard standing. For example: "d41d8cd98f00b204e9800998ecf8427e" would be transformed to "74be16979710d4c4e7c6647856088456". If you do not want players to be globally identifiable, use an HMAC instead.
The final field is a decimal integer, representing the number of newly collected goo balls since the player last visited World of Goo Corporation. This number is displayed on the chapter and title screen overlay.
Credit to Soultaker for first documenting this file format.
In the iPad version, two further fields follow. If the user has never connected to the Game Centre, they are both "_". Otherwise, the first is an underscore followed by their Game Centre Player Key (corresponding to GKAuthenticatedPlayerKey in com.apple.gamed.plist), for example "_G:100002345". The second field is an underscore followed by their Game Centre name, for example "_davidc".
Name encoding
The name stored in the profile is technically UTF-8. In the case of version 1.40 and above, this is correct. However there is a bug in previous versions of World of Goo. It appears that the top bit of the continuation bytes is cleared when the profile is saved.
For example, the character ä, Unicode code point U+00E4, should be encoded in UTF-8 as C3 A4, but in pers2.dat you actually find C3 24.
Given that (a) the first byte of the UTF-8 representation allows you to determine the number of continuation bytes by looking in the high-order bits and (b) the continuation bits should ALL begin with the high bit set (binary 10xx xxxx), it is possible to write code to reconstruct the correct UTF-8 representation: use the first byte to determine the number of continuation bytes, and then for this number of subsequent bytes, set the top bit. Then use standard UTF-8 routines to decode it.
This has been confirmed working for 2-byte UTF-8 characters. It is presumed that it will work with 3- and 4-byte representations; at least it can do no harm since these should all have the top bit set in the continuation bytes anyway.
Sample code from GooTool 1.0.3:
    // Go through and restore high-order bits for UTF-8 sequences (#0000270)

    int nskip = 0;

    for (int i=0; i<buf.length; ++i) {
      if (nskip > 0) {
        buf[i] |= 0x80; // set top bit
        nskip--;
      }
      else if ((buf[i] & 0xE0) == 0xC0) { // 110yyyyy: U+0080 to U+07FF
        nskip = 1;
      }
      else if ((buf[i] & 0xF0) == 0xE0) { // 1110zzzz: U+0800 to U+FFFF
        nskip = 2;
      }
      else if ((buf[i] & 0xF8) == 0xF0) { // 11110www: U+010000 to U+10FFFF
        nskip = 3;
      }
    }

    return new String(buf, "UTF-8");
anim.binltl Animation file format
NB. This is a description of the in-game BINARY file format for animations. You are advised not to use this format, but to contribute to the discussion on an XML format for these files.
This is some sketchy information about the anim.binltl file format. These contain the BinImageAnimation and associated structs. These are used to animate single elements in a scene. They store the description of the animation keyframes used, but not the actual item to be animated. This means a single BinImageAnimation (such as rot_1fps) can be used in multiple places.
BinImageAnimations are also used for each item animated in a movie, though in that case they're stored within the movie.binltl file.
File format
The file is unencrypted binary data, roughly corresponding to the C structs used in the game. Pointers are stored as offsets from the start of the file.
Note that when the BinImageAnimation appears within a movie file, the pointers in BinImageAnimation after relative to the start of the file, but the pointers they point to are relative to the start of the BinImageAnimation.
Simple types
float - 32-bit floating point in IEEE 754 floating-point "single format" bit layout
int - 32-bit little endian integer
char * - stored in files as a sequential list of null-terminated strings
enum = stored in the file as ints
enum TransformType {
      XFORM_SCALE = 0,
      XFORM_ROTATE = 1,
      XFORM_TRANSLATE = 2
};

enum InterpolationType {
      INTERPOLATION_NONE = 0,
      INTERPOLATION_LINEAR = 1
};
Complex types
struct keyframe
{
+0x00:      float x;
+0x04:      float y;
+0x08:      float angle;
+0x0c:      int alpha;
+0x10:      int color;
+0x14:      int nextFrameIndex;
+0x18:      int soundStrIdx;
+0x1c:      InterpolationType interpolation;
};

struct BinImageAnimation
{
+0x00:      int mHasColor;
+0x04:      int mHasAlpha;
+0x08:      int mHasSound;
+0x0c:      int mHasTransform;
+0x10:      int mNumTransforms;
+0x14:      int mNumFrames;

+0x18:      TransformType *mTransformTypes;
+0x1c:      float *mFrameTimes;
+0x20:      keyframe ***mXformFrames;
+0x24:      keyframe **mAlphaFrames;
+0x28:      keyframe **mColorFrames;
+0x2c:      keyframe **mSoundFrames;
+0x30:      const char *pStringTable;
};
Note that mXformFrames has an extra indirection, this is because there is one keyframe per frame per transform type (mNumTransforms).
File order
There is a single BinImageAnimation at the start of the file. All other items are referenced by "pointers" within this structure (offsets from the start of the file).
When the BinImageAnimation appears inside a BinMovie, the offsets are relative to the start of the BinImageAnimation, so you must compare them with 0 before shifting them.
Example
res\anim\rot_1rps.anim.binltl:
hasColor = false
hasAlpha = false
hasSound = false
hasTransform = true
numTransforms = 1
numFrames = 3
transformTypesOffset = 52
frameTimesOffset = 56
xformFramesOffset = 68
alphaFramesOffset = 84
colorFramesOffset = 96
soundFramesOffset = 108
stringTableOffset = 120
frameTimes[0] = 0.0
frameTimes[1] = 0.5
frameTimes[2] = 1.0
transformTypes[0] = ROTATE
frameOffset = 72
framePointer = 124
transformFrames[t=0,ROTATE][frame=0] = KeyFrame{x=-1.0, y=-1.0, angle=0.0, alpha=-1, color=-1, nextFrameIndex=1, soundStrIndex=0, interpolationType=LINEAR}
framePointer = 156
transformFrames[t=0,ROTATE][frame=1] = KeyFrame{x=-1.0, y=-1.0, angle=180.0, alpha=-1, color=-1, nextFrameIndex=2, soundStrIndex=0, interpolationType=LINEAR}
framePointer = 188
transformFrames[t=0,ROTATE][frame=2] = KeyFrame{x=-1.0, y=-1.0, angle=360.0, alpha=-1, color=-1, nextFrameIndex=-1, soundStrIndex=0, interpolationType=LINEAR}
framePointer = 0
movie.binltl Movie file format
NB. This is a description of the in-game BINARY file format for movies. You are advised not to use this format, but to contribute to the discussion on an XML format for these files.
This is some sketchy information about the movie.binltl file format. These contain animated movies used for the loading screen, cut-scenes and credits. They consist of a number of actors, each of which is animated according to a BinImageAnimation.
File format
The file is unencrypted binary data, roughly corresponding to the C structs used in the game. Pointers are stored as offsets from the start of the file.
Simple types
float - 32-bit floating point in IEEE 754 floating-point "single format" bit layout
int - 32-bit little endian integer
char * - stored in files as a sequential list of null-terminated strings
enum = stored in the file as ints
enum ActorType
{
       eActorType_Image = 0,
       eActorType_Text = 1
};

enum AlignmentH
{
       ALIGN_LEFT = 0,
       ALIGN_CENTER = 1,
       ALIGN_RIGHT = 2
};

enum AlignmentV
{
       ALIGN_TOP = 0,
       ALIGN_MIDDLE = 1,
       ALIGN_BOTTOM = 2
};
Complex types
struct BinActor
{
+0x00:       ActorType mType;
+0x04:       int mImageStrIdx;
+0x08:       int mLabelTextStrIdx;
+0x0c:       int mFontStrIdx;
+0x10:       float mLabelMaxWidth;
+0x14:       float mLabelWrapWidth;
+0x18:       AlignmentH mLabelJustification;
+0x1c:       float mDepth;
};

struct BinMovie
{
+0x00:       float length;
+0x04:       int numActors;
+0x08:       BinActor *pActors;
+0x0c:       BinImageAnimation **ppAnims;
+0x10:       const char *pStringTable;
};
Note that pActors is a pointer to the array of BinActors
ppAnims has an extra indirection which is strictly superfluous, however it allows the BinImageAnimation structure and associated animation data to be stored as a single contiguous block. Which is the format 2DBoy used for the original files.
File order
There is a single BinMovie at the start of the file. All other items are referenced by "pointers" within this structure (offsets from the start of the file).
A BinActor is an animated scene element. All BinActor string indexes reference the BinMovie string table. There is exactly one BinImageAnimation per BinActor.
Example
Some complete dumps (large files!) of movies, including their actors and BinImageAnimations can be found here: Chapter5End and credits
Here are just the actors from res\movie\credits\credits.movie.binltl:
length = 63.0
numActors = 34
actorsOffset = 20
animsOffset = 1108
stringsOffset = 1244
actor = BinActor{actorType=IMAGE, imageStr='IMAGE_MOVIE_CREDITS_BLACK32', labelStr='', fontStr='', labelMaxWidth=-1.0, labelWrapWidth=-1.0, labelJustification=1, depth=0.0}
actor = BinActor{actorType=IMAGE, imageStr='IMAGE_MOVIE_CREDITS_GIRL3', labelStr='', fontStr='', labelMaxWidth=-1.0, labelWrapWidth=-1.0, labelJustification=1, depth=1.0}
actor = BinActor{actorType=IMAGE, imageStr='IMAGE_MOVIE_CREDITS_GIRL2', labelStr='', fontStr='', labelMaxWidth=-1.0, labelWrapWidth=-1.0, labelJustification=1, depth=2.0}
actor = BinActor{actorType=IMAGE, imageStr='IMAGE_MOVIE_CREDITS_GIRL1', labelStr='', fontStr='', labelMaxWidth=-1.0, labelWrapWidth=-1.0, labelJustification=1, depth=3.0}
actor = BinActor{actorType=IMAGE, imageStr='IMAGE_MOVIE_CREDITS_GIRL0', labelStr='', fontStr='', labelMaxWidth=-1.0, labelWrapWidth=-1.0, labelJustification=1, depth=4.0}
actor = BinActor{actorType=TEXT, imageStr='', labelStr='$MOVIE_CREDITS_DATE', fontStr='FONT_BIGWHITE_52', labelMaxWidth=-1.0, labelWrapWidth=-1.0, labelJustification=1, depth=5.0}
actor = BinActor{actorType=IMAGE, imageStr='IMAGE_MOVIE_CREDITS_2DBOY', labelStr='', fontStr='', labelMaxWidth=-1.0, labelWrapWidth=-1.0, labelJustification=1, depth=6.0}
actor = BinActor{actorType=TEXT, imageStr='', labelStr='$MOVIE_CREDITS_SPECIALFRIENDS', fontStr='FONT_BIGWHITE_52', labelMaxWidth=-1.0, labelWrapWidth=-1.0, labelJustification=1, depth=7.0}
actor = BinActor{actorType=TEXT, imageStr='', labelStr='$MOVIE_CREDITS_D9', fontStr='FONT_BIGWHITE_52', labelMaxWidth=-1.0, labelWrapWidth=-1.0, labelJustification=1, depth=8.0}
actor = BinActor{actorType=IMAGE, imageStr='IMAGE_MOVIE_CREDITS_PAULHUBANS', labelStr='', fontStr='', labelMaxWidth=-1.0, labelWrapWidth=-1.0, labelJustification=1, depth=9.0}
actor = BinActor{actorType=TEXT, imageStr='', labelStr='$MOVIE_CREDITS_D8', fontStr='FONT_BIGWHITE_52', labelMaxWidth=-1.0, labelWrapWidth=-1.0, labelJustification=1, depth=10.0}
actor = BinActor{actorType=IMAGE, imageStr='IMAGE_MOVIE_CREDITS_ALLANBLOMQUIST', labelStr='', fontStr='', labelMaxWidth=-1.0, labelWrapWidth=-1.0, labelJustification=1, depth=11.0}
actor = BinActor{actorType=TEXT, imageStr='', labelStr='$MOVIE_CREDITS_D7', fontStr='FONT_BIGWHITE_52', labelMaxWidth=-1.0, labelWrapWidth=-1.0, labelJustification=1, depth=12.0}
actor = BinActor{actorType=IMAGE, imageStr='IMAGE_MOVIE_CREDITS_RONCARMEL', labelStr='', fontStr='', labelMaxWidth=-1.0, labelWrapWidth=-1.0, labelJustification=1, depth=13.0}
actor = BinActor{actorType=IMAGE, imageStr='IMAGE_MOVIE_CREDITS_AND', labelStr='', fontStr='', labelMaxWidth=-1.0, labelWrapWidth=-1.0, labelJustification=1, depth=14.0}
actor = BinActor{actorType=TEXT, imageStr='', labelStr='$MOVIE_CREDITS_D6', fontStr='FONT_BIGWHITE_52', labelMaxWidth=-1.0, labelWrapWidth=-1.0, labelJustification=1, depth=15.0}
actor = BinActor{actorType=TEXT, imageStr='', labelStr='$MOVIE_CREDITS_D5', fontStr='FONT_BIGWHITE_52', labelMaxWidth=-1.0, labelWrapWidth=-1.0, labelJustification=1, depth=16.0}
actor = BinActor{actorType=IMAGE, imageStr='IMAGE_MOVIE_CREDITS_GEAR', labelStr='', fontStr='', labelMaxWidth=-1.0, labelWrapWidth=-1.0, labelJustification=1, depth=17.0}
actor = BinActor{actorType=IMAGE, imageStr='IMAGE_MOVIE_CREDITS_GEAR', labelStr='', fontStr='', labelMaxWidth=-1.0, labelWrapWidth=-1.0, labelJustification=1, depth=18.0}
actor = BinActor{actorType=IMAGE, imageStr='IMAGE_MOVIE_CREDITS_GEAR', labelStr='', fontStr='', labelMaxWidth=-1.0, labelWrapWidth=-1.0, labelJustification=1, depth=19.0}
actor = BinActor{actorType=IMAGE, imageStr='IMAGE_MOVIE_CREDITS_KYLEGABLER', labelStr='', fontStr='', labelMaxWidth=-1.0, labelWrapWidth=-1.0, labelJustification=1, depth=20.0}
actor = BinActor{actorType=IMAGE, imageStr='IMAGE_MOVIE_CREDITS_AND', labelStr='', fontStr='', labelMaxWidth=-1.0, labelWrapWidth=-1.0, labelJustification=1, depth=21.0}
actor = BinActor{actorType=TEXT, imageStr='', labelStr='$MOVIE_CREDITS_D4', fontStr='FONT_BIGWHITE_52', labelMaxWidth=-1.0, labelWrapWidth=-1.0, labelJustification=1, depth=22.0}
actor = BinActor{actorType=TEXT, imageStr='', labelStr='$MOVIE_CREDITS_D3', fontStr='FONT_BIGWHITE_52', labelMaxWidth=-1.0, labelWrapWidth=-1.0, labelJustification=1, depth=23.0}
actor = BinActor{actorType=TEXT, imageStr='', labelStr='$MOVIE_CREDITS_D2', fontStr='FONT_BIGWHITE_52', labelMaxWidth=-1.0, labelWrapWidth=-1.0, labelJustification=1, depth=24.0}
actor = BinActor{actorType=TEXT, imageStr='', labelStr='$MOVIE_CREDITS_D1', fontStr='FONT_BIGWHITE_52', labelMaxWidth=-1.0, labelWrapWidth=-1.0, labelJustification=1, depth=25.0}
actor = BinActor{actorType=IMAGE, imageStr='IMAGE_MOVIE_CREDITS_TREE', labelStr='', fontStr='', labelMaxWidth=-1.0, labelWrapWidth=-1.0, labelJustification=1, depth=26.0}
actor = BinActor{actorType=IMAGE, imageStr='IMAGE_MOVIE_CREDITS_TREE', labelStr='', fontStr='', labelMaxWidth=-1.0, labelWrapWidth=-1.0, labelJustification=1, depth=27.0}
actor = BinActor{actorType=IMAGE, imageStr='IMAGE_MOVIE_CREDITS_TREE', labelStr='', fontStr='', labelMaxWidth=-1.0, labelWrapWidth=-1.0, labelJustification=1, depth=28.0}
actor = BinActor{actorType=IMAGE, imageStr='IMAGE_MOVIE_CREDITS_TREE', labelStr='', fontStr='', labelMaxWidth=-1.0, labelWrapWidth=-1.0, labelJustification=1, depth=29.0}
actor = BinActor{actorType=IMAGE, imageStr='IMAGE_MOVIE_CREDITS_TREE', labelStr='', fontStr='', labelMaxWidth=-1.0, labelWrapWidth=-1.0, labelJustification=1, depth=30.0}
actor = BinActor{actorType=IMAGE, imageStr='IMAGE_MOVIE_CREDITS_TREE', labelStr='', fontStr='', labelMaxWidth=-1.0, labelWrapWidth=-1.0, labelJustification=1, depth=31.0}
actor = BinActor{actorType=IMAGE, imageStr='IMAGE_MOVIE_CREDITS_WOGLOGO01', labelStr='', fontStr='', labelMaxWidth=-1.0, labelWrapWidth=-1.0, labelJustification=1, depth=32.0}
actor = BinActor{actorType=IMAGE, imageStr='IMAGE_MOVIE_CREDITS_LENSFLARE', labelStr='', fontStr='', labelMaxWidth=-1.0, labelWrapWidth=-1.0, labelJustification=1, depth=33.0}
Language Specific Image Files
This page is currently under construction and the information here may not be complete and/or accurate.
When searching for an image, World of Goo will usually load filename.png. However, if there is a file called filename.es.png and the game is being played in Spanish, that image will be substituted. This works for all language codes.
In the original game, this is mostly used for image-based signposts and text such as "Island 1: The Goo-Filled Hills".
There is also a fature coded into the game for Profanity Pack users, which loads filename.profanity.png instead of filename.png, and properties/profanity.xml.bin instead of properties/text.xml.bin. As 2D Boy has not yet released the profanity pack, it is unknown how this feature would be activated.
See also:
World of Goo Level Editor

World of Goo Level Editor (aka WooGLE) is a tool for making World of Goo levels
You can create your own levels using your own original graphics and music, or just tweak a level from the original game - or anything in between.
Quick Links: [ FAQ ] [ Reference Guide ] [ My First Level - Tutorial ] [ Download Page ] [ Install for Linux ]
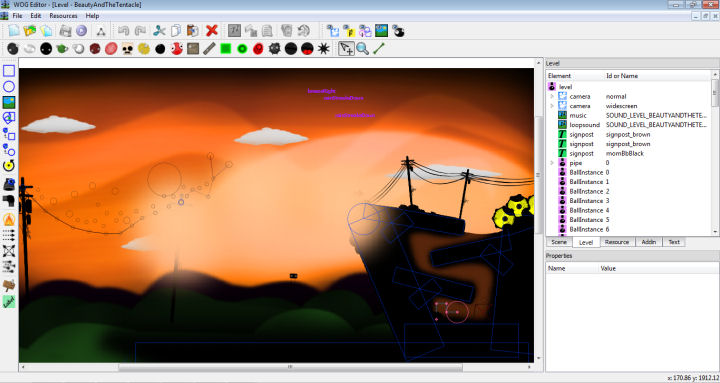
Before you start, you will need...
- A Computer
- The Editor is written in Python and so is fully cross-platform capable. That said, it is apparently far easier to make it work on Windows, and maybe Linux, than on Mac.
- World of Goo
- You will need to have purchased the full game. Windows Users, if you want to play your levels directly from the Editor (and you will want to), you also need to update to the latest version.
- GooTool
- For easy integration of your addins into your or other players games. Get it here.
- World of Goo Level Editor
- The full Windows installation package (and Linux binary package) are available from the download page.
The Very First Thing
The first time you run World of Goo Level Editor it will ask you to locate the WorldOfGoo folder you want to edit.
If you are familar with GooTool you will know that it always preserves the original game files and creates a separate folder which holds the modified version of the game. If you haven't yet, you should run GooTool and create the "modded" folder now.
This is the folder you should use for the Editor, since you should never modify the files in the original game folder. It is often best to create your modded folder in a private folder, be that "My Documents" or your "Home Folder" or on a separate drive somewhere. Wherever you create it, you will need to ensure you have full permissions to read/write/delete files and create folders.
The nickel tour
The Editor GUI is split into several areas: Open Image
The toolbars should be fairly self explanatory - all the buttons have tooltips telling you what they do, just hover of them for a moment before clicking.
The Level View area is a Multiple-Document Interface (MDI), so you can have several levels open at once, and you can minimize/maximize/restore each level view as needed. This also means you can copy and paste things from one level to another (described in more detail later).
Understanding the World of Goo
It will help you to design levels and find your way around if you have some understanding of how World of Goo (and hence the Editor) structures the level data.
World of Goo builds a complete level from 3 main XML files plus other information taken from a number of game-wide (global) files, as well as the actual image and sound files.
The XML files for a level are called Scene, Level and Resources (resrc).
- Scene
- Holds information about how the level looks (graphics, particle effects etc), the geometry (solid things) and other physics stuff (like gravity and wind) that affect the Goo Balls.
- Level
- Holds the information about the Goo Balls in the level, as well as things like where the pipe is, how many goos you need to collect and what music is played.
- Resources
- Holds a list of all the image and sound files used in the level and gives each one an ID. This ID is then used to apply images/sounds to items in the level, rather than using their actual filename.
Tree View Tabs
Each of these files is represented as a Tree View in the Tree Tabs panel. The tree begins at the top with a "root" item: scene, level or resources. All the objects in that file are listed as children underneath the root item. Open Image.
Whenever you add an item to your level, it will be added into one of these trees. You won't need to remember which one, because when you select the item in the graphical view, the entry for it will be highlighted in the Tree, and vice versa.
Properties Pane
When you select any item, a list of its properties/attributes is displayed in the panel below the trees. Open Image. These properties cover every possible value or setting that can be applied to an object of that type.
Some of these you can also change using your mouse (position, size, and rotation) by selecting and dragging objects in the level view. Others you will have to enter or select by hand in the properties pane.
Many of these properties you will never have to touch, except in advanced level designs.
Most items have a few properties that are "essential"; these will be given reasonable default values where possible, but some of them will appear in red to indicate that you must fill something in. Open Image
Next Steps
How about we get started on making "My First Level"...
My First Level
The following tutorial assumes that you have read, and partially understood the previous page
...and at the very least assumes you've done what it said.
Previous Level Editor tutorials have tended to be huge great blocks of text, which proved difficult to read, and even more difficult to follow. Even with a couple of screenshots, it was still difficult to get any real understanding across.
So... I'm trying something completely different...
The World of Goo Level Editor Video Tutorial
It's in 8 parts, so I've made a playlist.
Don't worry several of the parts are quite short, total running time is about 20 mins.
It takes you from Clicking the "New Level" button
through initial design and fixing some issues
to adding finishing touches and finally saving a .goomod file
I think it's pretty well annotated, and explains what's happening as it goes along.
Once you've finished....
Polite request: Please don't all upload your "My First Level" levels.. we'll have hundreds of 'em.
My Next Level
Now that you've made your first level, you probably can't wait to make your next.
Here's a few tips....
Getting Help
There's a pretty good and ever expanding FAQ - Here
We're also working on several Reference, Info and Guide pages - here
And if you still can't figure out how to do something... ask in the forums.
Don't try to re-invent the Wheel (or Cogs, or Windmills)
At least to begin with, almost everything you'll want to do will have been done before, or something quite similar. If you can think of an original level that did something like what you want, load it up and take a look at how 2DBoy did it.
You can even Copy and Paste stuff from the original levels into yours.
It may seem "naggy"...but it's for your own good!
When you first come to save your next level, chances are WooGLE is going to list 27 different things that are wrong with it... some of them will be CRITICAL and it will insist that you fix them before you go any further.
I know it's annoying... but "in the olden days" (a couple of months ago) it would let you try to play any old rubbish. The consequence usually was... the game crashed.. and you didn't know why. If there were actually 27 things wrong with your level, you would never find them all by just trial and error.
Let us know if your level crashes the game
We're pretty sure that WooGLE will catch most of the stuff that will crash the game, but we never cease to be amazed by some of the really "weird and wonderful" stuff that new level designers try. So we ask for your help.....
If you make a level, and WooGLE lets you play it, and the game crashes....
WE WANT TO KNOW!
You best way forward is... make a goomod of the level, upload it somewhere then post in the forums (with a link).. so the "experts" can take a look and figure out what you've done wrong, and what we've missed.
Don't try to make them too hard!
There is a tendancy for new designers (and experienced ones actually) to try to make levels that are hard to beat.
This is a problem for 2 reasons...
i) You actually want people to play your level and enjoy it. If it's too hard they won't.
ii) There are some PHENOMENALLY GOOD players around, and even if you think the level is really hard, they will probably be able to finish it in 3s and 0 moves and collect every single ball you put in there.
If you try to make the level so hard even they can't do it... NO-ONE else will even get close... so what's the point?
Most importantly...
Try to make your levels interesting and fun it's difficult to tell you how to do that.. but try!
And don't feel like you have to crank out levels by the hour, or even by the day. The best levels take time to create, once you really get into it, you'll spend ages tweaking things to get them "just" right.. and playing them over and over to check that every little detail is spot on, before you upload.
It does take time, but usually results in much better, more enjoyable levels.
Reference Guide
Here we aim to provide all sorts of useful reference information regarding all the objects and items used to build a World of Goo Level.
!! UNDER CONSTRUCTION !!
But here's what we've got so far...
Items with no link are planned but aren't done yet.
Scene
- Geometry (aka Solid Stuff)
- Lines
- Basic Shapes
- Composite Geometry
- Static (Walls and Cliffs)
- Dynamic (Motors, Hinges and Falling Things)
- Making Geometry Visible (Applying Images)
- Making Geometry less Solid
- DIY Composite Geometry (Advanced)
- Guide: Making things Spin!
- Info: The tag attribute
- Info: Materials
- Basic Shapes
Level
Resources
- Set Defaults
- Images
- Sounds
- Images
Addin Info
- Dependencies
- thumbnail
- Levels
- thumbnail
- Level Info
Text Resources
Reference by Game File Structure
Level Tree
Holds the information about the Goo Balls in the level, as well as things like where the pipe is, how many goos you need to collect and what music is played. See the bottom of the page for a full list.
It also has several attributes of it's own, listed below are those you may find quite useful... Full Details on all level attributes
ballsrequired
The number of Goo Balls required to finish the level. Required on levels with a levelexit, ignored on those without.
autobounds
If set to true this attribute limits the camera to "explored" areas only.
What consistutes an "explored area" is explained in more detail here - Explored Area
strandgeom
If set to true prevents the player from attaching Goo Balls through geometry objects. Useful for preventing building through walls or thin platforms. Can cause minor player "annoyance" when it prevents you for building near corners.
timebugprobability
The probability per move that a new time bug will appear. Values above about 0.5 will result in many timebugs, values around 0.1 will result in "a few", set 0 to disable timebugs completely.
visualdebug
If set to true displays an overlay showing geometry and other invisible objects. Static objects appear in yellow, Dynamic objects in Green, ForceFields in Blue. This can be very useful during the design phase, but should be set to false before you release the level.
The Level Tree contains....
Exits and Pipes


There are a number of ways you can complete a level in World of Goo, but by far the commonest is the pipe. see also Ending Levels without a pipe
However it's not the pipe that actually ends the level, it's a levelexit item, but you'll need both.
At it's simplest...
When the Editor creates a new level it includes a levelexit
Move this to where you want it and click the AutoPipe button on the toolbar, and you're almost done!
You just need to set how many balls are required to complete the level... see [ballsrequired]
If you want a little more than the "simplest"...
Pipes in detail
A pipe item is purely visual, it doesn't actually DO anything to the Goo Balls. A pipe just shows the player where they are aiming for, and becomes animated when the exit is open and Goo Balls are collected.
They have a type attibute which controls the colour of the pipe, but it does not affect what types of Goo Balls can or cannot be collected.
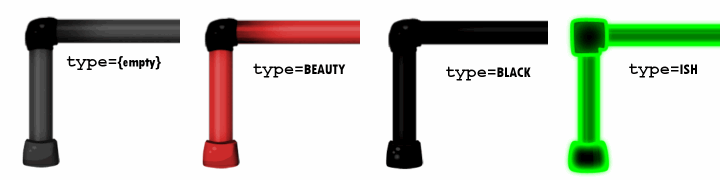
Pipes have child vertexes
The vertex items tell the game where to place the mouth of the pipe, where the bends are and where the pipe ends. You can have as many vertexes (bends) in the pipe as you like. However, pipes can only ever run horizontally or vertically and if there is a bend they MUST turn, if they go straight on (or turn back on themselves) the game crashes. The Editor will help you with this.
The first vertex listed is the mouth, it can be moved freely and should be positioned at (or close to) the centre of the levelexit. You should always position this first. Any other vertexes will "snap" into allowed positions as you drag. [Video that shows all of the above stuff about vertexes]
The levelexit
As mentioned above pipes are just visual items, it's levelexits that do all the real work. They control the opening / closing of the pipe, they suck Goo Balls towards their centre when the exit it open, and they allow balls into the pipe (or not). They also display the small puffs of air sucking towards the centre.
The radius attribute affects two functions of the pipe. It sets the detection distance for opening the pipe, if there is an attached Goo Ball within the radius, then the exit and pipe open. It also sets the suction range, (almost*) all Goo Balls within the radius are sucked towards the centre.
But not all Goo Balls will be collected.
Whether or not a Goo Ball is collected is controlled by two things. Some types of Goo Ball can never be collected (those tagged suckable=false; Pokey, Beauty, BlockHead etc). All other Goo Balls can be collected, and you can use the filter attribute to control which are "allowed" in this level.
If filter is empty or missing, then any "suckable" Goo Ball will be collected. Otherwise filter can be set to allow one (or more) specific types of Goo Ball into the exit. When more than one type of Goo Ball is allowed the types should be comma-seperated common,Ivy for example.
Notes
Pipes also have an id attribute which has no effect or function on the game.
Given this, both depth and id will be removed in future versions of the Editor.
Custom Pipes
In addition to the 4 "normal" pipes ('Grey','BLACK','BEAUTY' and 'ISH') it is possible to add your own custom pipes.
You could simply override the original graphics with your own, but this would also change the pipes throughout the original levels. So if you want to keep your special pipes "to yourself" and only use them in your levels... here's how.
Choose a name for your pipe
Something descriptive and "unique"... certainly nothing that has been used before. I used LEMON and since it is case-sensitive you are best sticking to UPPERCASE like the original types.
Create the new graphics
You will almost certainly need to create images for the open and closed mouth and the pipe itself, and it will be easiest if you keep the original naming convention for these images
| pipe_horiz_{PIPENAME} | pipeCap_closed_{PIPENAME} | pipeCap_{PIPENAME} | ||
 |  |  |
You could also create new images for the bends or corners, although for LEMON I just used the original black corner graphics that are used on the Grey,Black and Beauty pipes.
Add the Pipe Resources
If you plan to use this pipe in just 1 or 2 levels, you should add the resources to the level directly. Import the pipe images into your level then change the resource ids to match the list below. WooGLE will then automatically include the pipe resources and graphics in the goomod.
If you plan to make a level pack or chapter which uses the custom pipe many times, you should add the resources to the global properties/resources.xml.bin. However, you will need to add a merge file and all the necessary graphics to the goomod yourself.
| id | path | |
| IMAGE_GLOBAL_PIPE_{PIPENAME} | res/images/levelimages/pipe_horiz_{PIPENAME} | |
| IMAGE_GLOBAL_PIPE_BEND_TL_{PIPENAME} | res/images/levelimages/pipe_bend_tl_{PIPENAME} | |
| IMAGE_GLOBAL_PIPE_BEND_BR_{PIPENAME} | res/images/levelimages/pipe_bend_br_{PIPENAME} | |
| IMAGE_GLOBAL_PIPE_BEND_TR_{PIPENAME} | res/images/levelimages/pipe_bend_tr_{PIPENAME} | |
| IMAGE_GLOBAL_PIPE_BEND_BL_{PIPENAME} | res/images/levelimages/pipe_bend_bl_{PIPENAME} | |
| IMAGE_GLOBAL_PIPE_CAP_OPEN_{PIPENAME} | res/images/levelimages/pipeCap_{PIPENAME} | |
| IMAGE_GLOBAL_PIPE_CAP_CLOSED_{PIPENAME} | res/images/levelimages/pipeCap_closed_{PIPENAME} |
Notes about image files:
The paths shown above are for example only, you may use any valid image file for any of the pipe resources.
The image files do not have to be in res/images/levelimages, and if this pipe will only be used in one level it would be best if you put the images in the level folder.
You can use the original black bend images by simply omitting the _{PIPENAME} from the paths for the BEND resources.
Set the pipe type
Finally you need to set the pipe's type attribute.
This must exactly match the {PIPENAME} you used in the resource ids.
NB: You can only enter a "custom" name into type in WooGLE v0.74 and above. If you use a "custom" pipe then it will display as bright red in the level view.
If you want a closer look, or a reference for creating your own pipe, you can download my Lemon Pipe Demo below
| Attachment | Size |
|---|---|
| lemonpipe.goomod | 15.38 KB |
Ending Levels
There are a number of ways you can complete a level in World of Goo, by far the commonest is the pipe, but if you want something a little different there are several other options.
In the original game these other types of "exit" were used almost exclusively on the final level of a chapter. If you use any of these exits you should be aware that on "completion" the player will not be returned to the Chapter 1 Island screen, but to the main World screen. Also these other exits do not display the normal end-of-level sequence (Continue Handle -> Tank -> Level Stats), they jump immediately to any cutscene* then to the World screen.
targetheight
This type of exit was used in "Reguritation Pumping Station", it has a single attribute y which specifies a height.
The level will end if any attached Goo Ball is above this height.
NB: If an attached Goo Ball begins the level above this height, the level will end immediately.
endoncollision
This type of exit was used in "Product Launcher" and "Observatory Observation Station".
The level will end when two particular geometry objects collide (touch).
id1 and id2 are the ids of the geometry objects which must collide. There is one other attribute delay, this specifies the number of seconds after the objects collide, until the level actually ends. During this time the level remains completely playable.
endonnogeom *NEW*
This end condition was not used in any of the original levels, but is in the game code and does work.
Simply, the level ends when there are no dynamic geometry objects remaining.
Dynamic objects can be destroyed in 2 ways...
- Bombs and exploding Goos, if the geometry is tagged with break=
- By other geometry tagged as geomkiller
Multiple End Conditions
You may add more than one end condition to your level. In this case if any one of the possible conditions are achieved.. the level will end.
endonmessage
This end condition is used in "Deliverance" and "MOM", and ends the level after a particular message is displayed. If an UndeletePill hits a Ballbuster or a [Mostly]Deadly, it shows the popup, and ends the level if you have endonmessage set to END_DELIVERANCE. Otherwise, it will crash.
*Note: cutscenes are unavailable in the current version of GooTool.
Multiple Exits
It is possible to have multiple levelexit items in a level - but if you don't understand exactly how they work, the results will be confusing, both to you and to the player.
Multiple Pipes
Even if you add multiple pipes to your level, World of Goo will only display the first one you add. WOG Editor now only allows you to add 1 pipe item.
That's not to say you can't have more than one pipe appearing in your level. You can add as many pipe images as you like using SceneLayers, but only the pipe item will be a "real" pipe, and only the "real" pipe will change from closed to "open mouth" when the exit is triggered.
But Remember.. Pipes don't DO anything
Pipes do not SUCK, Pipes do not COLLECT Goo... even 'real' pipes. It's the levelexits that DO things... pipes just look pretty.
Multiple levelexits
In a normal level, with a single levelexit item, the levelexit performs 3 different actions:
- Trigger: Opens the exit and changes the pipe to the animated "open mouth"
- Sucker: Pulls goos (free or attached) towards its centre
- Collector: Accepts Goos and takes them out of the level (providing they match the filter property)
If you have two or more levelexit items in your level though, the first levelexit listed will only be the Sucker. It will not open the pipe when the Goo Balls get close, it will not collect any Goo Balls, and it will ONLY suck when the other exit tells it to. This exit is completely invisible.
The last levelexit listed will be the Trigger and the Collector. When the Goo Balls build close to this exit, it will open the pipe and collect balls. It will not Suck, but it will tell the first exit to suck. This exit will also show the little white "puffs" of air sucking into it.
Any additional levelexits do absolutely nothing.
So what use is an exit that doesn't suck? or one that ONLY sucks?
Well, both exits activate at the same time, when the Goos get to the last exit. This means that an action in one place (triggering the last exit) causes an effect somewhere else (Sucking at the first exit)
I used this effect to create a trap in Gotcha! but it could be used for other things, maybe even helping the Goo Balls somehow.
To be clear:
- Only ONE exit can ever open the pipe (The last levelexit item added)
- Only ONE exit can ever Suck (The first levelexit item added)
- Only ONE exit can ever collect any Goos (The last levelexit item added)
If you only have one levelexit, then first and last are the same, so it does everything. If you have two: know which is which, and what they do.
This video explains the behaviour in the case of multiple exits:
Explored Area
By default the camera is allowed to roam anywhere within the defined [Scenebounds], however if you set the autobounds attribute of the level to true, things get a little more complicated.
The game has the concept of an "explored area".
Put simply this area begins surrounding just the starting area and any initial Goo Ball structure and expands as you build to reveal more and more of the level.
Note: The explored area will not contract if the player dismantles their structure.
However there is a bit more to it than that...
The camera is allowed to move anywhere within the explored area and can show up to 800pixels either side horizontally and 600pixels above or below, although it will not go outside the defined scenebounds.
Note on Wide-Angle Cameras
If the initial zoom of the camera is "small" and the camera would show areas outside the explored area, the game automatically zooms in until only the explored area is visible. Each time the explored area expands the camera zooms out until it reaches its nominal zoom setting.
Fire

You can add particle effects that look like fire easily, see particles, but if you actually want to set Goo Balls on fire, you need a fire object.
Fire objects are circular so have a center and a radius. Any Goo Balls with a non-zero burntime attribute are flammable*, and will catch fire if they enter a fire object.
Note: Thrown balls do not catch fire, unless they bounce off something first.
You can control what the fire looks like using the particles attribute. You can select any local particle effect, although for playability you should choose
- an effect that looks like fire
- an effect that approximately matches the size of the fire object.
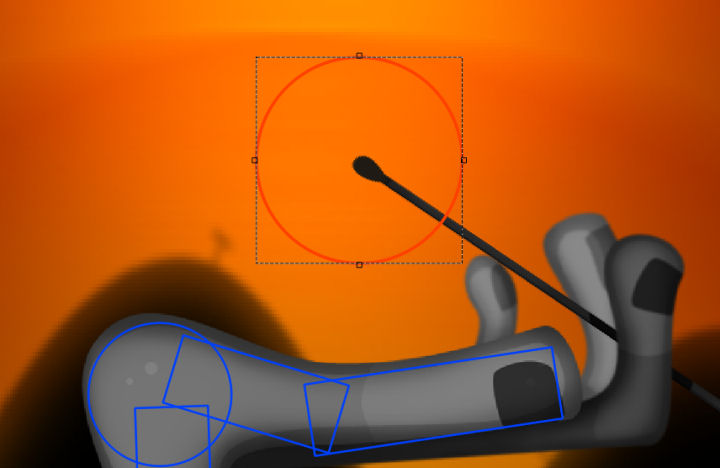
* Balls that are flammable
- Fuse
- Ivy
- Bit, Pixel, PixelProduct
- BombMini, BombShaft, BombSticky, ZBomb
- Drained, DrainedIsh
- BeautyProduct (but not BeautyProductEye, or UglyProduct)
Ivy balls are "flammable" in that the same "fire" property is used for "poisoned", just with different particle effects. Therefore it is inadvisable to use Ivy balls on levels containing real fire.
Goos and Strands


What is a Goo Ball?
The answer may seem obvious, but if you're new to editing World of Goo levels then there are some types of Goo Ball you probably won't be familiar with.
Things that you might not know are Goo Balls, but are.
- The Squares and Rectangles in "Graceful Failure"
- Timebugs
- Fixed Anchor Points
- The UndeletePill and the mass of Spam Envelopes in "Deliverance"
- The Applications and Games folders that create the window blocks in "MOM"
All these things are Goo Balls, along with the ones you'll know like "Ivy" and "Fuse". The different types of Goo Balls
Adding Goo Balls (aka BallInstance) to your level

The Goo-lbar allows you add any of the common types of Goo Ball from the original game. You can also add any other type of Goo Ball that came with the game, or a custom one you have made yourself, just add any Goo Ball from the toolbar, then change its type attribute to the type you want.
Goo Balls can be selected and moved with the mouse in the Level View. Square balls (Bone, BlockHead, RectHead etc) can also be rotated using the mouse.
You can Cut, Copy, Paste and Delete the selected Goo Ball using the toolbars, menus or the usual keyboard shortcut. Note: Pasted Goo Balls will appear exactly on top of the Copied one. So you should spread them out afterwards.
Connecting them together
Goo Balls can be connected together using Strands. The easiest way to do this is using the new "Strand Mode"
All you need to do is click on a Goo Ball and drag the rubberband line to another Goo Ball. If a Strand is too long, it be shown in red.
Some types of Goo Ball cannot have Strands (Beauty's, Blocks etc) the editor will prevent you from connecting these types of Goo Ball together.
Strands can be removed by simply selecting them and pressing {Delete} or from the Edit menu / toolbar
Note on deleting Goo Balls
If you delete a Goo Ball which is connected to another then the Strand will remain. Strands with only one (or no) Goo Balls attached will be highlighted in the Level Tree Tab.
discovered or sleeping
Goo Balls have a discovered attribute, this sets whether they begin the level awake or asleep. If this is left blank or set to true then the Goo Ball will begin the level awake. If discovered is set to false the Goo Ball will begin the level asleep.
Hint: By default Goo Balls are added awake. If you want a lot of sleeping Goo Balls, it is easier to add one, set it to be asleep, then Copy and Paste it as many times as you need.
Utility Balls
There is yet another type of Goo Ball; the Utility ball. These balls are used for many different things in the game, some you will have seen (the black support chain in Genetic Sorting Machine). Others you will not because they are invisible, and are used to do something "special" like playing a sound-effect or producing a cloud of other utility balls that each produce a particle effect. More information on Utility Balls
Music and Sound


There are two background sounds that can be played during your level: music and an additional loopsound. Both can be set from buttons on the WooGLE toolbar or from the Resources menu.
What music does should be obvious. loopsound provides additional background sound effects.. like wind, water or squeaky windmills.
You can select any ogg sound file to be either music or loopsound - see below for lists of those used in the original game. If you want to use your own music or sound effects you will need to convert them to Vorbis ogg format... [more information on sound files]
Music files
Sound files
Music by Level Name
| Level | Music File | Loop Sound |
|---|---|---|
| AB3 | Overture98Excerpt1 | loop_strongwind |
| BeautyAndTheTentacle | screamer | loop_rainLite |
| BeautySchool | temp_CarnivalLoop | |
| BlusteryDay | temp_jelly | loop_strongwind |
| BulletinBoardSystem | Overture98Excerpt1 | loop_squeaksInTheWind |
| BurningMan | stratloop | |
| Chain | temp_jelly | |
| Deliverance | temp_DWtD1 | |
| Drool | temp_CarnivalLoop | loop_waterPond |
| EconomicDivide | temp_DWtD2 | |
| FistyReachesOut | RainRainWindyWindy | |
| FlyAwayLittleOnes | RainRainWindyWindy | |
| FlyingMachine | temp_jelly | |
| GeneticSortingMachine | temp_DWtD1 threadcutter |
loop_squeaksInTheWind |
| GoingUp | temp_CarnivalLoop | |
| GracefulFailure | ReveilleDNT | |
| GrapeVineVirus | temp_DWtD2 | loop_bubbles |
| GraphicProcessingUnit | ReveilleDNT | |
| HangLow | RainRainWindyWindy | |
| HelloWorld | YearsOfWork | |
| HTInnovationCommittee | temp_islandam | loop_superbirds |
| ImmigrationNaturalizationUnit | temp_miniottbb | loop_shore |
| ImpaleSticky | temp_miniottbb | |
| IncinerationDestination | temp_DWtD1 | loop_fire |
| InfestyTheWorm | RainRainWindyWindy | loop_beforeItRains |
| island1 | temp_islandam | loop_firewater |
| island2 | threadcutter | loop_squeaksInTheWind |
| island3 | notld_anthem_excerpt1 | loop_strongwind |
| island4 | YearsOfWork | loop_strongwind |
| island5 | alwaysdestroythethingsilove(excerpt) | loop_strongwind |
| IvyTower | temp_DWtD2 | |
| LeapHole | temp_CarnivalLoop | |
| MapWorldView | temp_main | |
| MistysLongBonyRoad | RainRainWindyWindy | loop_strongwind |
| MOM | bigcomputer1 bigcomputer2 |
loop_superbirds |
| ObservatoryObservationStation | alwaysdestroythethingsilove(excerpt) | loop_eveningWater |
| OdeToBridgeBuilder | OdeToTheBridgeBuilder | |
| ProductLauncher | notld_anthem_excerpt1 | loop_celebrityCrowd |
| RedCarpet | n2 | loop_celebrityCrowd |
| RegurgitationPumpingStation | temp_DWtD1 | |
| RoadBlocks | screamer | loop_strongwind |
| SecondHandSmoke | temp_DWtD2 | |
| SuperFuseChallengeTime | kaptainpolka | |
| TheServer | temp_CarnivalLoop | loop_eveningWater |
| ThirdWheel | OdeToTheBridgeBuilder | loop_squeaksInTheWind |
| TowerOfGoo | kaptainpolka | |
| Tumbler | kaptainpolka | |
| UpperShaft | stratloop | loop_fire |
| VolcanicPercolatorDaySpa | temp_DWtD2 | loop_bubbles |
| WaterLock | temp_miniottbb | loop_waterPond |
| WeatherVane | threadcutter | loop_squeaksInTheWind |
| Whistler | temp_jelly | |
| wogc | RainRainWindyWindy | loop_squeaksInTheWind |
| wogc3d | DikkiPainguinLoop(rev-1) | loop_celebrityCrowd |
| wogcd | bigcomputer2 | loop_superbirds |
| YouHaveToExplodeTheHead | screamer | loop_fire |
Scene Tree
The scene tree holds information about how the level looks (graphics, particle effects etc), the geometry (solid things) and other physics-related items (like gravity and wind) that affect the Goo Balls.
The Scene Root item has a few properties of its own. Full Details Here
Scene Bound : minx,maxx,miny,maxy
These four values define the visual scene bounds - how far the level can be scrolled. No part of the level outside this area will ever be displayed on screen. Placing essential items (like the exit) outside these bounds could mean your level is unplayable. Placing balls outside this area is highly discouraged, since you won't be able to see them, or pick them up.
See also [Scene Bounds vs autobounds=true]
The Scene Tree contains....
Force Fields


There are 2 types of forcefield, linear and radial, these can provide effect like gravity, wind and water.
linearforcefields can simulate a number of very different effects depending on their settings.
Ambient Fields (Gravity)
If a linearforcefield has no size attribute (or it is left blank) then it is an ambient field, and it affects the entire level. Almost all of the original levels have an ambient field providing the gravity.
Local Fields (Wind)
linearforcefields can also be localized by giving them a size and a center. In this case only objects inside the field are affected by it. This is used most commonly to simulate wind or to support the Goo Balls when they are sitting on a cloud.
Water
When the water attribute is set to true, the game displays the water effect within the field in the given color. The top edge of the field is given surface ripples and makes little splashes when objects enter or leave at speed. However beyond these visual differences the field's physics operates in the same way as any other Local field.
radialforcefield
These fields are also used to provide a gravity effect, but on a larger scale. Used in Graphics Processing Unit and Main World View to give the orbiting effect. These fields cannot be ambient, so they must always have a center and a radius specified. The type,antigrav and dampeningfactor attributes work the same as linearforcefields see above
If forceatcenter and forceatedge values are different, then the force varies linearly between them.
Note on geomonly
This attribute can be applied to linear fields. When set to true the field only affects dynamic geometry objects and not Goo Balls. This can be useful in the construction of mechanisms - [link to...]
Note: geomonly tag was present on all radialforcefields in the original levels, but doesn't have any effect when set to true, so was removed from WooGLE in v0.74
Geometry


In the World of Goo, the geometry objects are what make things solid. Geometry is what the Goo Balls can sit on, walk on, attach to, bounce off etc.
There are several different kinds of geometry object you can include in your level, but no matter how complicated your level is, it's all built out of very simple shapes (rectangles and circles).
Geometry objects can be fixed in space (static) or moveable/moving (dynamic). They can be made of various materials, and can have a whole host of different effects on the balls and other things.
Geometry objects can also have images attached to them. This is unnecessary on static geometry - it is usually simpler to use a separate SceneLayer item for the image. But if you want the geometry to move, and you want the image to move with it, you must add the image to the geometry object.
Geometry IDs
Every geometry object has an id attribute. When you add a geometry object to your level, WoG Editor will automatically assign it a unique id of the form geometry{number}.
You can change these IDs to whatever you like, and the game is quite flexible in that regard. It will allow objects with duplicate IDs and blank IDs without complaint. However, this can cause you endless problems whilst you're editing the level.
WoG Editor will report any problems by refering to an object's ID. If you have many objects with the same (or blank) ID, you won't know which object actually has the problem.
Once you start designing larger levels, with dozens or hundreds of geometry objects, it can be useful to start giving them "meaningful" names: platform1, leftwall, killerwheel or whatever. As long as you keep these names unique, you will be fine.
Basic Shapes
There are only two basic shapes that Geometry objects can be; rectangles and circles. Most of the solid objects in your levels will be built using just these items.
| Rectangles | Circles | |
|---|---|---|
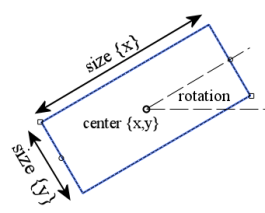 |
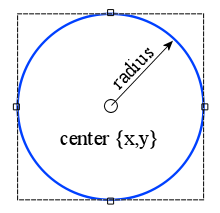 |
These shapes can be positioned, resized and rotated using the mouse in the Level View window, or you can enter values directly into the Properties Pane.
Options / Attributes
Static or Dynamic
tag attribute
[Material]
[Applying Images to Geometry]
[Making Geometry less Solid]
Composite


compositegeom objects are very similar to the Basic Shapes objects, with a couple of crucial differences and a few "quirks".
The basics of a compositegeom are most easily explained with a short video.
Whilst you can add as many children as you like to a compositegeom, and build a something fantastically complicated, it is still a single object, and it will move and act as such. Like other geometry objects it can have a material, tags and an image, and the compositegeom passes on these properties to all of its children.
So why is that useful?
The main uses of these objects are:
- Moving Objects which are 'complex' shapes
The Third Wheel in "Third Wheel" is a compositegeom object, as are the fingers in Genetic Sorting Machine. - Grouping a number of basic shapes together so that they share certain attributes.
Most of the platforms in "Alice and Bob" are parts of the same object, and all the walls and ledges in "Grape Vine Virus" are one big compositegeom.
Another crucial difference between compositegeom and other geometry objects is that compositegeom objects do not have a mass attribute. Their mass (and centre of gravity) are calculated from the masses and positions of all their child objects.
NB: This only matters when you are using [Dynamic objects].
Bugs
compositegeom objects also have a few "quirks" (steming from bugs in the game engine):
- Incorrect handling of deadly and mostlydeadly tags with "sticky" Goo Balls - see note in tag attribute
- Incorrect handling of nocontacts attribute with "sticky" Goo Balls - see note in [Making Geometry less Solid]
- Unexpected Displacement of Rotated, Dynamic compositegeom objects - [link TBA]
Dynamic

Dynamic Geometry is any geometry object that is set to static=false or {blank}. Dynamic objects can move or be moved, they will respond to forcefields (including gravity), they will react when Goo Balls or other geometry hits them. In short they behave as if they were real solid objects in your level.
Important Note: All Dynamic objects require a mass
If you set static=false you must enter a value for the mass of the object.
Despite what you might remember less than half the original World of Goo levels contained Dynamic Geometry.
If you're looking for information on how to create any of the following...
- spinning cogs
- wheels that will pop a Beauty Ball
- windmills that kills Goo Balls
- the wobbly head in "Chain"
- the lifting wheels from "Third Wheel"
then you should probably read this instead - Making things Spin!
There are a number of categories of Dynamic Geometry.
Free Standing
These are objects which are not fixed to anything, and are free to move or fall as the physics engine dictates.
Examples of Free Standing Objects
- The head block in "Burning Man"
- The Bomb Carriage in "Upper Shaft"
- All those explodable blocks in "Deliverance"
Free standing objects are the simplest to set up. Once you have set the object to static=false and given it mass.. you're done. Although you'll probably want to apply an image to it, so that the player can see it. see [Applying Images to Geometry]
Hinged
These objects can move, but they are constrained to rotating about a point, a hinge. The hinge can be a fixed point or can be attached to another dynamic object.
Examples of simple objects using fixed position hinges
- The platform in "Server Farm" - View Image
- The liftable bars/gates in "Flying Machine" - View Image
To create an object like this, set it to be static=false and give it a mass, then add a hinge object to the level. Move the hinge into the correct position and set its body1 attribute to the id of the geometry object.
[Full details on hinge and its attributes]
Examples of more complex hinged objects
- The Red Carpet Extend-o-matic machine in "Red Carpet" - View Image
- The machine/robot/thing at the bottom of "Deliverence" - View Image
Notes on Hinged objects
- When two dynamic objects are hinged together, they will not collide with each other.
However they will still collide with other geometry objects and Goo Balls.
And if A is hinged with B, and B is also hinged with C.. A and C can still collide. In the case of the Deliverance "robot".. the fingers could collide with the head, because they are not directly connected by a hinge. - Hinges cannot be attached to compositegeom child objects.
If you attempt to attach a hinge to a compositegeom child, the connection will be ignored, and the hinge will be in a fixed position. To hinge a compositegeom object you must attach the hinge to the parent object. - Hinges cannot be attached to Static Geometry
Again, if you try the connection will be ignored and the hinge will be a fixed position. This will not affect the dynamic object directly, since it was being hinged to a fixed body anyway. However, since the 2 objects are not connected by a hinge, they will collide as normal. - Bug in the game: Timebugs vs 2 body hinges
If you have a hinge which connects 2 dynamic bodies, then its position is not correctly reset when a timebug is popped, this can cause some very undesirable effects. Fixed position hinges are fine, but hinges that move get badly messed up.
Lines

Line objects are used to define the edges of the level, as far as the Goo Balls and dynamic geometry are concerned. Lines are the simplest type of geometry object, however if you don't understand how they work, they can cause you all sorts of problems.
Lines have a position (anchor) and a normal direction (normal). Together these tell the game where the line is and what its rotation is. The normal dictates which way the line points and defines the front and a back. It's the front and back which are important, because Goo Balls and dynamic geometry objects can only ever be in front of a line.
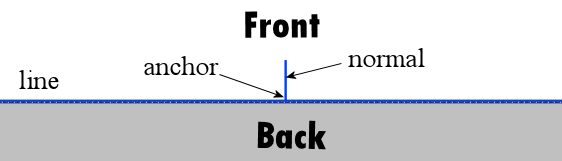
In fact, they must be in front of all the lines in a level. You must always have the normal's pointing inwards towards the middle of your level. If they face outwards then Goo Balls are not allowed to be in your level.
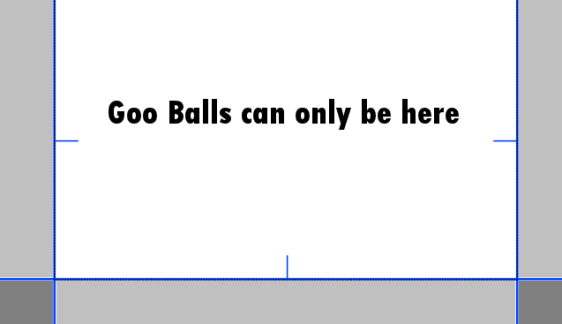
If a ball or dynamic geometry is placed the wrong side of a line, the physics simulation will go berserk due to the illegal placement.
Lines have a tag attribute and a material, so they can affect Goo Balls, Structures and Dynamic Geometry in many different ways.
Unlike circles and rectangles, lines can't be placed into a compositegeom - not that this would make sense anyway.
Sliders
[Under Construction]
Static
A Geometry object can be made fixed and unmovable by setting its static attribute to true.
Static objects are used for Walls, Cliffs, Platforms and the other things in your level that will never move. The vast majority of the geometry in your level will usually be static, so WoG Editor sets static=true on geometry objects when you add them.
The static attribute only affects the "fixed" nature of the Geometry object, it can still be assigned a [material] and tags.
You can also apply images to static geometry, however you are normally better using a separate image object. The only time that static geometry requires an image is when it can be destroyed - see [Making Geometry less Solid]
Note on Building Walls and Cliffs
There is a bug (more a "weakness") in the World of Goo game engine which allows fast moving Goo Balls to pass through thin walls. This has been used to great advantage by many players in order to beat levels faster or better.
However it can also be annoying and problematic if a level is designed "poorly" and Goo Balls can accidentally pass through thin walls and become stuck or die. The best way to avoid this problem is to make your geometry as big and solid as possible, rather than building thin walls around the edges of the images. Overlapping regions are fine, in fact they are encouraged, since Goo Balls can get stuck in small gaps between geometry that almost touches.
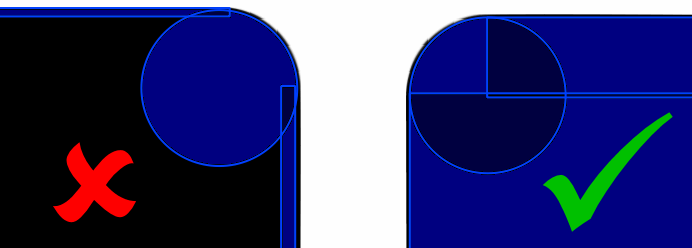
Images

Image objects, known as SceneLayers in World of Goo and WoG Editor, are how you get graphics into your level. It is important to realise that images are not solid. Just because you add a picture of a cliff to your level, this doesn't mean the Goo Balls will sit on it. You need geometry objects to make things solid.
SceneLayers let you build up the visuals in a level, from the background image to what the walls and cliffs look like, and they let you add foreground objects, like bushes, which come between the player and the Goo Balls.
You cannot import image files directly onto a SceneLayer object, the image file must first be added to the resource list and given a unique id. You can then select this id from a list in the image attribute of the SceneLayer.
Once you have assigned an image the SceneLayer can be moved, rotated and resized using the mouse in the Level view, or by changing the center, rotation and scale attributes.
Images also have depth
This allows you to control which images appear in front or behind other images, the geometry and the Goo Balls. depth can be positive or negative (positive values are in front of the Goo Balls, negative values are behind), and can be a fractional number (1.234).
It also controls the "distance" to the image. Over a limited range (where depth is between -2 to +2) the only apparent effect is which things are in front and which are behind. On a larger scale a parallax scrolling effect can be seen. Objects with large negative depth (-1000 say) will appear to move more slowly around the screen as you scroll, simulating being further away. Objects with positive depth (+200) will be in the foreground, will move faster as you scroll and will appear between the player and the Goo Balls. [Embed Video]
Other useful SceneLayer attributes
alpha allows you to control the overall transparency of the image.
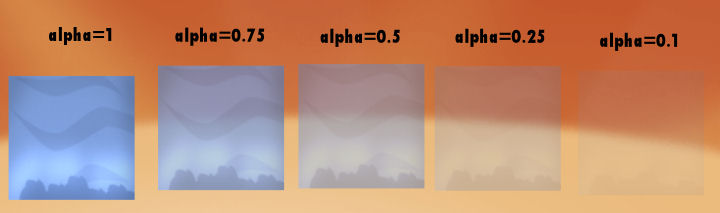
colorize allows you to change the color of an image.
The image will become tinted by the RGB color you enter [Technical Details Here]
A value of 255,255,255 will display the image unchanged, and 0,0,0 will display a completely black image.
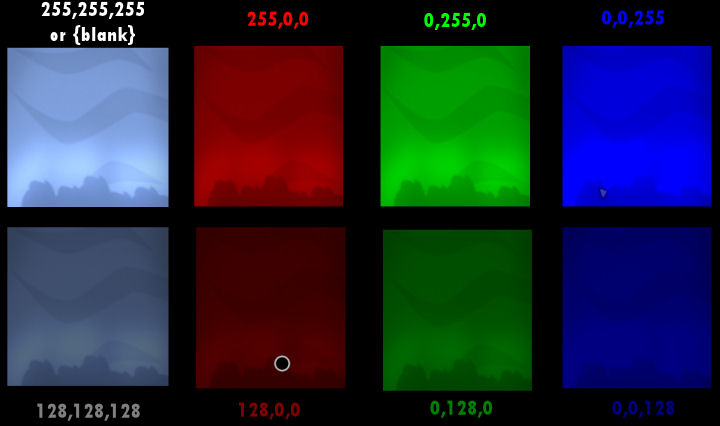
tilex and tiley repeat the image across the whole level.
Used in the original World of Goo Corporation levels for the "infinite" sky and ground. Note:tilex and tiley should not be used with rotated images, see this example showing why not.
SceneLayers can also rotate/spin, see Making things spin, or can be animated. However, whilst this may make the images move, they will still not interact with the Goo Balls or Geometry objects. If you want to create a moving object which can affect things, see [Applying Images to Geometry]
Full details of all the SceneLayer attributes and their functions [Here]
Notes on depth
- Images representing walls, cliffs should be as close to depth=0 as possible.
This applies to all SceneLayers showing the image for any solid object created using geometry. If these images have a large positive or negative depth, then they will move relative to the geometry, and Goo Balls may appear to bounce off thin air, or fall through a cliff, rather than off the edge. This is because the balls and geometry themselves are at depth 0. - The absolute maximum foreground depth is +700
This is where the camera is. Beyond this, the game considers the image to be behind the camera, but will still attempt to display the image. This causes some rather odd and disorientating effects.
For foreground objects such as bushes, trees and rafters etc. depths in the range +100 - +300 are best.
Animations


SceneLayer objects can be animated by setting their anim attribute. There are many different animations available to choose from, however only a few of these will be of any real use in a level.
"Useful" Animations Library
Animation Speed animspeed
Most animations run quite quickly at their default speed (animspeed=1), so you will usually need to slow them down by setting the this to a number less than 1. You can use negative values to make the animation run in reverse.
In particular, rot_1rps is an animation with precisely 1 rotation per second. To make something rotate once every 10 seconds, set animspeed=0.1.
Animation "Delay" animdelay
This appears to be named incorrectly, as it actually appears to do animation advance. In the video below, the object with animdelay=0.1 is ahead of the object with animdelay=0.
You may also notice that animdelay=0 and animdelay=1 give identical results.. in fact animdelay={x} seems to be the same as animdelay={x+1} (presumably the animdelay is a specified as a fraction of the animation duration).
Note on Animations and Scale
SceneLayer items can have both a scaling factor and an animation set.
However the game seems only to support uniform (x=y) scaling in conjuction with animations, and if presented with non-uniform scaling, will use the larger scaling factor on both axes.
So scale=2,2 or 0.5,0.5 appear as expected, but scale=0.5,2 will appear in the game as if you entered scale=2,2
Importing

Before you can use an image in WoG Editor you must import it into the Resource List. To do this click the Import Images button and select the file (or files) you want to import in the standard file dialog.
Each file that you select will be given a unique id and added to the resources list, if it's not there already. The id will be automatically generated and will be something like IMAGE_{FOLDERNAME}_{FILENAME}
When you edit the image property of any object, a list of the ids of all the image resources will be displayed.
Image File Format
World of Goo uses png files for all its graphics. It will accept any "flavour" of png file (paletted, grey-scale or 16m colour) and supports both alpha-channel and single-colour transparency.
Importing "external" images
All the image files that World of Goo uses must be located within (or below) {Game_Folder}/res/ If you import files from anywhere within this folder then WoG Editor will just add the filename and id into the resource list.
However, you can import images from anywhere on your system.
If you import files from outside the res folder WoG Editor will take a copy of each file and place it in the [Level Folder], and add the copies into the resources list.
Note on Images for Mac
On Mac, World of Goo uses graphic files in a "non-standard" and substantially different format Details here. GooTool will convert standard png images to this format when it installs a level.
(TODO: State whether GooTool will also convert jpg renamed as png correctly on Mac)
Labels


labels can be used to add text to your level. In the original levels they were only used in Alice and Bob and MOM.
labels have a position atrribute called center, which is slightly misleading since it is not always the centre of the text. The final positioning of the text is also affected by the align attribute.
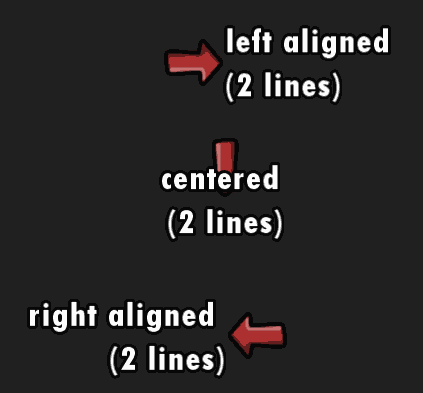
In the image the tip of the arrow is at the center coordinates.
labels have a rotation and a scale factor which can enlarge or reduce the text.
They also have a depth which operates in the normal way, but this can be overriden using the overlay attribute. If overlay is set to true, the text will be display on top of (in front of) everything else, regardless of the depth setting of the label, or the depths of the other elements in the scene.
text
The actual text for the label is held in a [Text Resource], so that it can be multi-lingual. The id of the text resource is selected using the text attribute of the label.
font
There are a number of fonts you can choose from, however not all the fonts can display the full character set.

Particles


particles items generally provide the background effects for a level like falling leaves, or snow or mist, but they are also used to provide effects such as fire, the signpost !'s and the musical notes created by the whistle.
There are 2 types of particle effect
- Ambient which cover the entire level
- Point-Source which eminate from a particular location
particles items have a position pos which only affects the Point-Source effects, and a depth attribute which allows you to control whether the effect appears in the foreground or the background.
The pretick attribute allows the particle effect to be virtually "run" for a time before the level begins. This time allows effects to "get going" or cover the level before it is displayed to the player. It was used very rarely in the original levels. The value is in milliseconds (1000 = 1second) and 1 second seems more than adequate for most cases.
Point-Source (non-ambient) Particles Library
Any of these effects could be used on a fire or signpost object, or as a particles item.
Ambient Particles Library
Any of these effects can be used on a particles item.
Guide: Spinning
There are several ways you can make something spin. The correct to do it depends on exactly what you want it to do.
If you just want a spinning background/foreground image
Use this method if you want a spinning image that looks pretty but doesn't affect the Goo Balls, like the small windmills in Blustery Day, or the black cogs in Upper Shaft.
Add a SceneLayer item, apply the image then set:
- anim = rot_1rps
- animspeed = 0.1 for example
In the above example, the image will rotate at 0.1 rotations per second, and thus complete its rotation once every ten seconds.
If you want a spinning cog or gear
If you want something to spin and also kill balls or pop a Beauty ball, like the main windmill in Blustery Day or the "buster" cogs, you are best doing it with two items:
- Add a SceneLayer exactly the same as the above. (this gives you the spinning image)
- Add a circle that's a similar size as the image and move it to the same place and set:
- static = true
- tag = {whatever} deadly or ballbuster - see tag attribute
If you want something that balls can grab hold of, or get hit by
Something that interacts with the balls and has physics effects, like the wobbly head in Chain or the wheels in Third Wheel, is achieved as follows:
- Add a Geometry object (Rectangle, Circle or Composite).
- Move it into place, set its image property and position the image.
- Set the object to be static=false and give it some mass - More information on Dynamic Geometry.
- Add a hinge and set body1={id of geometry object}.
- Move the hinge the centre of the object (or the point you want to it to spin around).
If you're happy with something that is moveable but doesn't rotate on its own, like the wobbly head in Chain, then you're done.
If you want it to spin on its own or lift balls, then on the geometry object set
rotspeed = 0.1.
Note about the mass of the object
In this last case, the mass you give to the object affects the power of the motor spinning it. If you set the hinge dead centre in the object it will spin fine regardless of its mass. But if you put the hinge off center, you will find that the motor may struggle to lift the object up one side, but it will drop down quickly on the other.
Also, if you have a "low" mass (like 10), as soon as a ball attaches, the motor will struggle to lift it. If you have a "high" mass (like 10,000), the wheel will grind on regardless and will lift many balls without slowing down at all.
If I can make it spin by just setting the rotspeed, what are motors for?
Well it's a good question. In fact there is only one proper motor object in the whole of the original game - on the robot's head in You Have to Explode The Head.
It seems that even 2D Boy found motors problematic / annoying / mostly pointless, and that using rotspeed and automatically setting the motor's power based on the mass of the object (discussed above) was far easier in most cases, than actually using a separate motor item.
The only time you really need a motor is if you want something that spins weakly but is also heavy, like the Robot's head.
You can't use rotspeed because that would automatically use a strong motor for a heavy object, so this is the only time you really need to use them.
Note: Since motors don't have a size or a position or anything else we could meaningfully draw, they don't show up in the Level View, so you must add and select them in the scene tab.
Errors and Warnings
When you Save, Play or Make a goomod in the editor, it performs a series of checks to ensure that the level you have made is valid and everything is correct. It will display an Issues message box if it finds any problems.
Each issue has a "severity" associated with it...
Advice : Mostly design tips, "best practice" hints and cosmetic issues
Warnings : More serious problems which will cause unexpected or bizarre behaviour in the level
Critical : Problems that will make the game crash or will cause serious trouble creating or distributing a goomod.
The level will always be saved, regardless of any problems, but the editor will not allow you Play or Make a goomod if there are any Critical Issues.
The next version of the editor will link directly from the message screen to this information page, so you can find out about each of the messages you receive. But if you just want to find out the problem are... read on.
Advice Messages
Scene Tree
Level Tree
Resource Tree
Dependancy Tree
Warning Messages
Scene Tree
Level Tree
Resource Tree
Other
Critical Errors / Problems
Scene Tree
Solution: Set the center position for this forcefield.
Level Tree
Dependancy Tree
Chapters and Islands


Once you’ve made a few levels, you might start thinking about making a complete chapter, before we start let's define some stuff and clear up a few misconceptions.
Chapter: A collection of levels, usually with a similar theme or graphics style.
Map Level: A level which defines and arranges the level buttons for a chapter.
Island: The game’s mechanism for creating a Chapter, linking a Map level and the list of levels in the Chapter.
An island is defined in the [ island.xml ] file.
Island and Chapter Numbers
There are 5 islands (1 -> 5) ignoring the mythical / non-functional Island6
There is no connection between Chapter Number and Island Number… the Chapter Number shown for any island is just specified as text in the Global Text file.
OK… 2DBoy set up the original in the "sensible" way; Chapter 1 uses Island1, Chapter 2 uses Island 2 etc.
However there is no absolute need to do this, the Chapter assigned to Island1 can be given any number in its title text.
Open Chapters and Pointer Arrows in MapWorldView
There is no direct relationship between Island Number and the order in which the levels can / must be played, or the order in which the Islands become available in the [ MapWorldView ]
A level is playable if its depends requirements given in the island.xml, are met.
If a level has no "depends" attribute, it is always playable.
An Island button is enabled if the first level entry in the island.xml is playable.
NB: "First" means the first <level> tag found in the file.
In MapWorldView the game sets the enabled / disabled state of the corresponding button id="islandx" based on this.
A black arrow pointer is displayed next to an island button if the island contains a playable level that has not been completed.
Island.XML
Requirements: island.xml must have...
map must be a valid Map Level
icon must give a valid Image Resource ID from the global resources.xml
At least one <level> tag defining a valid level.
Map Levels
Requirements: For each <level> tag in island there must be…
button with id="lb_{levelid}" This is invisible until level is playable
SceneLayer with id="ocd_{levelid}" This is invisible until OCD achieved
Optional:For each level tag in island there can be one or more..
SceneLayer with id="levelpipe_{levelid}" This is invisible until level is playable.
What happens when levels become playable…
When you finish a level, this may make 1 (or more) other levels playable. When this happens the game will display the unlockfuse particle effect which moves from the completed level button, to the newly playable button. When the effect reaches the target button, that button becomes visible, as do any levelpipe_ scenelayers for that level.
If a level depends on more than one level, the unlock particles travel from each depends level only when the final dependant level is completed.
How a Chapter Ends
When the 'last' level in a chapter is completed, the player is returned to the MapWorldView screen rather than island.
NB: Last means simple the last <level> tag appearing in the island.xml. This need not be the last playable level, based on depends, but normally it should be.
Special Islands
Island4 has one special thing.. the signposts. Any signpost, in any level, launched from island4 will display the green terminal sign, rather than the normal wooden one. This appears to be hard-coded into the game.
Island1 should also be considered as special and treated with care. Not because of there’s anything hard-coded in the game for it, but because this is the island that GooTool places custom levels into. Guidelines for redesign of island1
Commands and Actions that can be used in island maps
Action: wogcorp_from_island, zoomout, pl_{levelname}, pm_{moviename}
Display: ss_{levelname}, hs_{levelname}
For more details see [ Commands and Actions ]
MapWorldView

Also known as the Main menu, if you are considering a re-design or a “mod” to the MapWorldView level, you will need to make sure that you follow certain rules and include all the items which the game exe will attempt to access and manipulate.
It is recommended, if you are distributing a goomod, you merge your changes into the MapWorldView rather than compiling a new one, so that your mod will interact nicely with other mods that affect this screen.
Requirements
All the following items are required in the MapWorldView level. If any are missing the game will crash, usually right at the start.
buttongroup id="mainbuttongroup" (must contain at least 1 button)
button id="island1"
button id="island2"
button id="island3"
button id="island4"
button id="island5"
button id="island6" (Always invisible, can't be used but must be there)
button id="wogcorp_intact"
button id="wogcorp_3d"
button id="wogcorp_destroyed"
buttongroup id="boringmenugroup" (must contain at least 1 button)
button id="quit" onclick="quit"
button id="changename" onclick="selectprofile"
button id ="credits" onclick="credits"
label id="newballs" text="LABEL_PLUS_X"
SceneLayer id="newmail"
Customizing
So long as the above items are all present, you can modify the MapWorldView layout / level however you wish.
Commands and Actions
Action: island{Number}, selectprofile, credits, quit , wogcorp
Display: island{Number}showtext, islandhidetext
wogcorpshowtext, wogcorpdshowtext, showtooltip, hidetooltip
For more details see [ Commands and Actions ]
WoG Corp


The World of Goo Corporation consists of 3 separate levels; wogc , wogc3d & wogcd
We all know and understand the differences, and in the original game which one is available and when. However the rules the game applies to activate and switch between the different versions could be used in different ways.
The buttons in MapWorldView
The 3 wogcorp buttons are displayed (or not) using the following rules.
wogcorp_intact
Visible if island4 is NOT enabled and island5 is NOT enabled and WoG Corp is not destroyed. Also it is disabled until WoG Corp is unlocked
wogcorp_3d
Visible if island4 is open and island5 is not open and WoG Corp is not destroyed
wogcorp_destroyed
Visible if WoG Corp is destroyed.
Which level is played
The actual level that will be played when the wogcorp command is executed, matches the button which is visible.
The hole in the logic
It may not be obvious from the above, but there can be a gap in the wogcorp sequence.
If chapter 5 is enabled but WoG Corp is not destroyed… none of the buttons are visible.
In this case if you have an additional button which can access WoG Corp, then it will play the original "intact" level.
It is important to note that.. island4 need not be the fourth chapter played, nor island5 the fifth. So WoG Corp could change to "3d mode" immediately, or once the 1st chapter is completed, and could remain in that mode for anywhere from just 1 level, to the remainder of the game… since there is no requirement that WoG Corp is ever destroyed. Whilst changing the order in which the wogcorp levels become available is not possible, you can move through the sequence in different ways.
The Full Sequence
Disabled -> Intact -> 3d -> Invisible (but plays intact) -> Destroyed
By controlling when, and if, WoG Corp is unlocked and destroyed and when island4 becomes available, you can effectively skip various stages.
If WoG Corp is never unlocked, it is inaccessible until island4 is open, then the 3d mode is available, essential you have skipped the "intact" phase.
If WoG Corp is destroyed before island4 is open, you skip the 3d mode entirely.
[More Information about the WoG Corp Levels themselves]
Island1
Guidelines and Requirements for redesign of Island1
Island1 is special, mainly because this is the island into which GooTool places custom levels. If you plan to do a large mod, or multi-chapter level pack, or "WoG2" that will require you to redesign / reuse island1 then you should read and obey the following.
Advanced - Not for the faint hearted or the easily confused
The Rules
You may use compile XML versions of island1.resrc and island1.level
| Attachment | Size |
|---|---|
| island1.scene_.xsl_.template.txt | 1.75 KB |
| island1.xml_.xsl_.template.txt | 1.6 KB |
Special Levels
Most of the original levels are normal and everything about them is defined and configurable within the xml.
However there are a few exceptions, where the game exe is coded to do things a little differently. These tests and actions cannot be changed in the exe, so you will need to account for / avoid them as necessary.
The following are all the known “special” things.
Genetic Sorting Machine Music Change
If the level id is GeneticSortingMachine, then when a Beauty ball pops the level music is changed to a resource called SOUND_LEVEL_GENETICSORTINGMACHINE_ALTERNATE
Beauty and the Electric Tentacle Signpost
When a signpost with text="SIGNPOST_BEAUTYANDTHETENTACLE_3" is read, this unlocks a Steam achievement.
Note: This appears to work even if the signpost is in another level.
MOM
There are (obviously) many special things in this level, so many in fact that it really deserves its own page. [TBA]
Deliverance : Access denied Popup
When the player attempts to play a level with id Deliverance the game checks whether the "Terms and Conditions Accepted" flag is set in their profile.
If it is the level plays.
If not then a Popup Message box appears instead, which only allows the player to click OK, and the level does not play.
The popup uses the following Global Text resources
DELIVERANCE_BLOCKED_TITLE , DELIVERANCE_BLOCKED_BODY , DELIVERANCE_BLOCKED_BUTTON_TEXT
Undelete Pill
When an UndeletePill goo ball pops, the game displays a popup message (described in detail below) When the player clicks either button, the game executes the command undeletenow, which does the following.. in this order...
Modifies a linearforcefield
It enables a force field called skeletonfield (see Deliverance level).
Obviously if this field was already enabled then this has no effect, but if the level does not contain a linearforcefield item called skeletonfield, then the game crashes.
Switch to "movie" mode
It displays the letterbox bars, and prevents any further interaction with the Goo Balls, and prevents clicking on the Continue Handle, if already down.
Moves the camera
It pans the camera to a fixed position 0,1000
Pauses for about 5 seconds then pans again to 0,5550.
The camera will not leave the scene so if scenebounds maxy is less than 5850, then camera will stop when it reaches the top of the scene.
Sends an internal message : END_DELIVERANCE
If the level end condition is set to endonmessage END_DELIVERANCE the level ends normally.
If the level end condition is set to anything else… then the level is now stuck, and the player cannot finish it..
or retry or quit.
Undelete Pill Popup
Uses the following images and sounds.
IMAGE_GLOBAL_UNDELETE_DIALOG res/images/popup
IMAGE_GLOBAL_WIDEBUTTON_OVER res/images/widebutton_over
IMAGE_GLOBAL_WIDEBUTTON_UP res/images/widebutton_up
SOUND_GLOBAL_DIALOG res/sounds/popup
And these global text resources
UNDELETE_CONFIRM , UNDELETE_CONFIRM_TITLE , YES_BUTTON_TEXT , OK_BUTTON_TEXT
Commands
There are number of commands and actions you can execute in the game, these mostly control the GUI and where a button takes you, but there are other commands which perform specific actions like setting flags in the players profile.
Each command seems only to work at the appropriate stage ofthe game.
Commands available in MapWorldView
Actions
These commands are normally used in the onclick event of a button.
island{number} : Go to island{number}
selectprofile : Display the profile select screen.
credits : Show the credits movie
quit : Exit the game
wogcorp : Play the active WoG Corp level
Display commands
These commands are normally used in the onmouseenter and onmouseexit events of buttons
island{number}showtext : Show the CHAPTERx_NAME and CHAPTERx_DESCRIPTION text
islandhidetext : Hide the Chapter Name and Description Text
wogcorpshowtext : Show the Name and Description for WoG Corp
wogcorpdshowtext : Show the Name and Description for WoG Corp Destroyed
showtooltip : Show the text specified in the tooltip attribute
hidetooltip : Hide the tooltip
Commands available in Map Levels (Chapters / Islands)
Actions
These commands are normally used in the onclick event of a button.
pl_{levelname} : Play the level {levelname}
pm_{moviename} : Play the movie {moviename}
wogcorp_from_island : Play the WoG Corp level, but return to this island when finished.
zoomout : In effect "back".. return to the MapWorldView
Display commands
These commands are normally used in the onmouseenter and onmouseexit events of buttons
ss_{levelname} : Show the Level Name and Number of Goos collected for {levelname}
hs_{levelname} : hide the level name and number of goos collected
Commands available in / after levels
Profile Flags
The commands are used in the onclick event of a button, or in the oncomplete attribute of the <level> in the island.xml
oncomplete actions are executed when the level is "complete".
If the level is "normal" (ie. Pipe collecting Goos) the command is executed when the drop-down continue handle is clicked. ie before the scores are displayed.
If the level has any other type of endcondition, the command is executed when that condition is met.
unlockwogcorp : Set the WoG Corp Unlock Profile Flag (2)
This controls the enabled / disable state of the wogcorp_intact button in MapWorldView
undeletenow : Set the WoG Corp Destroyed Profile Flag (4)
See Special Levels - Undelete Pill for details.
NB: Executing this command in the "oncomplete" does work, however there is then a 20second delay before another button can be pressed.
unlockwhistle : Set the Whistle Found Profile Flag ( 8 )
The whistle becomes active immediately.
accepttermsandconditions : Set the Terms Accepted Profile Flag (16)
This unlocks the Deliverance level see Special Levels - Deliverance
Other Actions
restartlevelyes and restartlevelrightnow
These both appear to do the same thing, which is immediately restart / retry the level.
expandchapter4 : This command appears in the island4.xml as an oncomplete for the Hello World! level. However it does not appear in the game exe, and does nothing.
Mechanisms (Gotcha)
aka Tricks and Traps... the making of Gotcha!
SPOILER ALERT
What follows explains in detail the creation of my Gotcha! level.
If you haven't played it yet, you should, and you certainly should before reading on... otherwise it'll spoil the surpises!
Get it here http://goofans.com/download/level/gotcha
First a couple of basic building blocks...
compositegeom objects
Pretty much exclusively in the original levels, compositegeom objects were used to either
i) Produce more complicated movable shapes than just a circle or a rectangle.
(The lifting fingers in Genetic Sorting Machine, the Third Wheel in Third Wheel)
or
ii) To collect together a load of static items (walls, platforms etc) from all over a level, so they could all be tagged and moved together.
It's the third possibility that you can exploit when making traps, and I'm sure it'll have other uses as well.
A compositegeom object is built from a number of child rectangles and circles. Each one is positioned relative to the "center" of the compgeom object, so that when the main object moves or turns all the children move and turn in exactly the same way... as if they were a single solid object.
But... it doesn't mean that any / all of the children have to be close together or even touching. So, you can have multiple objects that move, turn, spin, act together (as if they were a single object).. but that aren't connected together by anything "solid".
This is a VERY useful "feature" of compgeom
The same is true for hinges
When dealing with any non-static (moving/movable) object you need a hinge to fix it to "the world".. otherwise they just free-fall.
The hinge has an "anchor" position and an object it attaches to (the "body")
If you want something to spin about its center (like the Wobbly head in Chain) you position the circle, put the hinge at its center point.. and hey presto.
But there's nothing that means the anchor has to be in the center of the object, or even inside it, or anywhere near it!
Like compositegeom objects, the hinge and the body act as if they are firmly connected together, without having anything solid actually connecting them.
This is also VERY useful
Using Linear Forcefields to throw / move stuff
I spotted this in Product Launcher, it's how they got the gun to rise up at the end.
The gun was just a normal rectangle, non-static with a mass and a material and an the image of the gun applied to it.
Initially it's sitting below the Z, and has a big Forcefield pushing up on it, but it can't move because the blocks that make the Z are in the way.
Once the Z blocks have exploded, the Gun rectangle is pushed up slowly by the forcefield.
Note: There is a very useful property of a linearforcefield.. geomonly
When set to true it means that the force field only acts on geometry objects, and NOT Goos. So you make huge and/or strong force fields wherever you need them, but they don't affect the goos, so the player doesn't know they are there... until it's too late! 
Trap #1
The Fakey Pipe and the Spikey Bar
The inspiration for this trap, came from a prototype level made by momo1526 which had 2 pipes and 2 levelexit's. It didn't work how he wanted it, but it gave me an idea.
Before you read on...
To understand how this trap works.. you should read [Wog Editor Reference : Multiple Exits and Pipes (Advanced)]
The Trap!
The mechanics of the trap are quite simple, although a bit fiddly to get just right.
View Trap Setup
The Spikey Bar is supported by the tiny rectangle (Latch) just below it.
The Latch is part of a compgeom object which also contains the Anchor_Support block... and there's an AnchorStickyInvisible Goo sitting on that.
The compgeom object is non-static and hinged. In this case I put the center point and the hinge in the same place, so that I could see how things would move by rotating the compgeom object in WoG Editor.
But that's it!
View Trap Triggered
When the lower exit is triggered, the Sucker (upper exit) pulls the Anchor Goo towards the center, the compgeom rotates, pulls the latch out from under the Spikey Bar.. and "Gotcha!"
Note: Normally the lower exit (the "Out of Order" pipe) would also collect Goos.
Because I didn't want that to happen in this level... I set the exit Filter to collect GooProduct only, so Ivys, Fuses and Commons will not go in. This means that NO Goo's can be collected in this level...ever!
Which is why I added the "targetheight" to the level, so there IS a way to finish.
I had to be a little careful about what happened after the trap was triggered, and if the exit closed and the sucking stopped.
I didn't want the latch block swinging back to its original position and getting in the way. So I adjusted the mass of the Anchor Support and the position of the hinge, to ensure that once it was triggered it would remain in the triggered position.
Note:
In v0.3 I removed the fire object that was covering the "workings" and put a big pipe graphic over it instead. I also put some geometry around the pipe, so the player wouldn't get caught on the top block, and also to make it easier to build up to the second pipe.
Also I set strandgeom = true (level root) so that you can't build through this new pipe, and strands don't try to attach to the AnchorStickyInvisible
Trap #2
The Pressplate and the Block Thrower
In Trap #1 we used gravity to do our dirty work. Once the latch was released, the Spikey bar just fell on its own.
Here I didn't want the killing object to just fall... I wanted it to be "Spring-Loaded" and fly sideways... and for that we use the "geomonly" Linear Forcefields I mentioned earlier.
It's a Trap!
Again the mechanism here is quite simple, but took a bit a tweaking to get right.
View Trap Setup I have reduced the size of forces in the image, for clarity
The killer block starts inside Forcefield #1, and is held in place by the latch.
The killer block is just a normal rectangle, with an image and tagged as deadly.
Note: In the final level the wall graphic is set to depth=1 so that it hides the block, I changed it here so you could see it.
The latch and the pressplate are parts of the same compgeom object, so that they move together, and the compogeom is hinged. The part of the floor image which moves, is applied to this compgeom object, and I cut out that bit from the "background".
Even though the pressplate is bigger than the latch, the latch is actually much heavier. This is needed to ensure that the latch stays in place, even through the killer block is pushing on it, and to stop the pressplate just falling on its own and releasing the block without the player touching it.
The Endstop holds the pressplate in place, without it the latch is heavy enough to lift the pressplate out of the floor.
I balanced it so that the whole trap is "lightly weighted".. so that even a single Goo would set it off.
View Trap Release
Goo steps on..the pressplate drops, the compgeom rotates and the latch lifts upwards.
Forcefield #1 pushes the block to the right and into Forcefield #2.. which really WANGS it.
You'll notice that ForceField #2 is in the shaft... but it's set to "geomonly=true" so won't affect the goos if they go into it.
Both fields have an upward component to lift the block a bit, and get the firing angle just right.
Notes:
Originally I had one large force field, but I found that it also pushed on the latch.. and could trigger the trap on it's own. So I split the field into 2, and left a gap where the latch is.
Materials:
When the killer block hits the far wall it's going fast. I found using the default material "rock".. made it bounce off to much. The killer block is now "fruit" and the back wall is "swamp". This really deadens the bounce nicely, so even though the block is going fast, it only bounces just enough to land on the pressplate.
In v0.3 I put the Endstop at an angle and changed its material to "ice", because sometimes the killer block would get caught on it. Now the block almost always slides off and kills any remaining Goos...
Trap #3
Blocks Crossing!
This one's more of an obstacle than a "trap" since it's not triggered by anything and it's active and running right from the start.
The "trick" is, how to get a block to move across the shaft, and then go back to where it started and go across again.
A couple of early ideas...
Something like "PONG", where the block goes across one way, then comes back.
Something like a machine gun, with a load of blocks on one side, that drop into the "barrel" and get fired across one after the other. I think this would have worked, but you have a finite amount of "ammo", so if the player takes ages to get there, you'll have run out by the time they do.
(Editor's comment: Maybe that would have worked, if you route the blocks around the level, like the Goo Balls in "Alice and Bob and the Third Party" [AB3])
Make it Spin!
The "neat" answer: Have just one block, and make it spin in a very large circle.
So it goes across the shaft, then moves round (outside the game area) and back where it started and then goes across again.
Despite the fact that this should be simple to make, it was in fact rather annoying. The problem seems to be.. WoG's physics engine doesn't handle rotating, unbalanced objects very well.
Original Setup
Just a single rectangle and a hinge a LONG way above it, and set it to rotate, so the rectangle moves in a big circle. But it was juddery and the rectangle kept moving away from the hinge and catching on other geometry and getting stuck.
v0.2
View Setup I did say the hinge was a LONG way above it.
The new setup has a compgoem object which has 2 rectangles in it (block #1 and #2) These are a long way apart (about 7500 px) and there's a hinge in the middle.
The important thing is that its nicely balanced, and spins great!
The complication with doing it this way, is you can only have 1 image on any compgeom object, so I had to make a tall picture with a little block at the top and one at the bottom.
v0.4
Having written this guide, I decided that it would be nice to show that these "mechanisms" could also be used to help you, rather than just killing Goo Balls.
So I added a new "feature" to the level, the "Do Not Pull" handle.
The idea was simple; add a lever that can be pulled to stop the blocks. Doing it proved less simple.
View Setup Image
The problem was I wanted a moving lever that would push a "killer" block (tagged geomkiller) into the path of the fast moving blocks, and destroy them. However, because the lever is also a dynamic object the "killer" block killed the lever as well. The key was [DIY compositegeom] so that the pushed block and killer block move as a single object, but can have different tags. A similar idea was used in a few of the original levels, Red Carpet for one, but for different reasons.
View Image
The lever is pulled, this pushes the "pushed and killer" blocks into the support field, which keeps them in position, and the next time one of the fast moving block comes around.. the whole "spinner" object is destroyed.
The killer block is also tagged deadly so kills the UtilNuker Goo, which makes the "siren,shut down, hiss" noise.
The "Damping Field" is there to stop the "Do Not Pull" sign from swinging really wildly when the lever is pulled. It is a normal linearforcefield, but it applies no force and just has a dampeningfactor
Notes
I found another "bug" in WoG..
The nogeomcollisions attribute doesn't work when applied non-static compgeom objects, but it's fine on static ones.
So instead.... View Solution
I split the walls on both sides, and added nogeomcollisions rectangle over each pipe mouth.
This stops Goo Balls going into, or getting stuck on, the mouth of the pipe, but it lets the blocks through to kill them just fine
Trap #4
Watch out for the....!
Just when you thought you were in the clear... a blooming great spikey wheel lands on you!
This trap is one of the most complicated and was one of the hardest to set up. Although I think there's a simpler way to do it.. which I might put in a later version of the level.
But for now....
View Trap Setup
There where several issues to consider when I was designing this trap ...
I want it to be triggered as soon as a Goo (balloon probably) comes out of the shaft
I want it to trigger no matter where (left - right) the Goo comes out
I don't want there to be any visible effect on the Goo when the trap is triggered
To cover these 3 things, the Trigger Bar rectangle seemed a good solution.
It's light (mass=1) so it doesn't affect the Goos, it's long and covers the whole shaft, and without an image it's invisible.
The problem is.. because it's so light, it can't do much... and because the Goo won't be going very fast, it doesn't have enough momentum to make very much happen.
That's where the Thrower Field comes in. It's geomonly again, so doesn't work on the Goos, but it's also a "force" field, rather than a "gravity" field, so as soon as the trigger bar moves up into it, it gets chucked nice and fast, which is enough to make something happen.
I wanted the Wheel to come from above, so the Pusher bar had to be nice and long and hinged above its center so it just hangs still to begin with.
The Ramp and Hurryup Field are just to guide the wheel and give it a bigger push... otherwise the goos have got up and out before the wheel arrives.
The final touch to this trap is the Quaker Goo (UtilEarthquake)
I got this idea from Product Launcher too...
The Quaker Goo is invisible and doesn't interact with anything and the player can't do anything with it...
What it does do... ALL it does in fact... is make the Earthquake sound when it dies.
The Pusher Bar is tagged as deadly.. so as soon as it moves the Goo dies and the rumbling sound begins... and moments later... Gotcha!
Trap #5
What now!?
Well first... here's a video....
It shows all 4 traps in action, using Visual Debug Mode.
So you can see all the hidden stuff, and all the important geometry is nicely highlighted.
My aim in designing Gotcha! was not to trick you, trap you and kill a lot of unsuspecting Goos....
although I'll admit it was fun...
I know some of you are already thinking about designing similar levels.. or levels that do similar things...and I look forward to playing them... but consider this....
My aim was to show that you can use the physics stuff in World of Goo to create some quite complex "mechanisms".
OK I used them for traps, but that's not the only thing they could be used for.
I can think of plenty of situations where very similar setups could be used to HELP the Goos not just to HURT them.
(See the "Do Not Pull" lever in Trap #3)
They can now open doors, without needing a Bomb to blow them up. They can pull levels and push buttons that actually DO something. A group of goos in one area could complete a small task and open a trap door for other goos in another area.
In short, I believe this is the start of something wonderful... we can now set proper "problems" for the Goos solve...
the possiblities ARE endless.
Have fun! 
DaB
FAQ
These are listed approximately in the order in which you might encounter them.
So ones about creating a level are first, then problems editing a level, then playing a level, then making a goomod... and so on.
[ I clicked New Level and...] [ I clicked Play and... ] [ How do I... ]
It's asking me to select a folder to edit. Which folder should I choose?
Actually that's a personal choice, but you should NOT (NEVER EVER) edit the original WorldofGoo game folder!
The popular choice is just to edit your Gootool "modded" folder. This will usually work fine, but there a couple of things that can catch you out.
Like - If you run GooTool with an old version of your level enabled... it'll overwrite any changes you have made.
For this reason some people prefer to create yet another World of Goo folder just for editting purposes.
I clicked New Level and...
...It won't let me have spaces in my level name. Why?
The level name you enter when you first create/clone a level is actually the folder name.
For compatability with other platforms you are not allowed to include spaces.
The name that will appear on the title screen for your level, and the addin name, are separate and can both be set in the Addin tab, and do allow spaces.
... I enter the name, click OK and it comes up with a error. Why?
The most common cause of this is lack of "permissions" or "rights" in the WorldofGoo folder you have selected to edit.
To create new level, or clone existing ones, you must be able to create folders, and read / write / create / delete files, under the main folder you are editting.
Try creating a new WorldOfGoo folder in "Your Space" (My Documents / Home Directory or whatever) or on a separate drive.
Then use Change World of Goo Directory from the file menu to select the new folder.
...What are these greeny/blue boxes?
They are representations of camera positions and POI's [Link to Camera's and Pois].
To begin with you won't need to worry about them at all. In fact, you're probably better off just hiding them. Use Hide Camera/Poi's on the top toolbar.
I've added a SceneLayer, but I can't enter anything into the "image" property. Why?
Before you can apply an image to a SceneLayer (or a rectangle or a circle) you must have imported the image into the Resources list.
Use the Import Images button on the top toolbar.. find the image files you want, select them and click Open.
They will now appear in the Resources Tab, and when you type something into an "image" property you will get a list of all the available images. Pick one.
If the one you want isn't there, go and import it as well.
I can't see the Goo strands (or other things in) in my level.
The main cause of this is having a background image set to depth = 0.
Strands are always at depth of 0 so if the background image (or any image) is also set to depth=0 or more, it will cover them up.
You should always set your background images to a depth less than 0 : -1 will do, but -100 or -200 is usually better.
I clicked Play and...
...It starts the game normally and I can't see my level anywhere.
...It starts the game normally and I can't see my level anywhere.
To play levels directly from the Editor, Windows users need to upgrade to v1.3 of the game.
Patch Available here -> http://www.worldofgoo.com/dl2.php?lk=patch
Note: If you are editing your "modified" folder ( which you should be ) then you will need to run GooTool and click Save after you apply the patch. This will copy the updated files into your modified folder as well.
...Nothing happens.
This is usually because the game has crashed, and is still open and displaying the "Fatal Error" window.
Close that window, and try again.
...It shows the Title screen and then just stops. What's wrong?
There are lots of ways to crash the game, and we're finding new and interesting ones all the time.
Are you using the latest version of the Editor?
Check Here [ Download Page ] We try to add protection and checks for as many of these problems as we can, so the latest version of the Editor may be able to tell you what's wrong.
Try loading one of the Original levels
But don't make any changes, and just click Play. If that doesn't work, then it's something about your system... post in the forums. If the original level works fine.. but yours still doesn't, then the problem is something in your level.
There are a few things we can't detect, warn about or prevent
So may be it's one of those... check the list below.
Missing Ball resources
If you have used a custom Gooball in your level, and it uses a custom image or sound and the file isn't where World of Goo has been told it is... the game Crashes
Missing Custom Particle Effects
If you have used a custom Gooball in your level, and it uses a custom particle effect, and you don't have the addin that Goo came from installed and enabled at the moment.... the game Crashes
If you checked all the above problems...
CONGRATULATIONS!!
You've might have found a new bug / weakness / problem with World of Goo that no one else has found / reported.
Your best bet is, make a goomod of your level.. upload it somewhere, then post for help in the forums. We're always interested in finding new ways to break the game, so we can add protection into the Editor and stop it happening again.
I clicked "End level" and the game crashed... what's the problem?
Yup, it does that.. we don't know for sure why, and we can't stop it.
If play through the Editor and you finish the level "properly" and click the Continue Handle.. the game ends fine.
If you quit by using "End Level".. the game crashes.. just close the Fatal Error Window and carry on editing.
It says my Addin Id is invalid... what is valid?
To be safe, always make your Addin Id something like com.goofans.YourName.LevelName
If you're interested... the rules are...
It can only contain letters, numbers and . (dots) No spaces or other symbols are allowed
It must contain at least one . (dot)
It cannot start or end with a . (dot) and cannot have .. (2 dots together)
If you're REALLY interested... RegExp: ^([a-zA-Z0-9]([a-zA-Z0-9]+)?\.)+[a-zA-Z0-9]+$
How do I...
...Set OCD for my level?
OCD is set in the Addin tab under Levels -> Level -> ocd
If you do not see an ocd entry, right-click Level in the tree, and choose 'Add child ocd' from the menu.
Note: You can never get OCD when playing directly through the Editor...
Sure you can meet the criteria.. but it won't go "ooohhh.. OCD!"
World of Goo Ball Editor

World of Goo Ball Editor (aka GooBLE) is a tool for making World of Goo Balls
You can create your own balls using your own original graphics and sounds, or just tweak an existing ball from the original game - or anything in between.
Quick Links: [ FAQ ] [ Reference Guide ] [ My First Goo Ball - Tutorial ] [ Download Page ] [ Install for Linux ]
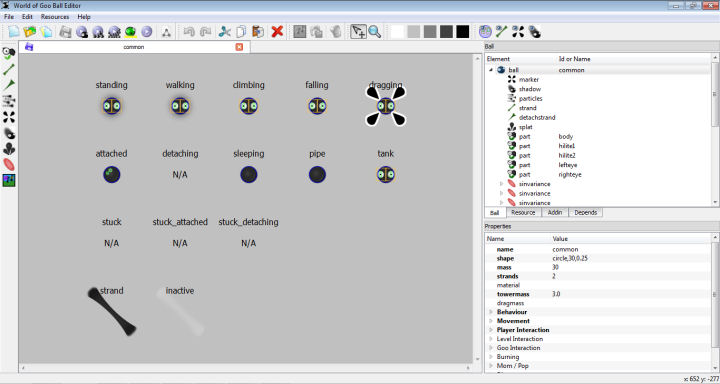
Before you start, you will need...
- A Computer
- The Editor is written in Python and so is fully cross-platform capable.
- World of Goo
- You will need to have purchased the full game. Windows Users, if you want to test your Goo Balls directly from the Editor (and you will want to), you also need to update to the latest version.
- GooTool
- For easy integration of your addins into your or other players games. Get it here.
- World of Goo Ball Editor
- The full Windows installation package is available from the download page
Linux and Mac versions will / should / may follow
The Very First Thing
The first time you run World of Goo Ball Editor it will ask you to locate the WorldOfGoo folder you want to edit.
If you are familar with GooTool you will know that it always preserves the original game files and creates a separate folder which holds the modified version of the game. If you haven't yet, you should run GooTool and create the "modded" folder now.
This is the folder you should use for the Editor, since you should never modify the files in the original game folder. It is often best to create your modded folder in a private folder, be that "My Documents" or your "Home Folder" or on a separate drive somewhere. Wherever you create it, you will need to ensure you have full permissions to read/write/delete files and create folders.
The nickel tour
The Editor GUI is split into several areas: Open Image
The toolbars should be fairly self explanatory - all the buttons have tooltips telling you what they do, just hover of them for a moment before clicking.
The Ball View area is Tabbed, so you can have several levels open at once, and you can switch between each view as needed. This also means you can copy and paste things from one ball to another (described in more detail later).
Understanding the World of Goo
It will help you to design Goo Balls and find your way around if you have some understanding of how World of Goo (and hence the Editor) structures the data.
World of Goo builds a complete ball from 2 main XML files plus other information taken from a number of game-wide (global) files, as well as the actual image and sound files.
- Ball Tree
- Holds all the information about how the ball looks (graphics, particle effects etc), how is moves, what it can do, what the player can do with it... pretty mich everything.
- Resources
- Holds a list of all the image and sound files used in the level and gives each one an ID. This ID is then used to apply images/sounds to items in the level, rather than using their actual filename.
Tree View Tabs
Each of these files is represented as a Tree View in the Tree Tabs panel. The tree begins at the top with a "root" item. All the different objects that make up a ball are listed as children underneath the root item. Open Image.
Whenever you add an item to your ball, it will be added into one of these trees. You won't need to remember which one, because when you select the item in the graphical view, the entry for it will be highlighted in the Tree, and vice versa.
Properties Pane
When you select any item, a list of its properties/attributes is displayed in the panel below the trees. Open Image. These properties cover every possible value or setting that can be applied to an object of that type.
Some of these you can also change using your mouse (position, size, and rotation) by selecting and dragging objects in the graphical view. Others you will have to enter or select by hand in the properties pane.
Many of these properties you will never have to touch, except in advanced ball designs.
Most items have a few properties that are "essential"; these will be given reasonable default values where possible, but some of them will appear in red to indicate that you must fill something in. Open Image
FAQ
Frequently Asked Questions
Coming 'Soon'
Reference Guide
Reference info regarding balls, their tags and attributes is currently here
http://goofans.com/developers/game-file-formats/balls-xml
Errors and Warnings
When you Save, Play or Make a goomod in the editor, it performs a series of checks to ensure that the ball you have made is valid and everything is correct. It will display an Issues message box if it finds any problems.
Each issue has a "severity" associated with it...
Advice : Mostly design tips, "best practice" hints and cosmetic issues
Warnings : More serious problems which will cause unexpected or bizarre behaviour in the level
Critical : Problems that will make the game crash or will cause serious trouble creating or distributing a goomod.
The ball will always be saved, regardless of any problems, but the editor will not allow you Play or Make a goomod if there are any Critical Issues.
The editor will link directly from the message screen to this information page, so you can find out about each of the messages you receive. But if you just want to find out the problem are... read on.
Advice Messages
Ball Tree
Resource Tree
Dependancy Tree
Warning Messages
Ball Tree
Resource Tree
Critical Errors / Problems
Ball Tree
Dependancy Tree
World of Goo Movie Editor

World of Goo Movie Editor (aka Goovie Maker) is a tool for making movies and animations.
Important: This package is in Beta Test
You can create your own movies using your own original graphics and music, or just tweak an movie from the original game - or anything in between.
Quick Links: [ FAQ ] [ Reference Guide ] [ My First Movie - Tutorial ] [ Download Page ]
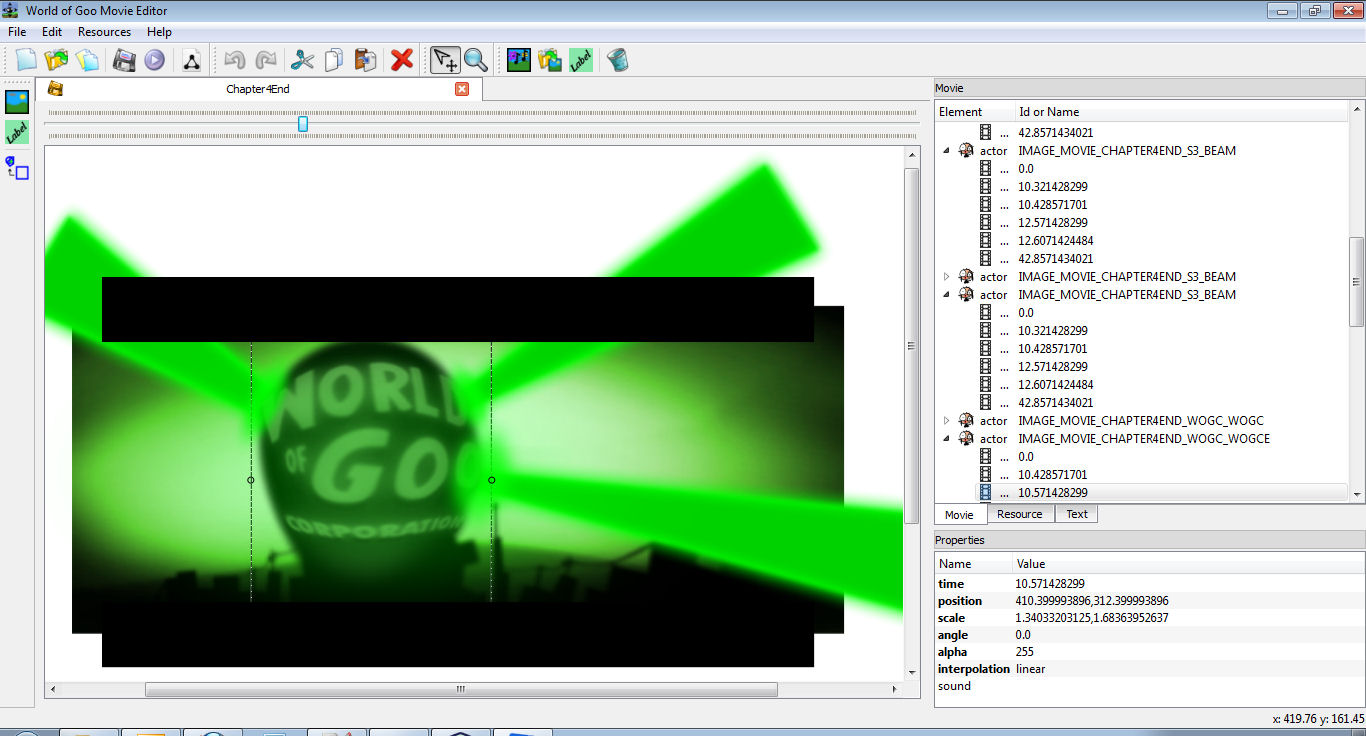
Before you start, you will need...
- A Computer
- The Editor is written in Python and so is fully cross-platform capable.
And will (may) eventually work on Windows, Linux and Mac - World of Goo
- You will need to have purchased the full game. Windows Users, if you want to play your levels directly from the Editor (and you will want to), you also need to update to the latest version.
- GooTool
- For easy integration of your addins into your or other players games. Get it here.
- World of Goo Movie Editor
- The full Windows installation package is available from the download page.
The Very First Thing
The first time you run World of Goo Movie Editor it will ask you to locate the WorldOfGoo folder you want to edit.
If you are familar with GooTool you will know that it always preserves the original game files and creates a separate folder which holds the modified version of the game. If you haven't yet, you should run GooTool and create the "modded" folder now.
This is the folder you should use for the Editor, since you should never modify the files in the original game folder. It is often best to create your modded folder in a private folder, be that "My Documents" or your "Home Folder" or on a separate drive somewhere. Wherever you create it, you will need to ensure you have full permissions to read/write/delete files and create folders.
The nickel tour
The Editor GUI is split into several areas: Open Image
The toolbars should be fairly self explanatory - all the buttons have tooltips telling you what they do, just hover of them for a moment before clicking.
The Movie View area is a Tabbed Multiple-Document Interface (MDI), so you can have several moviess open at once, and you can switch view as needed. This also means you can copy and paste things from one movie into another (described in more detail later).
Understanding the World of Goo
It will help you to create movies and find your way around if you have some understanding of how World of Goo (and hence the Editor) structures the movie data.
World of Goo plays a movie from a movie.binltl file (encoded binary) and a single resource XML file. The Editor uses an additional movie.xml file to store the movie information in "human-readable" form.
The XML files for a movie are called Movie and Resources (resrc).
- Movie
- Holds information about the actors (images and text) in a movie, and keyframe information for each which controls what they do and how they move and appear.
- Resources
- Holds a list of all the image and sound files used in the movie and gives each one an ID. This ID is then used to apply images/sounds to items in the level, rather than using their actual filename.
Tree View Tabs
Each of these files is represented as a Tree View in the Tree Tabs panel. The tree begins at the top with a "root" item: movie or resources. All the objects in that file are listed as children underneath the root item. Open Image.
Properties Pane
When you select any item, a list of its properties/attributes is displayed in the panel below the trees. Open Image. These properties cover every possible value or setting that can be applied to an object of that type.
Some of these you can also change using your mouse (position, size, and rotation) by selecting and dragging objects in the level view. Others you will have to enter or select by hand in the properties pane.
Most items have a few properties that are "essential"; these will be given reasonable default values where possible, but some of them will appear in red to indicate that you must fill something in. Open Image
Next Steps
How about we get started on making "Getting Started"...
Reference Guide
Movie Overview
A movie consists of a list of actors, each of which has their own animation defined by a number of keyframes.
An actor can be either an image or a text string.
Each keyframe in an animation has a time (in seconds) and can specify the position, scale, rotation, alpha and colour of the actor at that time, although not all of those values need to be specified in each frame.
Movie Size and Length
Movies work in screen / pixel coordinates with ( 0,0 ) in the top left corner.
All the original movies were created to fill an area 1095 x 600...it's not clear why, because 1095 is not a "nice" ratio like 16:9.
Goovie treat this as the "visible area" and draws a dotted rectangle around it. However, players with 4:3 screens will not see the very left and right hand sides, so Goovie also draws dotted lines to the indicate area visible on 4:3 screens.
The length of a movie is simply determined by the last (highest time) keyframe of any actor.
Times and Frame Rates
Strictly movies don't have a frame rate, you can enter any time you like into any keyframe, and when a movie is played the game will just display as many frames as it can.
However, to make life easier when creating movies and adding keyframes using the GUI, Goovie uses a "frame rate" which sets the time divisions on the time slider, this defaults to 20fps (0.05 second increments) on new movies.
Movie.binltl files don't have a "Frame Rate" encoded into them anywhere, and 2DBoy created the original movies in a whole range of different rates (from 11fps up to about 33fps).. so when Goovie loads a movie, it attempts to "divine" the original frame rate based on the times in the keyframes... this doesn't always work, but usually gives a reasonable approximation.
Notes about XML and binltl formats
The game stores the movie information in an encoded (not encrypted) format in files called .movie.binltl. These files consist mostly of binary and numeric information and are very difficult for puny humans to understand / interpret directly.
So an XML format was created to represent the information in "human-readable" form. The original format, created by davidc, was designed to hold all the information contained within the binltl files produced by 2D Boy.
Goovie uses a modified version of this XML format which has been tailored for the purpose of creating and editting movies. The Goovie format contains a number of additional attributes which cannot be stored within a binltl file, but which simplify the editing process.
If you open an original movie, Goovie checks whether an XML version exists. If it does not, Goovie decodes the movie.binltl into its XML format.
Goovie also creates a MovieName.text.xml to hold the information for any text actors. Like WooGLE, this information is put into the Global text.xml when you save and play... If you run GooTool, it will overwrite the global file, remove the text entries and your movie may crash when you play the game "normally" (outside GooVie)
Distributing your Movie : This is currently under review / discussion
Until the situation is resolved, goomods containing movies might NOT be published
At present there is no "Make Goomod" option for movies, because it doesn't really fit, and releasing a goomod which just contains a movie is a bit pointless. Unless you're XDBoy and just want to show off!
So if you want to include a new movie in a goomod you will have to do it manually.
You will need to... Export the Movie to binltl
Then include in your goomod...
override/res/movies/moviename/moviename.movie.binltl (and .binltl64 for Linux compatibility)
compile/res/movies/moviename/moviename.resrc.xml (decrypted)
Any custom graphics or sounds in the override folder, and add any movie text into text.xml
Future versions may have a "Make goomod folder" button, which will export everything into a goomod subfolder of the movie, so that you can easily copy it all into another goomod.
Getting your movie to play
This should be very simple, however at the moment... not so much.
Normally movies are played at the end of a level using the cutscene attribute in the [ island.xml ]
The addin.xml for a goomod can contain a <cutscene> tag for each level, however this does not work in the current version of GooTool, so you need to do it "manually" with a merge on the island.xml
However, even this is not quite as easy as it should be.
The simple approach would be to create a merge XSL file that locates the required level tag in the island.xml and adds the cutscene attribute to it. However, the merge files from the goomod are processed BEFORE GooTool has added the level info into the island.xml, so the level tag cannot be found, and this type of merge has no effect.
The only way I have found to make it work...
Create a merge XSL which adds its own complete copy of the <level> tag to the island.xml, and also includes the required cutscene attribute. GooTool will also add its tag for this level, however since your merge one was added first the game uses that, and the one added by GooTool is ignored.
Actors

Each Actor in a movie is either an image or a piece of text, and has an associated animation made up of a series of keyframes.
Actors have a few attributes of their own.
labelMaxWidth and labelWrapWidth were never used in the original movies, and need investigation.
Making Actors do things
In order to appear, and "do things" actors require [keyframes]
Exporting Animations
You can export the list of keyframes for an actor as a stand-alone [Animation]
KeyFrames

Keyframes are what make up the animation for an actor.
Each keyframe has a time in seconds and can specify any or all of the following attributes.
position : x,y
scale : scalex,scaley
angle : rotation in degrees
alpha : Transparency 0-255
color : R,G,B colorize
Each actor only requires 1 keyframe, however these actors will be static. They will appear at the time of the keyframe and remain displayed until the end of the movie. This is useful for backgrounds.
For actors with more than 1 keyframe, each keyframe need only specify the values which should change from the previous frame. ie. If the actor is initially given a position and a scale, but in the next frame only to changes position, you do not need to specify the scale values again.
Stop Motion or Tweened
The default mode for animations is "Stop Motion". The actor will keep the values assigned in one keyframe, until the time of the next keyframe. When the next keyframe arrives the actor will "jump" to the values set by the new keyframe.
This was used to good effect in a number of the original movies, Chapter3Mid for example.
However it is also possible to have the actor change "smoothly" from the values given in one frame to the values in the next. Often called tweening, this can activated by setting the interpolation attribute to 'linear'.
Interpolation can be set (or not) for each keyframe in each actor.
Most of the values change intuitively; positions, scales, alpha etc... however angle has a couple of "quirks".
The game will attempt to take the "shortest" path between 2 angles...
So if you specify a starting angle of 0, and the next keyframe is set to 360, the actor will not rotate.
If you start at 0 and the next frame is 359 degrees, the actor will make a rotation of only 1 degree, rather than spinning all the way around.
To get a full rotation(or rotations)...
2D Boy used 3 keyframes with angles set to 0 , 180 , 360
But you can get the same effect by having 2 keyframes with angles set to 0 and 720
This may seem odd, but it appears the game subtracts 360 from the angle if it is greater than 180.
So by supplying larger angles (like 720) you can "trick" the game into performing a full rotation using only 2 frames.
Sounds
A keyframe, except the last one in an actor, can also play a sound.
However, if you set the sounds to play in the normal moving actors, you will find it can be hard to properly syncronise the sound with the action. This is often because the sound file has a small amount of silence at the beginning, so if you set the sound to play at exactly the same time as an action occurs, the sound appears to lag behind the action.
One easy way around this is to add all the sounds as extra keyframes in one of the static actors. That way you can tweak the keyframe times to get the sounds matching up, without affecting the animation of the actor which is apparently making the sound.
As well as typing values into the properties pane, you can add / edit the [keyframes in the GUI]
Movie View
You can also add and edit keyframes in the Movie View.
When you select an actor, and then use the slider to move through the movie, the actor will remain highlighted. If move the slider to a time where this actor has a keyframe, then the "Tool Handles" will appear and you can move, size and rotate the actor.
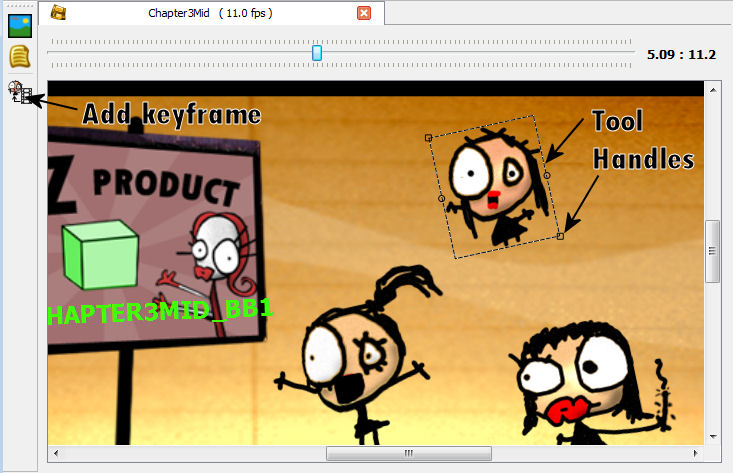
If the actor does not have a keyframe at this time, you can add one.
Click the "Add KeyFrame" toolbar button.
This will add a keyframe to this actor at the time shown on the slider.
If time is between two keyframes for this actor, those keyframes are set to interpolate=linear, then Goovie will calculate the position, scale, angle etc at this time, and automatically set those attributes on the new keyframe.
If you select a keyframe in the Tree View, the slider will automatically jump to the approriate time, and the keyframe for that actor will be selected, ready for visual editting.
You cannot set alpha, color or sound in the MovieView you must do this in the Properites Pane.
Animations


The keyframes you create for an actor can also be exported as a stand-alone animation file .anim.binltl
Simply select the actor whose animation you want to export and click the Export Animation button.
You can then apply these animations to SceneLayers in levels, in the same way you would apply any of the original animations (rot_1fps, blink etc)
If you give the actor a name then this will be used for the default filename name to export. {actorname}.anim.binltl
If you have not given the actor the default filename will be {moviename}.anim.binltl
Animation "quirks"
There are a few differences between how the game processes a movie animation and a stand-alone animation.
Alpha values only work in animations if color is also specifed and interpolation=linear
you can specify color="255,255,255" to avoid actually changing the color of the image
Animations with color values MUST also have alpha values.. or the game crashes.
Animations with no keyframe at time 0, can behave very strangely until the time of the first keyframe is reached.
Some exported Animations in a level
Image Localisation
As the localisation project has finished, the translation wiki has closed down, and World of Goo itself already has localised images for relevant languages, this feature is no longer included as of GooTool 1.1.0
Starting from version GooTool 0.9.4, GooTool contains a feature to enable translators to automatically generate in-game images using text from the translation wiki. It's not the most user-friendly thing in the world but it should be useful.
To enable this feature, you must first enable Translator Mode from the Advanced menu.
It requires an input directory in which you put l10n_images.xml along with the source graphics. A zip file containing a sample XML file plus source images is available here.
The translations are automatically downloaded from the wiki every time you click Test or Build, so you can see your wiki changes in real-time.
Test Mode
In test mode, you can choose a background colour to test transparency. You can also turn on debugging. This annotates the image as follows:
- Orange items show the positioning as defined in the XML file.
- Red items show the positioning after any rotation has been applied.
- X markers show fixed positioning anchors.
- Boxes show fit-to-box boundaries.
Test mode does NOT write any images to disk. It only opens a preview window.
Build Mode
In output mode, it will output all the files to the specified directory. NB I do not recommend doing this directly into your World of Goo installation!
Adding new images
You can easily extend it to add more translatable images using the XML file format described below. First make a PNG file of the source image minus all text (Kyle has uploaded source PSD files that will help with many of them). Then add a description of them to the XML file using the format below. If you add definitions for more images, please send me the blank images plus the XML snipped, so I can add them to this master zip file!
When drawing outlined text you should draw the outline first (since it's hollow and the outline stroke goes both inside and outside of the shape outline) and then draw the regular text on top of it in the fill color.
XML file format
The root element is i18n and contains a list of images to generate in the form of process-image nodes.
process-image nodes have a source, specifying the input PNG in your input directory, and a dest, specifying the output filename including path but excluding .png (since the tool will add .de.png etc. depending on the language).
process-image then contains a list of draw or layer images.
Layers can contain other draw/layer instructions, but are processed independently before being written into the target image. The purpose for this is to let you apply a filter to the contents of the layer, without applying that filter to the entire image. If you don't need filters, don't bother with the extra overhead of layers.
The only currently available filter is gaussian-blur, which blurs the layer that has been created at that point.
draw contains a positioning instruction (either fixed-position or fit-to-box) and then a number of actual drawing instructions. The only currently available drawing instruction is text. You can have multiple drawing instructions inside the draw element, which causes them all to inherit the same positioning.
All coordinates are given relative to the source image, where 0,0 is top left. Note that positioning is done before rotation is applied, so use the debug mode to test boxes.
In the table below, "?" means 0 or 1, "*" means 0 to many, "+" means 1 to many, and no symbol means exactly one.
The best way to understand all this is just to look in the sample l10n_images.xml in the zip above.
| Element | Purpose | Attributes | Children |
|---|---|---|---|
| i18n | Document element | process-image* | |
| process-image | One particular image to generate | source, dest, draw*, layer* | |
| source | The input file | (text) | |
| dest | The stem of the output filename | (text) | |
| layer | A layer containing other drawing instructions and filters. | draw*, gaussian-blur? | |
| gaussian-blur | Applies a Gaussian blur filter to the current layer | radius Blur radius |
(none) |
| draw | Something to draw | (fixed-position or fit-to-box), text* | |
| fixed-position | Specifies to draw at a fixed position | x x-coordinatey y-coordinatex-justify? left/center/right to justify about this point (default middle)y-justify? top/middle/bottom to justify about this point (default bottom) |
(none) |
| fit-to-box | Specifies to resize drawing to fit within the specified bounding box. | x x-coordinate of top left of boxy y-coordinate of top left of boxwidth width of boxheight height of boxx-justify? left/center/right to justify within this box (default middle)y-justify? top/middle/bottom to justify within this box (default bottom)allow-grow? If the text is actually smaller, should we make it larger to fit? (Default true).True: Grow or shrink to fit the box. False: Only shrink if necessary, never grow. |
(none) |
| text | Draws text | string,font,color,rotation?,arch? | |
| string | The ID of the string to draw (e.g. IMG_RESULTS_CONTINUE) If the string has newlines (pipe |), you can reference specific lines using [] e.g. IMG_IMPALESTICKY_HINT[1] (index starts from 1) |
(text) | |
| font | The font to draw using | name The TTF filename in input directorysize The point sizestretch? The x-stretch to apply (e.g. 2.0 makes it twice as wide, 0.5 half as wide)outline? The width of the outline to draw (defaults to filling instead of outlining) |
(none) |
| color | The color to draw in, in HTML format e.g. #ff0000, optionally followed by a comma and an opacity (alpha) value 0-1 e.g. #ff0000,0.3 |
(text) | |
| rotation | An optional rotation value in degrees. Negative is anticlockwise. | (text) | |
| arch | Causes the text to arch, as used for chapter intro images. Uses a simple half-sine wave to arch for now.. | height The height by which it should arch in the middleangle The rotational angle difference between the far left and far right character. Example: 45 degrees would mean the far left character is angled -22.5 degrees, the far right is angled 22.5 degrees |
(none) |
Resources
Tools
- World of Goo Level Editor (WooGLE)
- GooTool's Advanced menu
Documentation
- Further WOG file structure information on the wogedit wiki.
- Decrypted copies of the WoG files.
- Addin file format
Other
- wiki-based translation project
Chapter Addin Development
So you want to create a chapter? Great! This tutorial will guide you through the steps of doing so, and will show you how I created my Chapter Tutorial example chapter. Before you begin making your own chapter via this tutorial, though, I'd like to stress a few very important points:
1.
Creating chapters is hard. Really hard. It's the most complex kind of addin development out there, and it takes a lot of time and effort. But it's super cool, and chapter addins are a great way to put together a lot of levels of yours that have one over-arching 'theme'. Don't despair; if you ever have any questions, post below or in the forums. Just follow these directions and you should be good to go.
Also please note that this is an intermediate-level tutorial, and not all of the small common-sense details are explained; if this is your first time working with goomods, you may be better off checking some of the other tutorials here first.
2.
Knowledge of how addins work, how XML and XSL work, and the goomod format will help you big time. If you haven't already toyed around with the addin format, made a ton of levels already, made a few theme packs (even if you haven't posted them on this site), taken apart goomods that you think are cool, merged addins together into levelpacks, and more, then I would strongly recommend that you stop now. You'll be making it a lot harder on yourself if you don't at least have a basic understanding of how everything works already. But then again, you may learn how it all works by actually creating the chapter. If you are overwhelmed by the complexity or are running into problems left and right, then I would strongly urge you to stop working on the chapter, and get more experience with how goomods work first. davidc's level "Jingle Balls" is a great example here. It's one of the best levels I've ever played, and it was created with the old "wogedit" program (which was really hard to use!) and by hand-editing XML to create the Goo Balls. No Goo Ball editor, no nothing. It was the first .goomod released on this site, and was launched to promote GooTool. Knowledge of how everything worked was absolutely essential in those days. And it's a fantastic level, probably because of it.
3.
File size is important, and can potentially be an issue. If your addin includes a ton of custom music, graphics, and such, it may be too large for this site. The upper limit for a .goomod is 20 MB, and anything above this just won't upload. If you're running into filesize issues, and your goomod isn't uploading, try to keep your images 1024x1024 or smaller (this will also help people with lower-end graphics cards), and your music clips 45 seconds or less. If your goomod is just slightly too large, you can try using a more advanced archiver than Windows' default one (I personally like 7-zip) and compress more than the default settings. It'll take a bit longer to compress, but should be able to squeeze the file size down a bit. Be sure you're still using .zip format, though! You can also check and make sure to remove transparency from any .png image, if it's a background image and doesn't need it. You can even save your .png's as .jpegs, and rename them ".png"; the latest versions of GooTool and WooGLE support this "thB JPEG Hack" as it's called.
If worst comes to worst, and you simply can't shrink your goomod down any more, fear not. Send an email to our trusted site leader Davidc (davidc at goofans dot com) with a way for him to download it, and hopefully he'll be around to upload your goomod for you. He's generally good about that sort of thing.
4.
Please give us moderators time to test your goomod. You should have tested it yourself extensively (Being as complex a thing as a chapter, you should have played through the chapter more than once yourself while testing), but we'll need to test extensively, also. We'll try to be fast about it, if we can, but it may just take us a long while to test it. Please don't spam the publish request button; it may take a few weeks for us to finish testing it.
5.
Copyright issues. This goes for any goomod, really, so I'll make this brief. Don't use any images or music you don't own the copyright to, or that has a nonfree license. If you make your own images or music, you're fine. OCRemix and Newgrounds are great places to look if you want new music; there's some really talented musicians in both places, and everything there is free. Also, don't use images, music, Goo Balls, or other assets from other people's goomods without asking permission first, just to be on the safe side.
6.
Thou shalt not add any new chapters. Thou must only overwrite the ones that are there. A whole bunch of really brilliant goomodders have tried to add new chapters, and have all failed. Chapters are hardcoded, and there are only five of them. And will only ever be five, unless 2DBoy releases the source (hasn't happened yet, and they don't seem too eager to do so) or unless 2DBoy makes the changes necessary (which Ron said would be difficult, so that isn't likely either).
"But there's already a chapter 6 button in MapWorldView..." Yes, there is. And no, it doesn't work. It's hardcoded to not work. There's absolutely nothing you can do about it. If you're making chapter addins, you can only change the chapters that are here, which brings me to:
7.
Please don't try to edit Island 1. It's a whole, big, huge can of worms that nobody should have to open. Seriously, it's a nightmare. I spent days on end making WorldSpin, and fried my brain in the process. In contrast, editing Island 2 took about 2 days of work and was totally easy in comparison (That's not to say it was easy, but it was way easier, and keep in mind that chapter development is a tricky business!). I'm a guy who knows what he's doing, and it was hard for me. The reason you shouldn't ever edit Chapter 1 is that level addins are merged into Chapter 1, and if somebody installs a level addin while your Chapter-1-overriding addin is installed, there will be very major problems. Island 1 is special and should be treated as such.
But I know nobody's going to listen. "But, MOM4Evr, I already have this great 5-chapter addin all planned out! I can't possibly compress this brilliant idea into chapters 2-5!" So, if you do edit Island 1, the below tutorial doesn't apply. At least, mostly. There's three ways you can edit Island 1, if you have to:
The Good Way
If you want to be a good addin developer, and want to impress us mods by knowing what you're doing, this will make up for ignoring our advice and overriding Chapter 1 when we asked you not to. What you'll have to do is merge in your changes to island1.scene.bin (the .resrc.bin and .level.bin files don't have to be merged if you don't want to merge them) rather than sticking the xml in compile/ in the goomod like normal. An ok way to do this is to use Davidc's XML Diff Tool (here) to create an XSL stylesheet from the original and your intended XML. I've personally run into glitches with the tool before, and the XSL it spits out is completely unreadable and quite a lot larger than it needs to be, but for people like me who know basically nothing about XSL, it's better than nothing. The better way is to read up on XSL (the goomod-specific tutorial here is great, or you can google for XSL tutorials, or read the W3C specs for XSL here) and create the XSL by hand. It's more time-consuming, but it's more readable, usable, and generally a lot easier to edit (This is what goomatz does because goomatz is awesome). While editing Chapter 1, though, there's a few things that GooTool counts on that you have to keep in mind:
-- Don't change the scene's maxy attribute. GooTool will change this automatically, and you'll mess everything up if you change it yourself. So don't.
-- Don't touch the buttongroup "levelMarkerGroup". GooTool will stick the buttons for levels in there, and this will fail if the buttongroup isn't there. You can change/remove the actual buttons of course, but don't remove the buttongroup.
-- Don't remove the resources for the buttons and OCD flags. I think the game crashes if you do so. In any case, GooTool expects the resources to be there, and it fails if they aren't.
-- Try to check and see if any other island1-merging addins aren't compatible with yours, and say so on your addin page. The addins that I know of at the time of this writing that merge into island1 are "WorldSpin", "Intelligent Islands", "Island 1 Enlarger", and "Island 1 Infinite".
The Bad Way
"But XSL is too hard! It doesn't make any sense at all!" Well, there is a tolerable way to override Chapter 1 if you absolutely have to, just follow the directions below for overriding Chapter 2, and you'll point the actual island to open your level map instead of the default "island1" map. Thing is, this will cause all level addins to not be playable, since they're stuck in the "island1" map. You'll need to explicitly state on your addin page that this should be the only addin installed in GooTool, and we (the mods) will tolerate it gladly enough. We won't be completely happy, but we won't force you to change everything.
The Ugly Way
You override res/levels/island[number] (i.e. you stick an "island1.scene.xml" in compile/res/islands/island1/ in your goomod). Addins that override any original level, chapter maps included, aren't tolerated on this site. Something will likely explode if you override island1. This shouldn't be an issue, since you can't directly edit original levels in WooGLE, but just in case anybody tries, it won't be published.
But enough with warnings and such. Let's make us a chapter!
Step 1. Create the Levels
Simple enough, really. Use WooGLE as normal to create each individual level and export them as .goomods. You're going to have to merge them all together, so keep them all in a folder where you can find them easily. Once you're done, rename all the .goomod's to .zip's (following the directions in Steps 1 and 2 here if you don't know how to already), and extract them all. Now, you should have a bunch of folders named "com.goofans.yourname.levelnames" all in the same folder. Create a new folder named something appropriate (like "alltogether"), and copy all the files in there. Note that you can't just copy com.goofans.yourname.level1 into that folder; you have to open the com.goofans.yourname.level1 folder, select all the files in there, go into your "alltogether" folder, and paste everything in there. Also note that you won't have to merge the "addin.xml"'s together, that'll come later. You will need to use data from each level's addin.xml, though, so hang on to them. I personally just let Windows rename those files to "addin (2).xml" and so forth. Once you're done with the goomod, though, be sure they aren't included in the final product.
However, your text.xml's will need to be merged. So follow the directions in Step 5 here to stick them all together. Once you're done, make sure your final one is named "text.xml" and you're good to go. Once again, be sure you don't include any "text (2).xml" files in the final goomod.
Step 2. Create the chapter map
Once you're done creating the levels, you'll need to have your chapter map where you can actually click on them and play them. This is the main difference between a chapter addin and a levelpack; if you don't need a chapter map, and you're perfectly fine with all your levels appearing in Chapter 1 in the upper left corner, then ignore this tutorial and follow this one.
There are quite a few major differences between creating a normal map and creating a chapter map that are important and need going-over.
Buttons
First off, there's the buttons. You need some way to click on a button to play a level. To add a button, in the Scene tab in WooGLE, right-click the "scene" element and choose "Add button". A new button will appear. Change the id of the button to "lb_[levelname]" where [levelname] is replaced by the directory of your level (what the level is named in WooGLE, not the title you specified in the Addin tab of the level). So, if you want to play your level "The Jungle", which has a directory name of "TheJungle", then the button id should be "lb_TheJungle". Capitalization matters. Note that while you can scale the button directly using the handles on the corners, there are no rotation handles, so you'll have to specify rotation manually in the "rotation" field. Now set the "up" and "over" fields to be the images you want for the button to show. The "up" field will be the button when the mouse cursor isn't near it, and the "over" field will be the image that displays when your mouse cursor is overtop the button. This is used in the original levels to make the button slightly larger and lighter-colored when the cursor is near.
TL;DR NOTE:
------------------------------------------------------------------
If you want to show off some cool skills, you can make dynamic buttons, like the kind in my example addin, and in WorldSpin. To do this, specify the "anchor" attribute of the button to be a dynamic piece of geometry. Now, the "center" field in the button is a relative offset from the geometry the button is anchored to, and as the geometry moves, the button will as well. Generally this isn't too terribly useful, but it's really cool to toy around with, and opens up some neat possibilities. However, level text won't be displayed properly, since the text will be displayed in the same position as when you moused over the button, and the button will move away from the text. To fix this, you can change the "over" image to have the level name actually on it, making this "over" image bigger than the "up" image if needed (It'll still display properly, and behave the same). Then, leave the "onmouseenter" and "onmouseexit" fields blank, and don't worry about creating text resources for this level later. You can see me doing this with the "MOM4EvrSonic" level in my example addin.
------------------------------------------------------------------
World of Goo will automatically make this level button appear if the dependency levels you specify are completed (which we'll do later, in the island's XML). Now, to make the button play a level, set the button's "onclick" field to "pl_[levelname]", and to make the level's name display properly, change the "onmouseenter" field to "ss_[levelname]" and the "onmouseexit" field to "hs_[levelname]". Repeat this for all the levels in your chapter, place them all correctly, and test out your level in WooGLE. Because of a bug in the game, actually clicking them will do nothing, and the level name won't display, but you'll be able to see the onmouseenter and onmouseexit images being displayed.
OCD Flags
Now for the OCD flags. These are fairly simple. Make a scenelayer with your OCD flag image and set the "id" field to "ocd_[levelname]". Change the "anim" to "ocdFlagWave" if you want, and you're good to go.
TL;DR NOTE 2:
------------------------------------------------------------------
Actually, it doesn't have to be a scenelayer. If you have a dynamic button, make it a dynamic piece of geometry with the image set to the OCD flag, and hinge it to the object the button is anchored to. It'll display if you've gotten the OCD, and will remain hidden if you haven't, just like a "normal" scenelayer OCD flag, as long as the id is "ocd_[levelname]".
------------------------------------------------------------------
Pipes
Now for the pipes that go between levels. These are fairly easy as well. Just make a SceneLayer, position it right, and set the id to "levelpipe_[levelname]", where [levelname] is the name of the second level you're connecting to. For example, if I have a button for "TheJungle" and a button for "WreckingBall" beside each other, and I want "WreckingBall" to be the level that's unlocked when "TheJungle" is complete, for the pipe going between WreckingBall and TheJungle I'll set the pipe's id to "levelpipe_WreckingBall". Note also that pipes are completely optional; some of the original levels (all of chapters 4 and 5, Welcoming Unit, etc) don't have them. Actual level dependencies (i.e. Unlock level Y when you complete level X) are set in the island's (not the map's) xml.
Finishing touches
Now, test the level and see if it works. You should see all the level buttons, pipes, and OCD flags. Since the game doesn't recognize it as an island yet, it just displays all the images for now. This will change when you add the island's xml, as long as you have all the buttons and scenelayers named right. Make sure everything you want displayed is displayed, make sure everything is at the proper depth so that buttons display on top of pipes and such, add some particles and bushes and whatever you'd like, and get the chapter looking how you want it to look to players. When you're all done, go to the "Level" tab, select the "level" element, and changed "letterboxed" to "true" (Save this as the last step, since this will prevent you from panning around in the level when you launch it from WooGLE). Now that you're done, fill the "Addin" tab fields in with random garbage (you won't be using the addin.xml generated by this level), export it as a .goomod, rename it to a .zip, extract it, and copy everything (except addin.xml) into your folder with all your other goomod data. Merge in your text.xml if you have any text strings in your chapter, and you're done here.
Step 3. Merge in the island changes
You can also compile the changes in, but in this case, merging is both cleaner and easier. Just use goomatz's handy template:
<?xml version="1.0" encoding="ISO-8859-1"?>
<xsl:transform version="1.0" xmlns:xsl="http://www.w3.org/1999/XSL/Transform">
  <!-- Copy everything not matched by another rule -->
  <xsl:template match="* | comment()">
    <xsl:copy>
      <xsl:copy-of select="@*"/>
      <xsl:apply-templates/>
    </xsl:copy>
  </xsl:template>

  <!-- Delete existing levels -->
  <xsl:template match="/island/level"/>
  <xsl:template match="/island">
    <xsl:copy>
      <xsl:copy-of select="@*"/>

       <!-- Change name and map attribute -->
       <xsl:attribute name="name">island name</xsl:attribute>
       <xsl:attribute name="map">folder name</xsl:attribute>
      <xsl:apply-templates/>

      <!-- Here is where you can insert your levels -->
	  <level id="[LevelName]" depends="[Level]" name="LEVEL_NAME_" text="LEVEL_TEXT_" ocd="[OCD]"/>

    </xsl:copy>
  </xsl:template>
</xsl:transform>
In my case, I want it to be named "MOM4Evr's Island", so I'll change the name to that, without the quotes (Note that the name is actually arbitrary; name it whatever you want). The folder name for the chapter map I created is MOM4EvrTutorialIsland2, so I'll change the folder name to that. Now for the levels.
<level id="[LevelName]" depends="[Level]" name="LEVEL_NAME_[LEVEL]" text="LEVEL_TEXT_[LEVEL]" ocd="[OCD]"/>
the id is the actual folder name of your level, like it's called in WooGLE. depends is what level should come before this one, so that this level will unlock when that level is completed. name and text are for text resources, which I'll go over later; for now, just name them LEVEL_NAME_[LEVEL] and LEVEL_TEXT_[LEVEL], where [LEVEL] is the UPPERCASE name of your level. ocd is the OCD for your level, in the format "balls,[ballnumber]", "time,[seconds]", or "moves,[movesnumber]", where [ballnumber], [seconds], and [movesnumber] are a number specifying how many Goo Balls, how many seconds, or how many moves respectively.
So, for example, my first level is named "TheJungle", it's the first in my mod, so it doesn't depend on anything, and it has no OCD. Therefore, for this level I'll have:
<level id="TheJungle" name="LEVEL_NAME_THEJUNGLE" text="LEVEL_TEXT_THEJUNGLE" />
My second level is called "WreckingBall", and I want it to unlock right after someone completes TheJungle, and it has an OCD of 5 seconds, so this one will look like:
<level id="WreckingBall" depends="TheJungle" name="LEVEL_NAME_WRECKINGBALL" text="LEVEL_TEXT_WRECKINGBALL" ocd="time,5" />
Note that a whole chapter will unlock when the first level (That you put in the XSL here) in that chapter has a depends="[level]" criteria that's met. If the first level in that chapter that has no depends, that chapter will stay unlocked, and that level will be playable from the beginning. For my mod here, I'm not worried about it, since it's a one-chapter addin. But if you want to make multiple chapters, you'll want to make the first level of one chapter depend on the last level of the previous chapter. For example, in the original game, Drool (The first level of chapter 2), depends on RegurgitationPumpingStation (The last level of chapter 1). This way, Chapter 2 unlocks when you complete Chapter 1.
Note also that the when the last level in the XML here is completed, the game will pan back to the main menu, and the particle effect for unlocking the next chapter will be displayed. So, in my case, even though "MOM4EvrSonic" is a random level I tacked on at the end, I want it next-to-last in the XML so that the chapter officially ends when "AllAboard" is completed.
My final XSL looks like this:
<?xml version="1.0" encoding="ISO-8859-1"?>

<xsl:transform version="1.0" xmlns:xsl="http://www.w3.org/1999/XSL/Transform">

  <!-- Copy everything not matched by another rule -->
  <xsl:template match="* | comment()">
    <xsl:copy>
      <xsl:copy-of select="@*"/>
      <xsl:apply-templates/>
    </xsl:copy>
  </xsl:template>

   <!-- Delete existing levels -->
  <xsl:template match="/island/level"/>

  <xsl:template match="/island">
    <xsl:copy>
      <xsl:copy-of select="@*"/>

      <!-- change name and map attribute -->
       <xsl:attribute name="name">MOM4Evr's Island</xsl:attribute>
       <xsl:attribute name="map">MOM4EvrTutorialIsland2</xsl:attribute>
      <xsl:apply-templates/>

      <!-- Here is where you can insert your levels -->

	<level id="TheJungle" name="LEVEL_NAME_THEJUNGLE" text="LEVEL_TEXT_THEJUNGLE" />
	<level id="WreckingBall" depends="TheJungle" name="LEVEL_NAME_WRECKINGBALL" text="LEVEL_TEXT_WRECKINGBALL" ocd="time,5" />
	<level id="GravityHole" depends="WreckingBall" name="LEVEL_NAME_GRAVITYHOLE" text="LEVEL_TEXT_GRAVITYHOLE" ocd="moves,20" />
	<level id="StackEm" depends="GravityHole" name="LEVEL_NAME_STACKEM" text="LEVEL_TEXT_STACKEM" ocd="moves,7" />
	<level id="CrushingTest" depends="StackEm" name="LEVEL_NAME_CRUSHINGTEST" text="LEVEL_TEXT_CRUSHINGTEST" ocd="balls,20" />
	<level id="CutTheChain" depends="CrushingTest" name="LEVEL_NAME_CUTTHECHAIN" text="LEVEL_TEXT_CUTTHECHAIN" ocd="balls,25" />
	<level id="CableCar" depends="CutTheChain" name="LEVEL_NAME_CABLECAR" text="LEVEL_TEXT_CABLECAR" ocd="moves,2" />
	<level id="CrushingZone" depends="CableCar" name="LEVEL_NAME_CRUSHINGZONE" text="LEVEL_TEXT_CRUSHINGZONE" ocd="balls,40" />
	<level id="JobCriteria" depends="CrushingZone" name="LEVEL_NAME_JOBCRITERIA" text="LEVEL_TEXT_JOBCRITERIA" ocd="balls,25" />
	<level id="MOM4EvrSonic" name="LEVEL_NAME_MOM4EVRSONIC" text="LEVEL_TEXT_MOM4EVRSONIC" ocd="balls,45" />
	<level id="AllAboard" depends="JobCriteria" name="LEVEL_NAME_ALLABOARD" text="LEVEL_TEXT_ALLABOARD" cutscene="levelFadeOut,x,gooTransition_out"/>

    </xsl:copy>
  </xsl:template>
</xsl:transform>
Wait, what's the cutscene="levelFadeOut,x,gooTransition_out" doing in AllAboard? Don't worry; I'll talk about cutscenes a bit later.
Step 4. Creating the text resources
In the last step, I told you to pretty much ignore the LEVEL_NAME_[LEVEL] and LEVEL_TEXT_[LEVEL] tags, just to name them according to your level names. Well, what are they? In World of Goo modding, resources are generally named in UPPERCASE, so these are resources, but we haven't defined them yet. We'll do so here. Since they're text resources, open up your text.xml for your addin that I told you to put to the side, and take a look. So far, mine looks like:
<!-- Created by WooGLE v0.78 RC3 -->
<strings>
<string id="TEXT_CRUSHINGTEST_STR1" text="Hi there!|This is a signpost.|It probably tells you to hurry or you'll be toast|or something like that|-The Sign Painter" />
<string id="SIGNPOST_JOBCRITERIA_1" text="Deep in the darkest factory...|I went searching for a new job.|And ended up here.|I guess the idea is to eject these Goo Balls onto this conveyor belt.|But someone else wants this job, too.|I don't know why.|It looks pretty boring to me.|I mean, I could do this for a few hours, but the rest of my career?|No thanks. You can have the job.|I hope they pay you minimum wage.|-The Sign Painter" />
<string id="SIGNPOST_WRECKINGBALL_1" text="Behold! The latest product of genetic engineering!|This Goo Ball, when attached, emits a high wavelenghth of photovoltaic electromagnetic radiation.|The last time one of these guys attached to another, my car started, all the lights in my house turned on,|and my toaster oven started singing 'My Bonnie Lies Over the Ocean.'|I guess that this radiation will turn on any machinery that's nearby.|What kind of machinery could get these other guys to the pipe, though?|...|Signed, The Sign Painter"/>
</strings>
Well, first things first. Let's organize things a bit, and also solve a slight problem while we're at it. World of Goo by default defines Chapter 2's name in MapWorldView as "Little Miss World of Goo". Unless your chapter is named that, also, you'll probably want to change that. So let's add that. The text resource we want to override is "CHAPTER2_DESCRIPTION":
<string id="CHAPTER2_DESCRIPTION" text=""MOM4Evr's Island""/>
What's with the
" on either side? These are defined as quotation marks by the W3C (Remember them? They're the people who defined what XML is). The problem with a formatting language with XML is that you may want to use special characters, like <>/"' and that sort of thing inside an attribute field. If you try to, however, an XML parser (What reads the XML into the actual game) will have a hard time figuring out what you're trying to do. For example, since I want the text to be "MOM4Evr's Island", with the quotes, if I just type:<string id="CHAPTER2_DESCRIPTION" text=""MOM4Evr's Island""/>
the parser will read the text attribute as text="", an empty string. Then it'll see
MOM4Evr's Island"", which isn't valid XML, and it'll stop there with an error. If you're using non alpha-numeric characters, here's a list of the ones World of Goo and GooTool support:< = <> = >" = "' = '| = newline
Ok, enough about XML specifics. If we insert our line overriding CHAPTER2_DESCRIPTION right after the <strings> field (which is where GooTool will start parsing the XML), we'll have:
<strings> <!-- Override chapter name in MapWorldView --> <string id="CHAPTER2_DESCRIPTION" text=""MOM4Evr's Island""/> <!--Signpost texts --> <string id="TEXT_CRUSHINGTEST_STR1" text="Hi there!|This is a signpost.|It probably tells you to hurry or you'll be toast|or something like that|-The Sign Painter" /> <string id="SIGNPOST_JOBCRITERIA_1" text="Deep in the darkest factory...|I went searching for a new job.|And ended up here.|I guess the idea is to eject these Goo Balls onto this conveyor belt.|But someone else wants this job, too.|I don't know why.|It looks pretty boring to me.|I mean, I could do this for a few hours, but the rest of my career?|No thanks. You can have the job.|I hope they pay you minimum wage.|-The Sign Painter" /> <string id="SIGNPOST_WRECKINGBALL_1" text="Behold! The latest product of genetic engineering!|This Goo Ball, when attached, emits a high wavelenghth of photovoltaic electromagnetic radiation.|The last time one of these guys attached to another, my car started, all the lights in my house turned on,|and my toaster oven started singing 'My Bonnie Lies Over the Ocean.'|I guess that this radiation will turn on any machinery that's nearby.|What kind of machinery could get these other guys to the pipe, though?|...|Signed, The Sign Painter"/> <!-- Level names --> </strings>
I added a few other things while I was at it. The stuff between the
<!-- and --> tags are called comments, which basically serve no other use than to tell someone looking at the XML what the XML is doing. So my comment "Level names" right before the final </strings> line is telling us to insert our level names in there. Let's do that.For my first level, I want the level name to be "The Jungle". Notice that now I can finally put that space in there. Before now, I've been calling it "TheJungle", since that's the directory name in WooGLE, and World of Goo doesn't support spaces in folder names. However, we'll name it "The Jungle" here, since this is the text resource telling World of Goo what to display the name as. We can name it "Wharrgarbl" if we want to and it won't make any difference. So anyway, right after our comment I was just talking about, I'll add two more lines:
<string id="LEVEL_NAME_THEJUNGLE" text="The Jungle"/>
<string id="LEVEL_TEXT_THEJUNGLE" text="By Gooton Sinclair" />
The LEVEL_TEXT_THEJUNGLE attribute here is the subtitle for the level, and here's where we get to specify it.
Ok, here's the important part. You'll want these to be named exactly the same as the XSL names you typed in Step 3. Let's look back at the XSL again for our level TheJungle:
<level id="TheJungle" name="LEVEL_NAME_THEJUNGLE" text="LEVEL_TEXT_THEJUNGLE" />
Notice that the LEVEL_NAME_THEJUNGLE part matches up exactly with our string we just made. If there's a typo anyplace, you'll have troubles, so your best bet is to copy the names and paste into the strings, so you know they match up precisely. Or just type really carefully.
Once we've got all our text made, our final text.xml will look like this:
<strings> <!-- Override chapter name in MapWorldView --> <string id="CHAPTER2_DESCRIPTION" text=""MOM4Evr's Island""/> <!--Signpost texts --> <string id="TEXT_CRUSHINGTEST_STR1" text="Hi there!|This is a signpost.|It probably tells you to hurry or you'll be toast|or something like that|-The Sign Painter" /> <string id="SIGNPOST_JOBCRITERIA_1" text="Deep in the darkest factory...|I went searching for a new job.|And ended up here.|I guess the idea is to eject these Goo Balls onto this conveyor belt.|But someone else wants this job, too.|I don't know why.|It looks pretty boring to me.|I mean, I could do this for a few hours, but the rest of my career?|No thanks. You can have the job.|I hope they pay you minimum wage.|-The Sign Painter" /> <string id="SIGNPOST_WRECKINGBALL_1" text="Behold! The latest product of genetic engineering!|This Goo Ball, when attached, emits a high wavelenghth of photovoltaic electromagnetic radiation.|The last time one of these guys attached to another, my car started, all the lights in my house turned on,|and my toaster oven started singing 'My Bonnie Lies Over the Ocean.'|I guess that this radiation will turn on any machinery that's nearby.|What kind of machinery could get these other guys to the pipe, though?|...|Signed, The Sign Painter"/> <!-- Level names --> <string id="LEVEL_NAME_THEJUNGLE" text="The Jungle"/> <string id="LEVEL_TEXT_THEJUNGLE" text="By Gooton Sinclair" /> <string id="LEVEL_NAME_WRECKINGBALL" text="Wrecking Ball" /> <string id="LEVEL_TEXT_WRECKINGBALL" text="That's the way we like it" /> <string id="LEVEL_NAME_GRAVITYHOLE" text="Gravity Hole" /> <string id="LEVEL_TEXT_GRAVITYHOLE" text="...And cold, cold, cold" /> <string id="LEVEL_NAME_STACKEM" text="Stack 'Em" /> <string id="LEVEL_TEXT_STACKEM" text="...Or not" /> <string id="LEVEL_NAME_CRUSHINGTEST" text="Crushing Test" /> <string id="LEVEL_TEXT_CRUSHINGTEST" text="Ouch" /> <string id="LEVEL_NAME_CUTTHECHAIN" text="Cut The Chain" /> <string id="LEVEL_TEXT_CUTTHECHAIN" text="Unleash the rabid rabbits" /> <string id="LEVEL_NAME_CABLECAR" text="Cable Car" /> <string id="LEVEL_TEXT_CABLECAR" text="Turn on the mine machinery" /> <string id="LEVEL_NAME_CRUSHINGZONE" text="Crushing Zone" /> <string id="LEVEL_TEXT_CRUSHINGZONE" text="Hydraulics to the rescue!" /> <string id="LEVEL_NAME_JOBCRITERIA" text="Job Criteria" /> <string id="LEVEL_TEXT_JOBCRITERIA" text="Friendly warfare..." /> <string id="LEVEL_NAME_ALLABOARD" text="All Aboard" /> <string id="LEVEL_TEXT_ALLABOARD" text="Out we go..." /> <string id="LEVEL_NAME_MOM4EVRSONIC" text="Sonic" /> <string id="LEVEL_TEXT_MOM4EVRSONIC" text="It's super" /> </strings>
Note that apostrophes are replaced by
' since ' is another special character in XML.Ok, now we're finally done with the text.xml. Let's turn our attention to the addin.xml.
Step 5. addin.xml
Because we're merging all the levels and such in manually, the addin.xml is actually really really simple in comparison.
<addin spec-version="1.1">

<id>com.goofans.MOM4Evr.Chapter2Tutorial</id>

<name>Chapter 2 Tutorial Example Addin</name>

<type>mod</type>

<!-- May put a thumbnail in later version -->

<version>1.0</version>

<description>
See the forum links and such for how to create chapters; this one was made in a couple of days.
</description>

<author>MOM4Evr</author>

</addin>
See the addin.xml specification (here) if you're interested in what each individual field does. For now, just change the id, name, version, description, and author to match what you want, and you're good to go.
Step 6. Finishing touches
So what about that cutscene tag? What about making your chapter look different in MapWorldView? What about WOGCorp? Ish signposts? Having more than one chapter? Changing random other stuff to make your addin more awesome? All will be revealed in the next episode of... no wait, I mean all is revealed here.
Cutscenes
So, there's this tool called GooVIE. It's super hard to understand, it's completely unlike WooGLE and GooBLE, there are no tutorials for it, and generally everyone leaves it alone. There's no Mac or Linux version, and the source wasn't even released until recently. What gives?
Well, here's a small tutorial for using it to make cutscenes. There's a ton here that isn't said, and maybe somebody will make a full-fledged tutorial someday, but for now, hopefully this will help a bit.
GooVIE is an editor for making custom cutscenes (or animations, but I won't go into that here) for World of Goo. It's such an early alpha version that there's basically zero error-checking, and nothing's protected, so you can edit the original cutscenes and break them if you're not careful. Nonetheless, it's the only feasible way to make your own movies, and movies are part of what makes World of Goo awesome. Everybody wants a cool cutscene at the end of their chapter, right? It's cool.
Note that davidc and Daft As Brush wanted to make a specific XML format for cutscenes, but neither of them agreed on anything, and thus we're stuck with sticking cutscenes in the override folder of goomods. It's hackish, it likely doesn't work cross-platform very well, but it's all we got.
Cutscenes in World of Goo are made from a series of actors with keyframes. You go to a particular location in the time scale, you move, rotate, or scale an actor, make a keyframe, and the actor will move to that position, rotation, and scaling when it gets to that timestep. In fact, the movement will be interpolated, which basically means that if you have more than one keyframe on that actor, it'll gradually move from one keyframe to the next. If it's supposed to take one second to move from the bottom left corner of the screen to the upper right corner, it'll move at the right speed to get there in one second. Pretty nifty.
Animation in general is tricky. You'll have to toy with a cutscene a lot to get it to do what you want, and chances are you'll accidentally break something in the process, so back up your work often. Once you're done, save it as .binltl and copy those two files into the proper folder (override/res/movie/[moviename]/) in the goomod. Now decrypt the [moviename].resrc.bin (Which will be inside the /res/movie/[moviename]/ folder in the World of Goo directory that GooVIE is working from) to [moviename].resrc.xml and copy this to /compile/res/movie/[moviename]/ in your goomod.
Now back to the cutscene tag in my XSL I pointed out. I'll show it again here:
<level id="AllAboard" depends="JobCriteria" name="LEVEL_NAME_ALLABOARD" text="LEVEL_TEXT_ALLABOARD" cutscene="levelFadeOut,x,gooTransition_out"/>
So what's with the cutscene="levelFadeOut,x,gooTransition_out" part? Well, cutscenes are played right after levels end, and they come in groups of three. "levelFadeOut" is a cutscene that gradually fades the screen to black, and "gooTransition_out" is the cutscene you get when you enter a chapter map. "x" means no cutscene. So "levelFadeOut,x,gooTransition_out" all together means that once the level is done, the level fades to black, then immediately transitions back to the chapter. If I had the time, I would have made some cutscene showing the rocket blasting off, and I'd probably have named it something like "MOMRocketBlastoff", and stuck it in here. Then I would have had cutscene="levelFadeOut,MOMRocketBlastoff,gooTransition_out". But oh, well. I'll save that for later; maybe I'll make a movie tutorial sometime.
Instead, I let XDBoy do all the work, and used his "MOOvie" that he made as a joke to override the intro "2dboyLogo" movie, just sticking the proper files into the proper places in my goomod. Thanks, XDBoy.
Editing MapWorldView
Well, this is tricky. I chose not to do it for my chapter addin, and you're better off if you don't either. But of course everyone will want to, so here goes. There's more than one way to do it. You can't edit it directly in WooGLE because it's an original level, so you'll have to clone it and make changes there. Before you make changes, though, READ THIS: MapWorldView Specification. Daft as Brush spent a lot of time figuring out what'd crash the game and what wouldn't, and wrote it all down there. If you break one of the rules there, the game will crash. So read it, and pay attention.
Once you're done editing MapWorldView to your liking, you'll have to either merge or compile in the changes. If you want to be a good little goomodder, you'll merge them in. But merging is tricky and I quite frankly don't blame you one bit if you want to compile in the changes instead. In fact, that's what I would do. The problem is, since you had to clone MapWorldView, you'll have to rename everything to compile the changes. So, once you're done editing, save the .goomod, rename it .zip, unzip it, and open it up. You should have your standard compile and override folders. First, rename the folder /compile/res/levels/[yourMapWorldView]/ to /compile/res/levels/MapWorldView/, and open the folder. You'll see three files there: [yourMapWorldView].level.xml, [yourMapWorldView].scene.xml, and [yourMapWorldView].resrc.xml. Rename these MapWorldView.level.xml, MapWorldView.scene.xml, and MapWorldView.resrc.xml, respectively. Now, open MapWorldView.resrc.xml with a text editor (NOT Notepad, ok? Notepad stinks. I personally prefer Notepad++). At the top of the file, you'll see:
<ResourceManifest><Resources id="scene_[yourMapWorldView]">
change this to:
<ResourceManifest><Resources id="scene_MapWorldView">
and you're good to go. All your custom resources will still be in res/levels/[yourMapWorldView], but this still works fine. Copy the data inside this goomod (everything except addin.xml) into your main goomod folder, and you're done.
WOGCorp
So, what should you do about World of Goo Corporation? If you edit it and add geometry, you'll make others (and likely yourself) get a "cheater" badge, so don't do that. If you want to be awesome, make a themepack that changes how the level looks and you're good to go. Or you can make your own sandbox and stick it in one (or all) of your chapters. Unfortunately, you cannot make the World of Goo Corporation button in MapWorldView link to this level, since it's hardcoded to only play the original WOGCorp. If you want, you can move the WOGCorp button off the screen of MapWorldView, so nobody can click it, and not worry about it. If you're really ambitious, you can edit the map res/levels/islandUi to remove the buttons for WOGCorp there, too. Just follow my directions for editing MapWorldView above to rename it when you're done.
The NotWOG2 team, back when we were planning on making the first ever chapter addin (which Tacomann beat us to), were planning on editing WOGCorp for a longest-bridge rather than tallest-tower contest. We were going to add a line at y = 0 and have the bridges underneath that so there'd be no chance of anybody using this to cheat. Basically, do whatever you want with WOGCorp, just make sure that nobody can cheat because of changes you make. Also, don't add anything that can kill Goo Balls, since if any of your 300 die in WOGCorp, they're gone forever.
ISH Signposts
Here's where another hardcoded thing comes into play: Signposts in chapter 4 of the original game are hardcoded to use the ISH signpost variation, so if you override anything there, or stick any levels in that chapter, keep in mind that they'll have the ISH signposts. If you don't want ISH signposts at all, copy puggsoy's addin "Wooden Signs" (available from the "ISH Signs" download page here) into yours, just ignoring his addin.xml.
But if you want ISH signposts in one chapter, never fear. The chapter numbering is arbitrary. You can have the chapters in any order, since each chapter is unlocked when one of its levels' "depends" condition is met (See Step 3 for a description of the "depends" attribute). You can make Chapter 4 be your second chapter, if you'd like. No problem at all.
Of course, if you feel really ambitious, you can replace the ISH signposts with another signpost type of your own making. The sky's the limit!
Multi-chapter addins
If you want to do a "total conversion" mod that overrides the entire game with one of your making, first off good luck! You have a lot of work cut out for you. If you change Chapter 1, be sure to merge it in properly (unless you choose not to), and give us mods quite a while to test your mod!
You should have the technical know-how to make multi-chapter addins by now. Just copy the files from each level into the right folders in your goomod, make sure to merge changes into the proper island, and keep adding to your text.xml as you go along. If you have any troubles, post in the forums. We're here to help.
Other random stuff
To make your chapter all that much more chapter-like, consider overriding the image that World of Goo displays while loading a level in that chapter. For example, for my chapter addin, I added an image in the goomod: /override/res/images/islandicon_2.png to make a cool rocket (drawn by Martin33 for the NotWOG2 project) replace the default windmill image for Chapter 2. It adds a nice touch.
If you're nearing the 20 MB cap for goomods, or if you just want to make your addin as small as possible so people can download it faster (Read: People will like you if you do this), you'll want to make sure that the same image isn't being included more than once in your goomod. WooGLE, by default, copies all custom images for a level into that level's folder, which can be a problem if you're merging more than one level together that use the same custom image. The best way to do this is to stick the image in question into /override/res/images/[yourname]/ in the goomod, or someplace like that, and edit each level's .resrc.xml file by hand to point to that image. Or just stick that image there in the first place, and make WooGLE look there rather than using the "Import Resources" button. It's a bit of extra work, but it really pays off in file size.
Step 7. TEST
Select "addin.xml", "text.xml", the "compile", "override", and "merge" folders, zip them up, rename it .goomod, and test like mad. You may even want to point GooTool at an empty folder, so you can have a clean World of Goo installation to test on. Create a new profile to test the levels, if you've played them before out of GooTool, so you can have an experience as close to a new player as possible. Then, play the mod. All the way through. More than once. Fix any bugs you find, and if you can't, post in the forum. We're here to help. But test it extensively, so you can troubleshoot and fix any problems you see. It'll make the publishing process that much faster if we don't have to stop playing, tell you about an error, and wait for you to fix it. Have a couple friends play the mod, or ask a fellow GooFan or two. The more beta-testing you can get, the better. But at least test it yourself extensively.
Step 8. Upload!
Yay! You're done. Upload your final .goomod here on goofans, add some cool screenshots, describe it thoroughly, and request for it to be published. Give us a while to test it; we'll try to get it approved ASAP, but we may take a while. If your levels are really difficult, though, we'll likely take longer. This isn't to say that challenging levels are bad in any sense (I personally prefer challenging, but not overly hard or tricky, levels), but it's just a fact that they'll take us longer to test. Especially because we have to complete every level in order to test them all. But basically, your work is done. Hopefully you had fun and learned a lot in the process, and I'm personally looking forward to the awesome goomods that everyone is going to create.
Happy goomodding! 
Creating a Ball-Changing Mod
So, you want to create a goomod that changes the appearance of the Goo Balls in the game? Well, you've come to the right place! Read on!
Step 1: Determining the Graphics to Change
You probably already know the graphics you want to change, right? Hopefully you do. But you'll have to find the actual image names, as they may be slightly different for each Goo Ball. To figure this out, browse to your World of Goo directory. You should see a few files, and two folders: "properties" and "res". Double-click on "res".
You'll see a bunch more folders. One of them will be called "balls". Double-click that one.
Now, hopefully you already know what kind of Goo Ball you want to change. If so, find the appropriate folder and double-click it. Take note, however, that the Goo Balls in World of Goo Corporation are actually in the "Drained" folder.
Now that you're in the folder of the Goo Balls you want to change, you'll see a bunch of files. Some of these will be .bin files. These are the actual Goo Ball properties, and you don't want to change them, or else you'll get a big fat red "cheater" badge, and you don't want that. The other ones are OGG files, which are the sounds that the Goo Balls make in certain instances. If you want to be really creative in your mod, you can change these too, but most people don't. So concentrate on the PNG images for now. I'll take the example of the Fuse Goo Ball for now. Note that other Goo Balls will be slightly different.
So in the /res/balls/Fuse/ directory, you'll see 6 PNG images:
body.png,
splat1.png,
splat2.png,
spring_goo.png,
spring_goo_burnt.png, and
strand_pull.png
Hopefully, it's fairly obvious what these images are and what they do. So now, you have a list of the images you'll need to create to make these Goo Balls look different.
Step 2: Modify the images
Before you go editing the images, copy them somewhere that they're easy to access, like your desktop or your documents folder, and work of these copies. You don't want to change the originals, anyway, in case something goes wrong.
So, how do you edit these images? If you're getting the images from somewhere else, or if you've already created them, your job is easy. Simply make sure the images are the same size (in pixels, width and height), make sure they're the same names, and skip to the next step. If you haven't made any images yet, however, read on.
First things first: NEVER EVER EVER USE PAINT TO MODIFY THESE IMAGES. Paint does not support transparency, so any images you create will have white boxes around them and they'll look awful. What program you use is up to you, just don't use Paint. Kyle Gabler, when he created the original images, used Photoshop, so if you have that and know how to use it, you're good to go. I personally use GIMP, which is somewhat of a free alternative to Photoshop, others prefer Paint.NET or similar. Just find a program you like and use it. You've got a lot to choose from: http://en.wikipedia.org/wiki/List_of_raster_graphics_editors#List
Once you've got your images, make sure they have the right names. Capitalization matters, so if you've changed the "body.png" file and you save it as "BODY.png", "body.PNG", or "Body.png", it won't work. It has to be exactly the same name as the original.
Now you're ready to stick the files into a goomod!
Step 3: Setting up the Directory Structure
Sounds scary, doesn't it? It isn't. I just like big fancy words. Basically, you want to make sure that the images you have changed are in the right folders. So, go someplace handy (Like your desktop or your documents) and create a new folder named "res".
Here, you'll want to make the full file path of the graphics you overrode. Huh? For example, I'll take overriding the Fuse Goo Balls, as I did in my mod Dynamite Fuse Goo Balls.
In this mod, I changed the following images:
body.png
(As you can see, you don't have to change all of the images to get the effect you're after!)
So, the full file path of these Goo Balls (starting from the World of Goo folder) is res/balls/Fuse/. Now you'll need to create this path. Go to someplace convenient (ie your desktop or documents folder) and create a folder. Name it something you'll remember. You'll put all the files for your goomod in here. Go into that folder, and create a folder inside that named "override". Then go into that folder. Now you'll want to create the right path. To do this, create a folder named "res", go inside that folder, and create a folder named "balls", and go inside THAT folder and create a folder named "Fuse" (In my case; if your path that you determined earlier is different, it'll be something else). Now stick the images you created into this final folder.
Are we done? Nope. It's time to edit some XML.
Step 4: Creating the addin.xml manually
Oh, no! Programming! Actually, this isn't too bad. First things first: go back up to the folder in your desktop/documents (the folder that you created the "override" folder in) and create a new text document named "addin.xml" (See here if file extensions are disabled; they are by default). Right-click on this file and choose "Open With"->"Notepad". You can't just double-click on the file, since it'll open with Internet Explorer or whatever your default web browser is.
Now highlight the following code, press Control-C, go into Notepad, and choose "Edit"->"Paste" (or Control-V):
<addin spec-version="1.1">
  <!-- The unique ID of this addin. Used to check if it's already installed or compare its version -->
  <id>com.goofans.yourname.modname</id>

  <!-- name shown to user -->
  <name>Your Mod Name</name>

  <!-- either "mod" or "level". For user display, and to determine whether to create a chapter 1 entry. For a ball-changing addin, this has to be 'mod'. -->
  <type>mod</type>

  <!-- Version. Must be numerically comparable at each "." boundary. You could also do it without periods. 11281 is a fine version number.-->
  <version>1.0</version>

  <!-- description shown to user -->
  <description>This mod IS THE BEST MOD EVAH!</description>

  <!-- author shown to user -->
  <author>yourname</author>
</addin>
Now you need to edit this to reflect your addin (Note that the stuff between the
<!-- and --> tags is stuff that's there to help you fill it out). So, for my mod, I'll change the<id>com.goofans.yourname.modname</id>line to:
<id>com.goofans.MOM4Evr.Dynamite</id>I'll change the
<name>Your Mod Name</name>line to
<name>Dynamite Goo Balls</name>The version line I'll change to 1.1, to reflect my latest change to the addin. So I'll change
<version>1.0</version>to
<version>1.1</version>,the
<description>This mod IS THE BEST MOD EVAH!</description>I'll change to something more meaningful, like:
<description>This mod changes the fuse gooballs into sticks of dynamite. Version 1.1: Created an XML file out of the .bin to make it cross-platform.</description>,Finally, I'll change
<author>yourname</author>to
<author>MOM4Evr</author>.
Ok, that's done! You can save your file in Notepad and exit Notepad now.
Stick it all into a .goomod
Now that the hard part's over, all that remains is to select both the "addin.xml" and the "override" folder, right-click, and choose "Send to"->"Compressed (zipped) folder". Rename this new .zip file to "com.goofans.[yourname].[modname].goomod" (Remember that you'll have to have file extensions turned on to change this to a .goomod! See here if they aren't enabled). So in my case, I'll name mine "com.goofans.MOM4Evr.Dynamite.goomod". Note that this is the same thing I put in the <id></id> part of the addin.xml, only with a ".goomod" tacked on the end.
Are we done? Well, almost.
Step 5: Testing
This goes for ANY addin. ALWAYS ALWAYS ALWAYS test it before you upload it to goofans. So fire up GooTool, install the addin, and launch World of Goo. Go to a level that has the Goo Ball type that you changed. If it shows up, great! But if it crashes the game, doesn't show some images, or something like that, go back and make sure you did everything correctly. If the level didn't even install with GooTool, check your addin.xml to make sure you did everything right. If your new images don't show, make sure you named all the folders right. If GooTool says that there was an "Uppecase file extension", that means that one of your images is named ".PNG" instead of ".png" as it should be. If you can't figure out what you did wrong, upload the goomod someplace, post a link to it in the forums, and we'll gladly help you troubleshoot.
Step 6: Don't upload your addin
Yep, I'm serious. DO NOT UPLOAD YOUR ADDIN TO THIS SITE. Us moderators don't like addins that just change one kind of Goo Ball's appearance. See here. We don't want single-Goo-Ball-changing addins. If you beg and plead enough, we might publish it, but we'll do it reluctantly and you probably won't get very good ratings or many downloads anyway.
But what about the "Dynamite Fuse Balls" addin that you made, MOM4Evr? Why was that approved? Well, see the date I published it and see the date that Daft as Brush made that forum post? I snuck in under the radar before those rules were made.
What it boils down to is that we don't like addins on this site that just change the appearance of a single Goo Ball. If you want your mod to be published, you should include multiple Goo Balls or change the appearance of a level as well. If you change several Goo Balls, change out the original graphics, or something of the sort, great! We'll gladly publish it.
The point of this tutorial is that you can create awesome, new, exciting addins that don't just change ONE kind of Goo Ball, but that change A LOT of them. All you have to do is add the right folders and files inside your /override/res/balls/ folder. Notice what Daft as Brush says we like: "Theme Packs which make only graphical changes to the original balls and or levels". Note that this is plural. "ballS" and "levelS". So if you change more than one kind of Goo Ball (like Winter and Industrial Revolution - These mods are rated pretty high and have a lot of downloads!), we're happy.
GREAT NEWS!
Guess what? I just told you how to create addins that modify ANY of the original World of Goo graphics! All you have to do is make sure the file paths are right. So if you're changing the background image in the level Second Hand Smoke, all you have to do is create an image, name it "bg.png", and stick it in your goomod in the folder "/override/res/levels/SecondHandSmoke/". How's that for nifty? The "override" folder in goomods is awesome!
How to merge two (or more) goomods together
Recently, we've had a bunch of people who want to make more than one level per .goomod, so I've decided to make a step-by-step guide to help you guys out.
Step 1: Rename the .goomod( s )
First, you need to get your .goomods unzipped. Remember that as per goomod specification (here), a .goomod is just a renamed .zip file. For Linux/Unix users, this isn't much of a problem, but as Windows hides file extensions by default, you'll need to do an extra step.
There are two possible methods (Thanks, thB):
Method 1:
- Open Control Panel (usually from the Start Menu)
- Search for "Folder"
- Click on "Folder Options"
Method 2
- Open Windows Explorer (Win+E on your keyboard, or just Start Menu->Documents)
- Click "Organize" in that toolbar at the top (left).
- Click on "Folder and search options" in the menu
After you do either of these, a new window will appear. Click the "View" tab up top, and scroll down in the "Advanced Settings" box until you see a checkbox with the name "Hide extensions for known file types." Uncheck it. You should now see your levels have an extension of .goomod, and you ought to be able to rename them .zip easily (Ignore the warning message that Windows gives you when you try to do so).
As an alternative for method 2, if you have the toolbar enabled in Windows Explorer (You can show it even if you don't by pressing the Alt key), you can click the "Tools" menu, and reach "Folder Options" from there.
These directions are for Windows Vista and 7. Other flavors of Windows will be slightly different, but essentially the same.
Step 2: Unzip
After you've gotten them to be two (or more) .zip files, you can simply right click on them and select "Extract All...". Windows will guide you through the extration process with a nice little wizard.
Step 3: Stick the files together
Once you have two unzipped .goomods (preferably in two different folders), you'll see a couple folders (called "compile" and "override", and maybe one called "merge") and a couple XML files (called "addin.xml" and "text.xml"). If you're missing any of these, don't worry; not all goomods have to have them (Actually, all level goomods HAVE to have at least an "addin.xml" and a "compile" folder, but the rest of these are optional). Now, you'll want to copy these together. The easiest way to do this is to go to one of them, select the FOLDERS (not the "addin.xml" and "text.xml" files, but the "compile", "override", and "merge" folders themselves), press Control+C to copy them, browse back to the other extracted .goomod, and press Control+V to paste. Windows will prompt you, asking if you want to merge these folders together. Tell it yes. If any files conflict, skip those files. You won't need duplicates.
Step 4: Manually put the "addin.xml"s together
This is the hard part. Follow these steps EXACTLY or something may go terribly wrong:
Go back to the first goomod (The one you copied the folders out of before). Select "addin.xml" and "text.xml" and press Control+C to copy these. Go back to your second one and paste. Because these are named the same thing, Windows will prompt you. Choose to "Copy, but keep both files". This will cause the two .xml files from the first .goomod to get copied, but renamed to "addin (2).xml" and "text (2).xml" or similar.
Now right-click on "addin (2).xml" and choose "Edit" (If this isn't there, choose "Open with..."->"Notepad"). Notepad will open and you'll see a whole bunch of gobbledygook (Unless you've had previous XML experience before, in which case you'll probably drool over how nice and clean the code is). It ought to look something like this:
<!-- Created by WooGLE v0.77 Final -->
<addin spec-version="1.1">
  <id>com.goofans.MOM4Evr.RabidManiac</id>
<name>RabidManiac</name>
<type>level</type>
<version>0.1</version>
<description>What kind of raving lunatic would do such a thing? Certainly not me... ?!</description>
<author>MOM4Evr</author>
<levels>
    <level>
      <dir>RabidManiac</dir>
<name text="Rabid Maniac" />
<subtitle text="He looks less evil than he is" />
<ocd>time,20</ocd>
</level>
</levels>
</addin>
Now do the same thing to open "addin.xml" with Notepad. You'll see something similar to above.
The key now is to get the right stuff from "addin (2).xml" and stick it into "addin.xml". What is the right stuff? I'll tell you:
Select the stuff between the <levels> and </levels> tags, not including the tags themselves. In the case of the file above, this will be:
     <level>
      <dir>RabidManiac</dir>
<name text="Rabid Maniac" />
<subtitle text="He looks less evil than he is" />
<ocd>time,20</ocd>
</level>
Of course, your addin will have your own level's name and all that, but it'll always be the stuff between <levels> and </levels>. Now, double-check that you've selected everything in there (Don't miss one little bracket) and press Control+C to copy it to the clipboard. Go back to "addin.xml". Now, you'll want this in the same spot it was in the previous file, only this time there's some stuff already there. To work this out, place your text cursor (not the mouse cursor) right past the </level> tag that's already there. That's the </level> tag, not the </levels> tag. Press Control+V to paste the text there. You should end up with something like the following:
<!-- Created by WooGLE v0.77 Final -->
<addin spec-version="1.1">
  <id>com.goofans.MOM4Evr.RabidManiac</id>
<name>RabidManiac</name>
<type>level</type>
<version>0.1</version>
<description>What kind of raving lunatic would do such a thing? Certainly not me... ?!</description>
<author>MOM4Evr</author>
<levels>
    <level>
      <dir>RabidManiac</dir>
<name text="Rabid Maniac" />
<subtitle text="He looks less evil than he is" />
<ocd>time,20</ocd>
</level>
<level>
      <dir>FarLands__L02</dir>
      <name text="Far Lands - level 2"/>
      <subtitle text="Far Lands"/>
      <ocd>balls,16</ocd>
    </level>
</levels>
</addin>
Thanks, Hany.
Now what? Well, it'll work now, so take a deep breath and press Control+S to save the file. But this file still has all the same stuff as the original (second) goomod had, like the same description and stuff. You'll want to change this all to reflect this brand new .goomod (No, you're not done yet, but I know you'd like to be).
So, update the appropriate fields. This will be the stuff between the <id></id> tags, the stuff between the <name></name> tags, the stuff between the <version></version> tags, and the stuff between the <description></description> tags (And in my case, the stuff between the <author></author> tags, but if you want to merge in someone else's level, you'll have to ask them first of course!). So the changes you make might look like the following when you're done:
<!-- Created by WooGLE v0.77 Final -->
<addin spec-version="1.1">
  <id>com.goofans.MOM4Evr_Hany.ManiacalLevel2</id>
<name>Rabid Maniac with a piece of Level 2</name>
<type>level</type>
<version>1.0</version>
<description>What kind of raving lunatic would do such a thing? Certainly not me... ?! And why is there a "Level 2" in here now?</description>
<author>MOM4Evr and Hany</author>
<levels>
    <level>
      <dir>RabidManiac</dir>
<name text="Rabid Maniac" />
<subtitle text="He looks less evil than he is" />
<ocd>time,20</ocd>
</level>
<level>
      <dir>FarLands__L02</dir>
      <name text="Far Lands - level 2"/>
      <subtitle text="Far Lands"/>
      <ocd>balls,16</ocd>
    </level>
</levels>
</addin>
Of course, if you're feeling particularly confident, you can change anything else you want, too, just don't mess with anything that's between a less-than and a greater-than symbol.
Now that that's all over, save the file and close both Notepad windows. You're done! With this part, anyway...
Step 5: Manually put the "text.xml"s together
If you put signposts in your levels, good news! You still have more work to do with XML. Of course, if you don't have signposts, skip this step altogether, and if you have signposts in one level, you should be set. Just make sure there's one file by the name of "text.xml" and you're done. But if you put signposts in both levels, read on.
First, you'll want to open both the "text.xml" and the "text (2).xml" files in Notepad, like I told you how to do with the "addin.xml" pair. These will look slightly less complicated (hopefully!) unless you have a bunch of signposts in each level. They'll look more like the following:
<!-- Created by WooGLE v0.78 RC3 --> <strings> <string id="SIGNPOST_BROKENBONES2_2" text="Huh...|You can say that you are back!|Back to the factory,|Back to the robot room!|Only...|Some things are changed...|The robots are simply destroyed...|Even more too bad...|They are broken...|But anyway try to use your previous skill how to explode the head...|-the Sign Painter" /> <string id="SIGNPOST_BROKENBONES2_1" text="Ones apone the time...|There were lots of robots...|After they have been destroyed...|The bones only left!|-the scary Sign Painter" /> <string id="SIGNPOST_BROKENBONES2_3" text="May be you don't see...|But next to me behing this big cog hiding one little gear|May be if it is ball buster then may be it can help you with the ugly|- the Sign Painter" /> </strings>
(Thanks, Wikigoo-4evr)
Note that there may be more than one <string>, and there may not. This is perfectly ok; it'll just depend on how many signposts you have in each level. Make sure you're in "text (2).xml" and select everything between the <strings> and </strings> tags. For this file, that would be the following:
<string id="SIGNPOST_BROKENBONES2_2" text="Huh...|You can say that you are back!|Back to the factory,|Back to the robot room!|Only...|Some things are changed...|The robots are simply destroyed...|Even more too bad...|They are broken...|But anyway try to use your previous skill how to explode the head...|-the Sign Painter" /> <string id="SIGNPOST_BROKENBONES2_1" text="Ones apone the time...|There were lots of robots...|After they have been destroyed...|The bones only left!|-the scary Sign Painter" /> <string id="SIGNPOST_BROKENBONES2_3" text="May be you don't see...|But next to me behing this big cog hiding one little gear|May be if it is ball buster then may be it can help you with the ugly|- the Sign Painter" />
Then press Control+C to copy the data, go to "text.xml", and position your text cursor right BEFORE the </strings> part. Press Control+V to paste. You should end up with something along these lines:
<!-- Created by WooGLE v0.78 RC3 --> <strings> <string id="TEXT_SHIFTINGMACHINE_STR1" text="Welcome back to the factory!|Here is one more thing that haven't been done!|These goo balls need your help!|Ouch!|These spikes realy hurt everyone!|But not the goo balls|I mean they KILL the goo balls!|So be careful!|-the Sign Painter" /> <string id="SIGNPOST_BROKENBONES2_2" text="Huh...|You can say that you are back!|Back to the factory,|Back to the robot room!|Only...|Some things are changed...|The robots are simply destroyed...|Even more too bad...|They are broken...|But anyway try to use your previous skill how to explode the head...|-the Sign Painter" /> <string id="SIGNPOST_BROKENBONES2_1" text="Ones apone the time...|There were lots of robots...|After they have been destroyed...|The bones only left!|-the scary Sign Painter" /> <string id="SIGNPOST_BROKENBONES2_3" text="May be you don't see...|But next to me behing this big cog hiding one little gear|May be if it is ball buster then may be it can help you with the ugly|- the Sign Painter" /></strings>
The cool thing about XML is that indentation and spacing and such don't matter. So even though this example here looks odd because of the gap in the middle and the </strings> tag being butted right against the pasted data, it'll still work fine.
Now that that's done, save the "text.xml" file and close Notepad. Yay! You're done! Well... almost. Read on.
Step 6: Zip it all together
Now that all the above is done, the rest should be fairly easy. What you'll want to do is get the right stuff back into a .goomod and put it on goofans! What is the right stuff? Well, it's easy. Select the folders you have in the second goomod (In case you haven't guessed, this is the one you're going to upload), which will be the "compile" and "override" folders (and maybe "merge", if it's there). Also select the "addin.xml" and "text.xml" files. Ignore the other xml files here; you're done with them. Now, with these four items (And these four items ONLY) selected, right-click and choose "Send To"->"Compressed (zipped) Folder". A new file will appear called "[something].zip", where [something] may be your level name, or it could be something else. Rename this to [your addin ID].goomod . Remember that in "addin.xml" there's this part that is between the <id> and </id> tags? Well, this is your addin ID that you specified in WooGLE. In the case of my addin above, mine was "com.goofans.MOM4Evr_Hany.ManiacalLevel2". So I'll name this addin "com.goofans.MOM4Evr_Hany.ManiacalLevel2.goomod". You can name it anything you want, but it's a good idea to give it the same name as your addin ID.
Now are we done? Yes, we are! But before you upload it to goofans, INSTALL IT IN GOOTOOL AND MAKE SURE BOTH LEVELS WORK. If either of them don't work, go through all the steps above and make sure you followed them exactly. If you can't find the problem, ask in the forum or in the comment section below.
I hope this helps! Of course, you can make more than just 2-level addins following these steps. Just use your brain and make sure all the XML comes out looking like above, and you should be fine. If you're merging more than 2 addins together, though, I'd recommend merging two together, testing it, merging a third one into the result, testing that, and so forth, so it's easier to figure out if/when you've made a mistake.
Have fun!
Running Editors in Linux
This is for any Linux users who are having a difficult time getting WooGLE to run. I'm running Kubuntu 10.10, but most other flavors of Linux should have similar steps.
As far as I know, a single, stand-alone package is not possible for Linux, so even if you install the .deb, it may or may not work. The best thing to do here is to build the pyCrypto library from source, which is easy enough. You just have to use the proper version.
To build it from source, you'll need the python-dev library, and maybe some others (they ought to be fairly straightforward to install).
Anyways, to cut to the chase, here's what all you have to do. (Although I imagine most Linux users can figure it all out anyhow, but this is for Linux newbies like me):
Step 1: Install python-dev
Just one standard terminal command. Simple enough.
sudo apt-get install python-dev
Step 2: compile pyCrypto from source and install it
Download pyCrypto 2.0.1. I've had trouble running WooGLE off of newer versions. This version did the trick for me (the site that's linked to in the 3RD_PARTY_linux text file in the source seems to be down).
Once you're done downloading it, unzip the tarball and navigate to that folder in a terminal. Next, a couple simple commands, taken directly from their readme:
python setup.py build
sudo python setup.py install
Step 3: Run the thing!
For WooGLE, installing the .deb is nice and easy, but if it doesn't seem to work out, running it from source isn't hard either; just download the source, unzip, navigate to the folder, and pop open a terminal:
chmod +x launch.sh (only the first time you try to run it)
./launch.sh
If you want to create your own desktop icon for this, it's pretty simple, but as I said before, the .deb works fine.
All of the above applies to WooBLE, too, except that since there is no .deb, you have to run it from source. This shouldn't be a terribly big problem, though.
I've toyed around some with running GooVIE in Linux... It doesn't work so well. After manually tweaking some of the python (adding an "=" character to all the struct.unpack() formatting strings in movie_binltl.py), I can get it running and playing cutscenes fine, but saving them back crashes the game. It could just be 64-bit Linux or my Python version, it could just be me.
Hope this helps! If you have any questions, ask here or in the forum.
Uploading Addins
The process for uploading addins should be fairly intuitive. From the "World of Goo Addins" menu along the top of the screen, choose "Upload an Addin".
You are prompted for some basic information about your addin: the name, description and type. The description can use limited HTML including hyperlinks, lists, headings and so forth.
The addin type should be one of the following:
- Chapter
- A set of levels that replaces a chapter in the original game.
- Level
- A new playable level.
- Level Pack
- A set of multiple levels, all of which will appear in Chapter 1 (Unlike a Chapter addin)
- Ball Style (World of Goo Corp)
- Changes the appearance of balls in the World of Goo Corporation.
- Ball Style (Other)
- Changes the appearance of other balls in game (e.g. Ivy, common).
- Theme
- Changes the graphical appearance something in the game, whether a level, chapter, or the UI.
- Utility
- Something that runs outside of the World of Goo, such as GooTool or wogeditor.
- Sample
- Example addins, such as demonstrations of functionality. Not generally useful for a player.
- Other
- Any addin that doesn't fit into one of the above categories.
Screenshots and videos
You can upload as many screenshots as you like. They will automatically be thumbnailed to appropriate sizes (currently 200x200 in the addin page and 150x150 in preview teasers), and the user can click on them to see the full version. The first screenshot in the list is the one used for the previews of this addin.
You can also link to YouTube videos, which will be automatically embedded in your page. Just enter the full YouTube URL, for example http://www.youtube.com/watch?v=jzWkQk9zfy4
Note that you can rearrange the order of both screenshots and videos by dragging the little handle on the left of each row.
Downloads
Once you've saved your addin, you can go to the "Downloads" tab and upload attached files. Once they're uploaded you can edit them or change their state.
- Live
- The download is active and is shown on your addin page.
- Archived
- The download is not displayed by default, but can be shown by clicking "Show archived downloads", and can still be downloaded by users.
- Deleted
- The download is effectively deleted. Users cannot see or download it; it is only visible to the author. It is never actually deleted because we keep download statistics for old versions.
Publishing
When you first create your addin, it is not yet visible to the public. You will see an orange box at the top of the page warning you about this. However you can continue to edit the page, including screenshots, videos, and downloads.
Once you have completed your page, you can click the link at the top to tell us your addin is ready for publishing. Note that you cannot do this until you have uploaded files and added a description. Also note that we will not publish an unfinished page.
Any questions? Ask in the forum.
Taking addin screenshots
Most addin pages should have at least one screenshot. This is used to give people a preview of the addin, a little taste of what the addin looks like. It also makes the page a little more colourful and appealing.
This page explains how to take and save screenshots.
Windows
In Windows, you can take a picture of the screen using the Print Screen button on your keyboard, which is usually written as PRTSC or PRTSCN. On some laptops you may have to hold down a Function (Fn) button while pressing the Print Screen button.
When you press Print Screen, everything you currently see on the screen is copied to the clipboard, which you can then paste into a program such as Paint. You can then save this as an image file. For goomod screenshots you should save this as either a JPG, PNG, or GIF file.
So to take a screenshot of your level, play your level, and when you want to take a screenshot press Print Screen on your keyboard. Then exit World of Goo, paste the image into Paint, and save as one of the file types mentioned above. Then upload it to your addin page and you're done!
(On some graphics cards, World of Goo may need to be in windowed mode for you to take screenshots. In this case, you can Alt+Enter to change to windowed mode and use ALT+PRTSCN to take a screenshot of only the active window.)
Mac OS X
On a Mac, you can save a screenshot directly as an image. Press Command, Shift, and 3 at the same time, and it will automatically save a picture of your entire screen to the desktop as a PNG file.
So to take a screenshot of your level, play your level, and when you want to take a screenshot press Command+Shift+3 on your keyboard. Then exit World of Goo, upload the image on your desktop to your addin page and you're done!
(On some graphics cards, World of Goo may need to be in windowed mode for you to take screenshots. In this case, you can press Command+Shift+4, then space, then click on the World of Goo window.)
Linux
It depends on the distro, but generally identical to the Windows instructions (PrtSc or Fn+PrtSc to copy the screen to the clipboard). Some distros (KDE-based ones, for example), will pop open a window you can directly save the screenshot from. If not, just paste into GIMP or your image editor of choice and save as PNG, JPEG, or GIF.